
Baked Zucchini Fries (Vegan)
Posted: November 20, 2013 Filed under: Uncategorized | Tags: baked zucchini fries, dairy-free, egg-free, healthy sides, vegan Leave a comment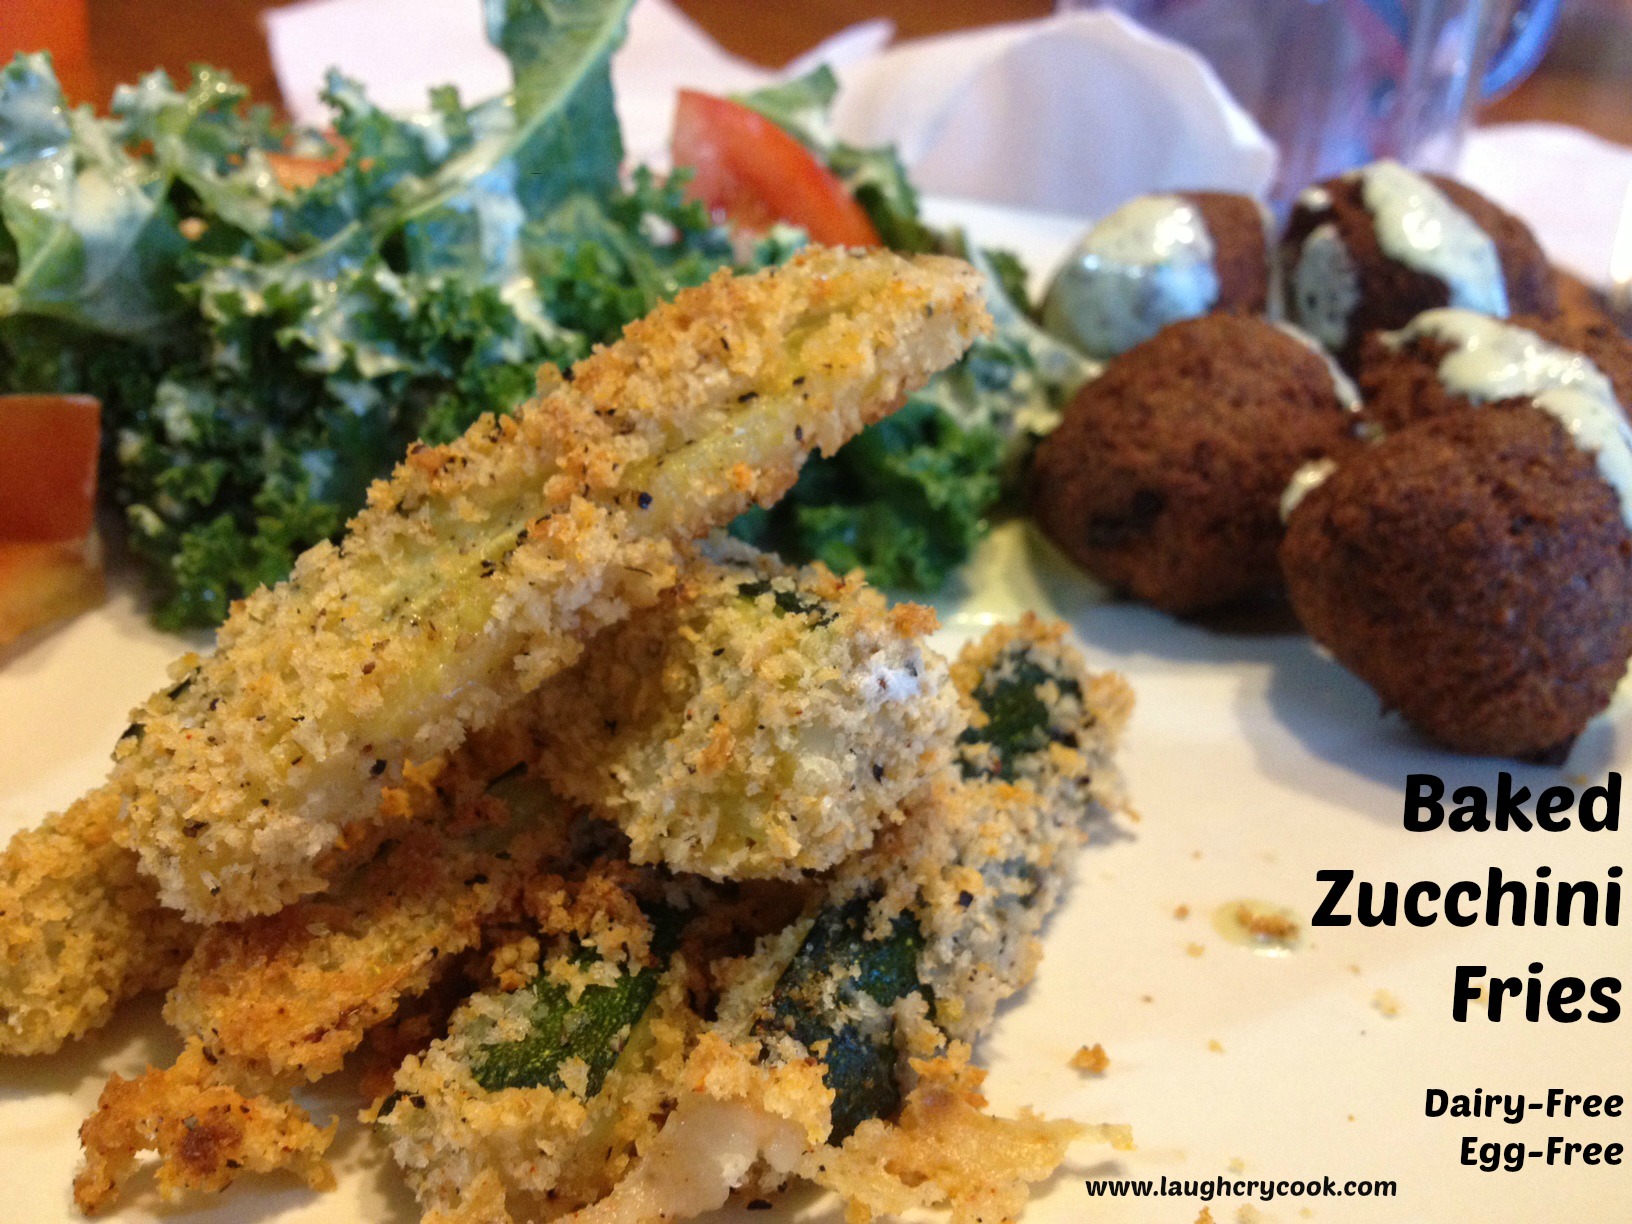
These Baked Zucchini Fries have started making a regular appearance on our family’s menu . When they cook, the zucchini gets soft and almost buttery, but the outside creates a crunchy shell. It’s a little like biting into a nutty chocolate truffle. You have to bite down with a little force to get through the crunchy exterior and then your mouth gets a surprise as your teeth quickly sink into the pillowy soft middle.
Sorry if I just took you from craving zucchini to craving chocolate in one paragraph. Come back! You won’t be disappointed. In fact, I’d pick a box of zucchini fries over a box of chocolate truffles any day. Unlike a box of chocolates, I know exactly what I’ll get in each bite…and it’s delicious.
I like serving them instead of garlic bread on pasta night. The bread coating gives you a little carb crunch, but unlike garlic bread, it also sneaks in a serving of veggies. I also paired them with The Gluten-Free Vegan’s Falafel recipe. I don’t recommend making both on one night, as that would be a labor intensive evening, but the falafel freeze wonderfully and can re-heat right in the oven with the zucchini fries.

Baked Zucchini Fries
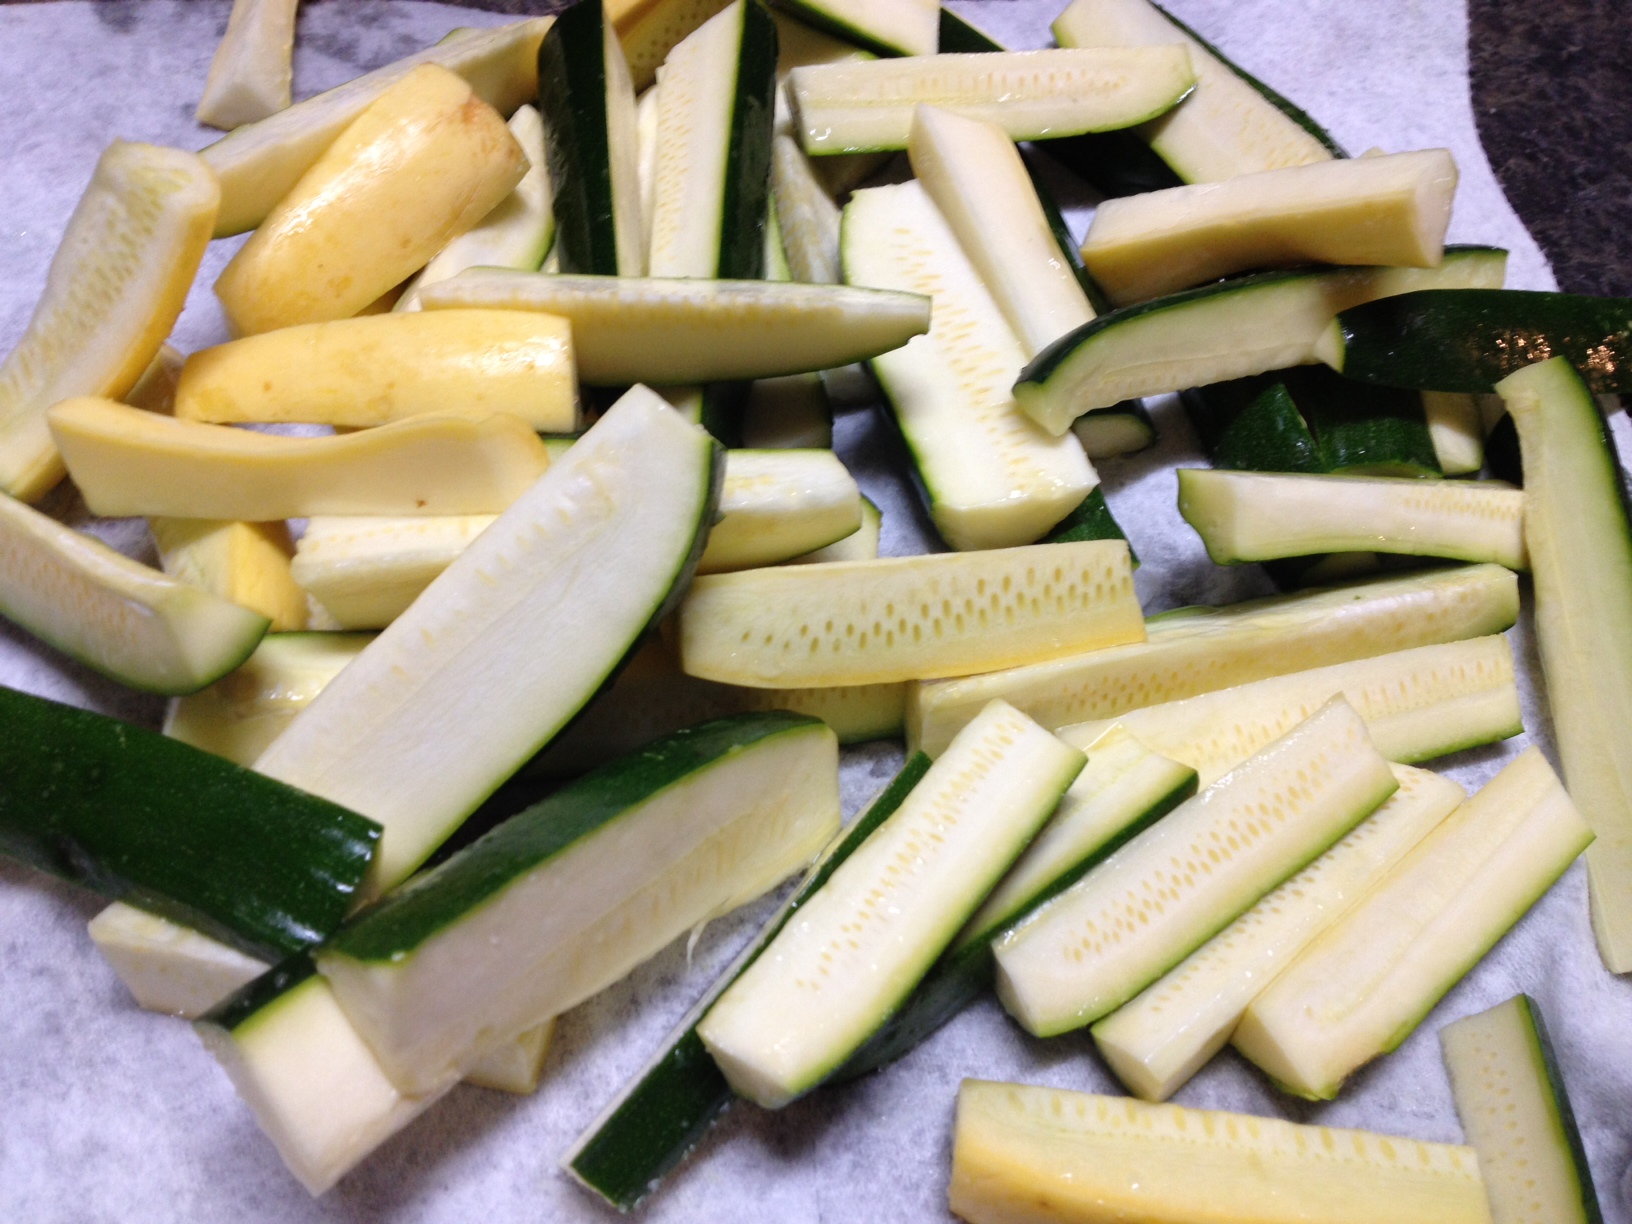
I didn’t do exact measurements here. You can do as few as one zucchini or as many as you want. I usually do three to four for our family of three. Simply refill your dredging station as you run out. If you can’t fit them all on one pan, add another pan and bake at the same time.
Zucchini Squash (cut like steak fries) (Yellow squash works too)
Olive Oil Baking Spray
Flour
Unsweetened Almond Milk (or your choice of milk)
Panko Bread Crumbs
Salt
Pepper
Smoked Paprika (or regular paprika)
Italian Seasoning (you could also use a steak seasoning or any other favorite spice blend)
1.Preheat oven to 400.
2. Line cut squash on a bed of paper towels. Sprinkle with salt and let sit for 20 minutes.
3. Spray a baking sheet with olive oil spray.
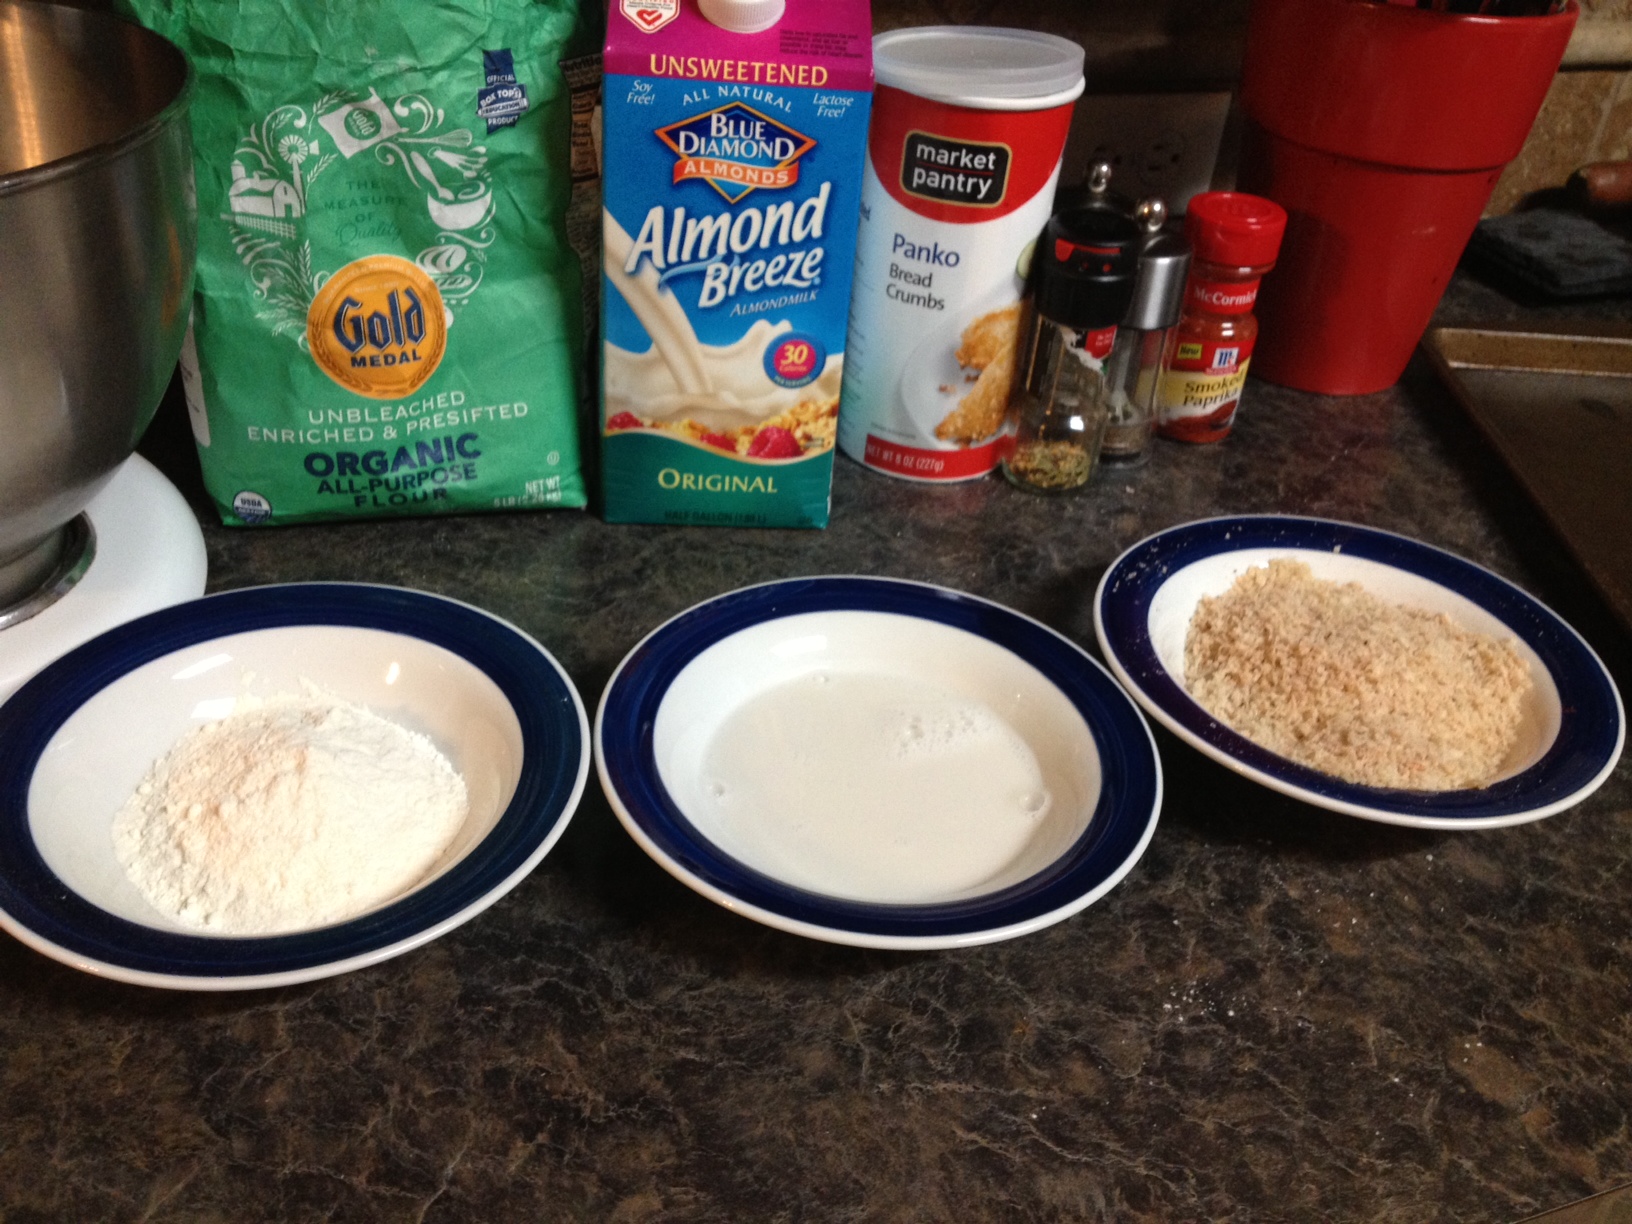
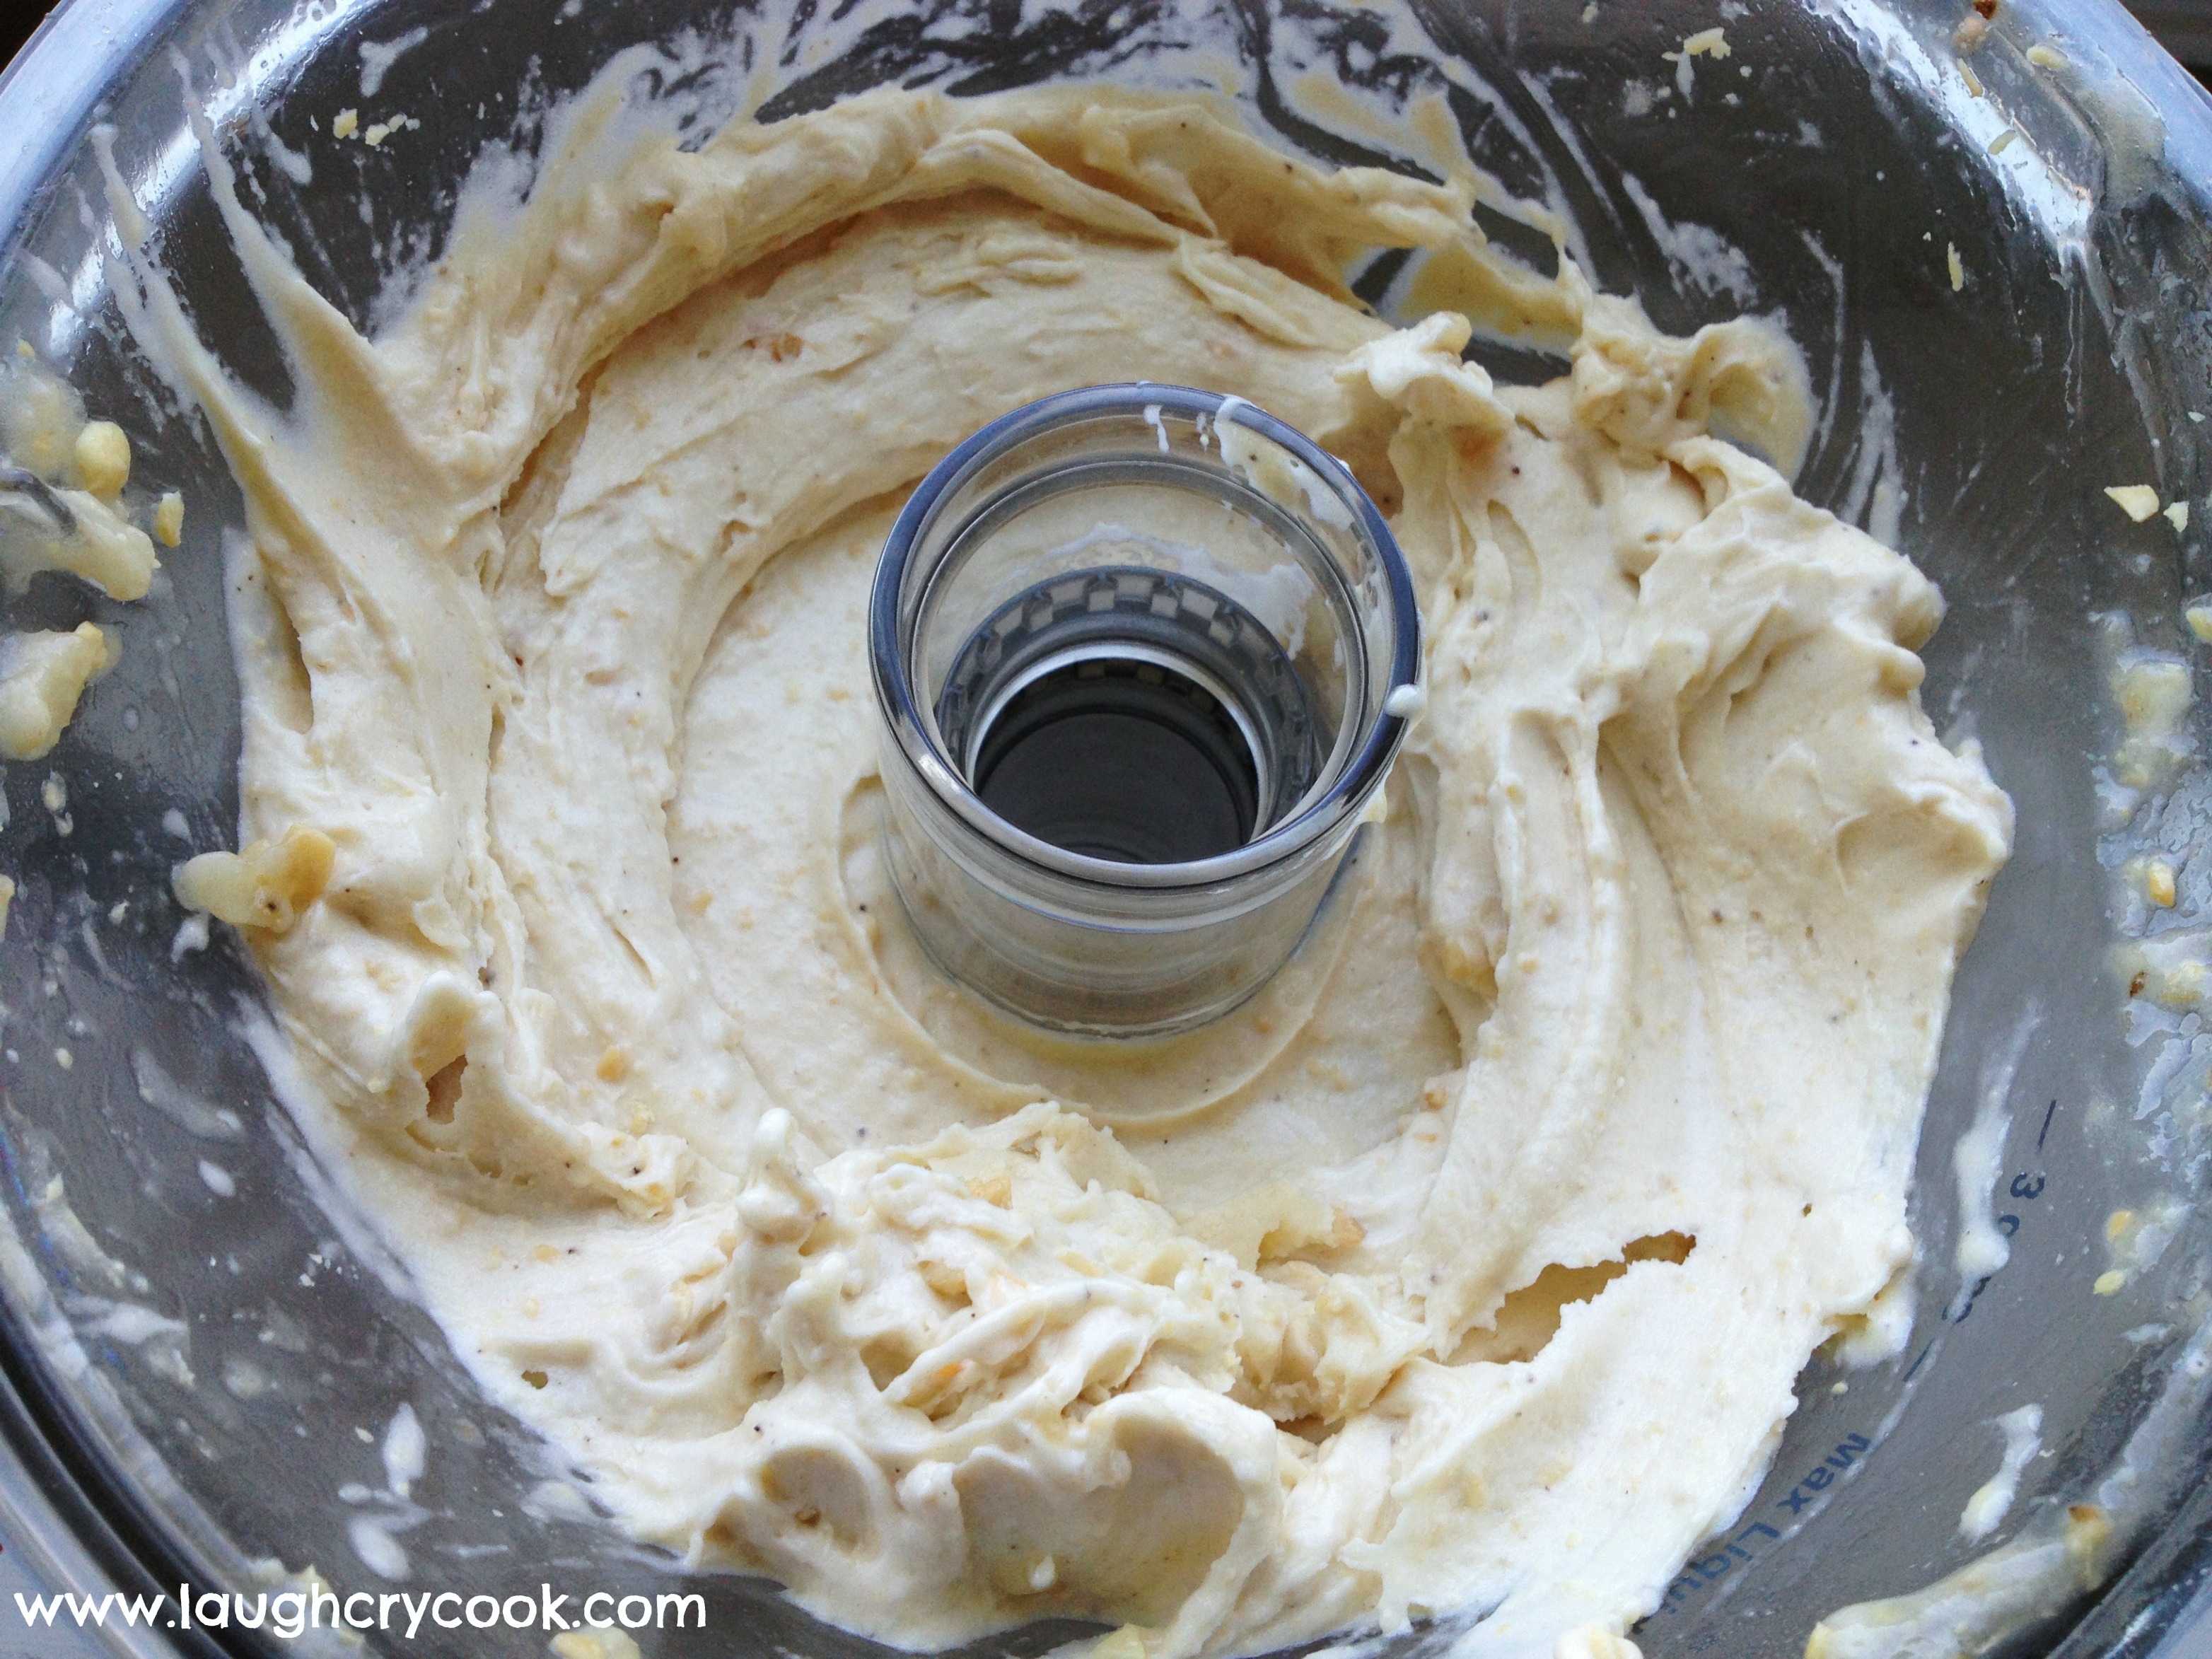
4. Make dredging station: Put flour in a bowl, milk in a bowl, and bread crumbs in a bowl. Stir in salt, pepper, smoked paprika, and Italian seasoning into the bread crumbs (about 1/2 teaspoon each seasoning to 1 cup of bread crumbs).
5. Pat the zucchini dry.
6. Dredge: Dip them one or two at a time into the flour. Tap off excess flour. Dip into milk. Dip into bread crumbs. Place on baking sheet. Repeat until all zucchini are dredged.
7. Spray zucchini generously with olive oil baking spray.
8. Bake for 20-25 minutes until coating is crispy and brown and the inside is soft and buttery.
 If you end up with extra flour, your child or grandchild will get a big kick out of blowing it across the counter. Embrace it. You’ll have to sweep after this dish anyway. 🙂
This was printed from: We Laugh, We Cry, We Cook
The site URL: http://welaughwecrywecook.com
The Title: Baked Zucchini Fries
The URL: http://wp.me/p1UwM9-16G
Roasted Butternut Squash Mole Enchiladas
Posted: October 30, 2013 Filed under: Gluten Free, Main Dishes, Mexican Dishes, Toddler-Approved, Uncategorized, Vegan, Vegetarian, Veggies | Tags: Gluten-Fre, mole sauce, raisins, Roasted Butternut Squash Enchiladas, vegan, vegetarian 2 CommentsPeople often ask me how I cook with Jackson around. In We Laugh, We Cry, We Cook, I wrote about how cooking with him was kind of like cooking on an obstacle course. For a long time, that was what it felt like. But recently, I realized at this stage–the two’s–cooking with him is one of the easiest things on my to-do list to accomplish with him around. Not easy…but it’s something he’s come to feel at ease around. It’s kind of “our” thing.
I left him with a friend the other day for a few minutes and when I returned she shared this little conversation they had.
Sarah: Do you have a dog?
Jackson: No, I have a mommy.
Sarah: Oh, well that’s almost as good as a dog.
Jackson: Yeth, I cook with mommy.
Well, there you have it. Dogs don’t make very good cooking companions for kids, but mommies are very good for that.
My other to-dos don’t have the same smiley affect on him. Writing with him around. Yeah right. Phone calls. Let’s just say, the last conference call I was on with our editor, I had to muffle the phone while I hollered, “Jackson, don’t stick your head through the fence” and then again while he hollered, “Noooooo! Don’t wipe meeee!” as I was trying to discreetly potty train mid-call.
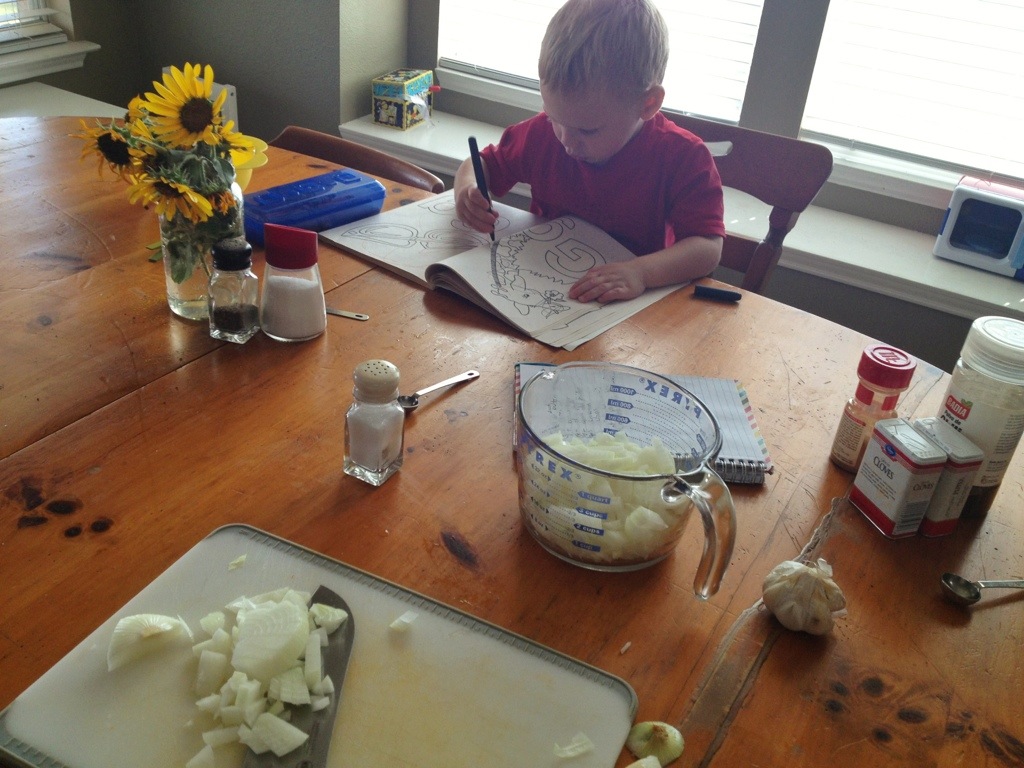
Cooking is mostly a piece of cake…because he can participate, he can be a helper. And even when he can’t help with something like chopping onions, he’s still content because we’re together and I’m talking to him, not somebody else on the phone or looking at a computer screen.
And with a little creativity, there’s almost always a way to get a child involved in the cooking if they want to be.
I don’t cook every day, but the days I do, the moments we are in the kitchen together, are often the moments we enjoy the most. The kitchen is a place where our lives intersect, where my almost 30-year old female joys and interests cross with my two-year old little boy’s interests. I don’t have to pretend that the lego tower we just built is the tallest most amazing piece of architecture I’ve ever seen. He doesn’t have to be patient with me as I make a quick call or pick up groceries. The smells of cloves and cinnamon, the colorful block puzzle from butternut squash, the sound of the blender engine purring excite us both. We don’t have to pretend. We just have to be. Together.
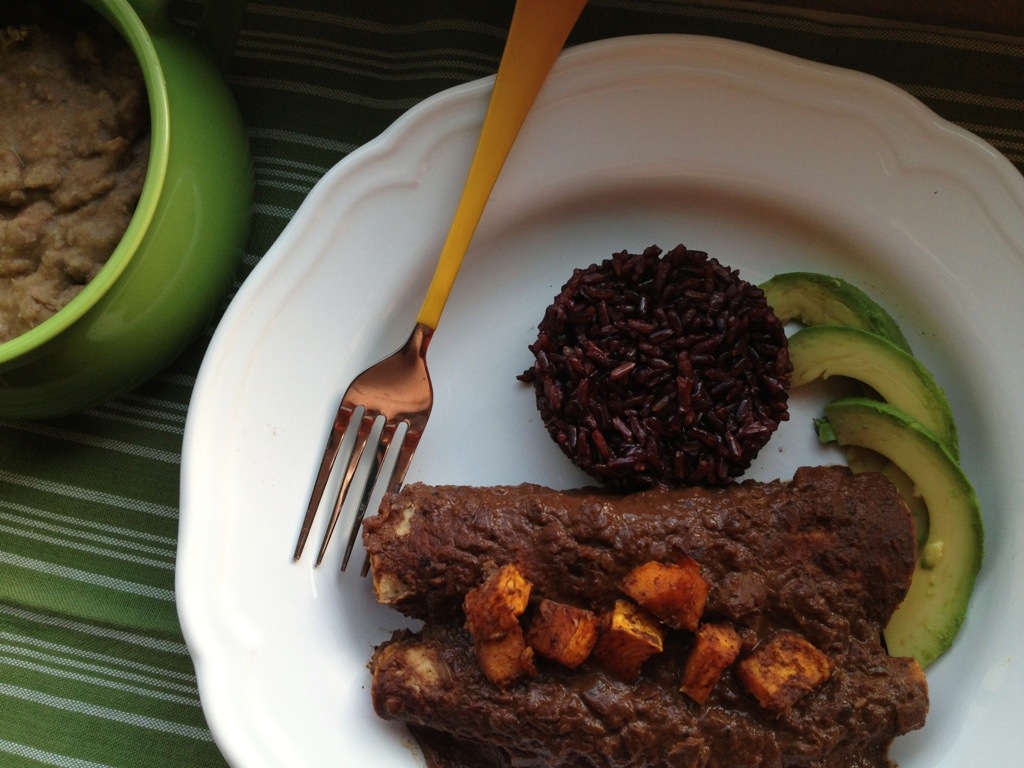
Roasted Butternut Squash Mole Enchiladas
Serves 4
5 cups diced butternut squash
1 tablespoon oil (canola, olive, grapeseed)
1 teaspoon brown sugar
1/4 teaspoon chili powder
1/4 teaspoon cinnamon
8-10 corn tortillas
1/2 cup raisins, soaked for 10 minutes in warm water and drained (optional)
2 cups Mole Sauce (I used this easy recipe from Vegetarian Times)*
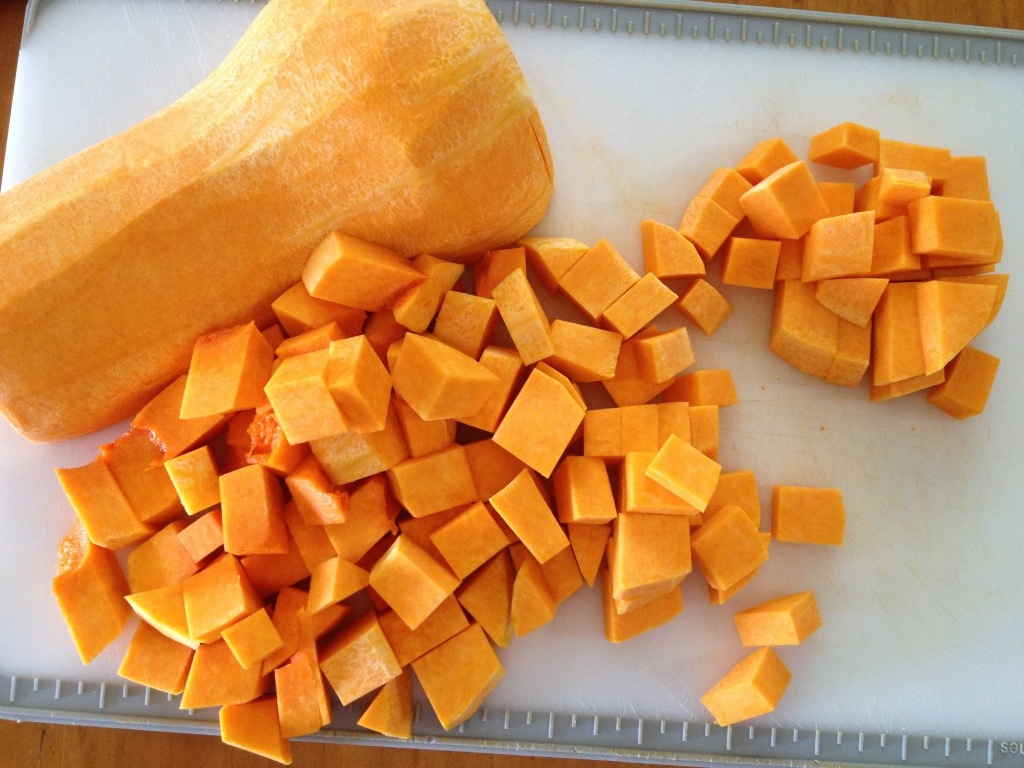
Preheat oven to 400. Toss butternut sqaush with canola oil, brown sugar, chili powder, and cinnamon. Bake at 400 for 20 minutes or until tender and cooked through. Resist temptation to eat all the squash now.
Reduce oven temp to 350. Ladle 1/2 cup mole sauce into bottom of a 9×13 casserole dish. Wrap corn tortillas in a damp paper towel and heat in microwave for about 30 seconds, just enough to warm them up and make them pliable. Dip corn tortilla into mole sauce. Fill with about two tablespoons of butternut squash and a sprinkle of raisins. Roll up. Repeat. Ladle a generous amount of sauce on top. Bake at 350 for 15 minutes.

I didn’t put the raisins in when I took pictures, but I should have! I added them to the top and it really made the dish, so I incorporated them into the final recipe.
Serve with black or wild rice. The nuttiness from the black rice went perfectly with this dish.
*I blended half of the sauce this time. I think I’d leave it unblended next time though, because it was a lot prettier unblended.
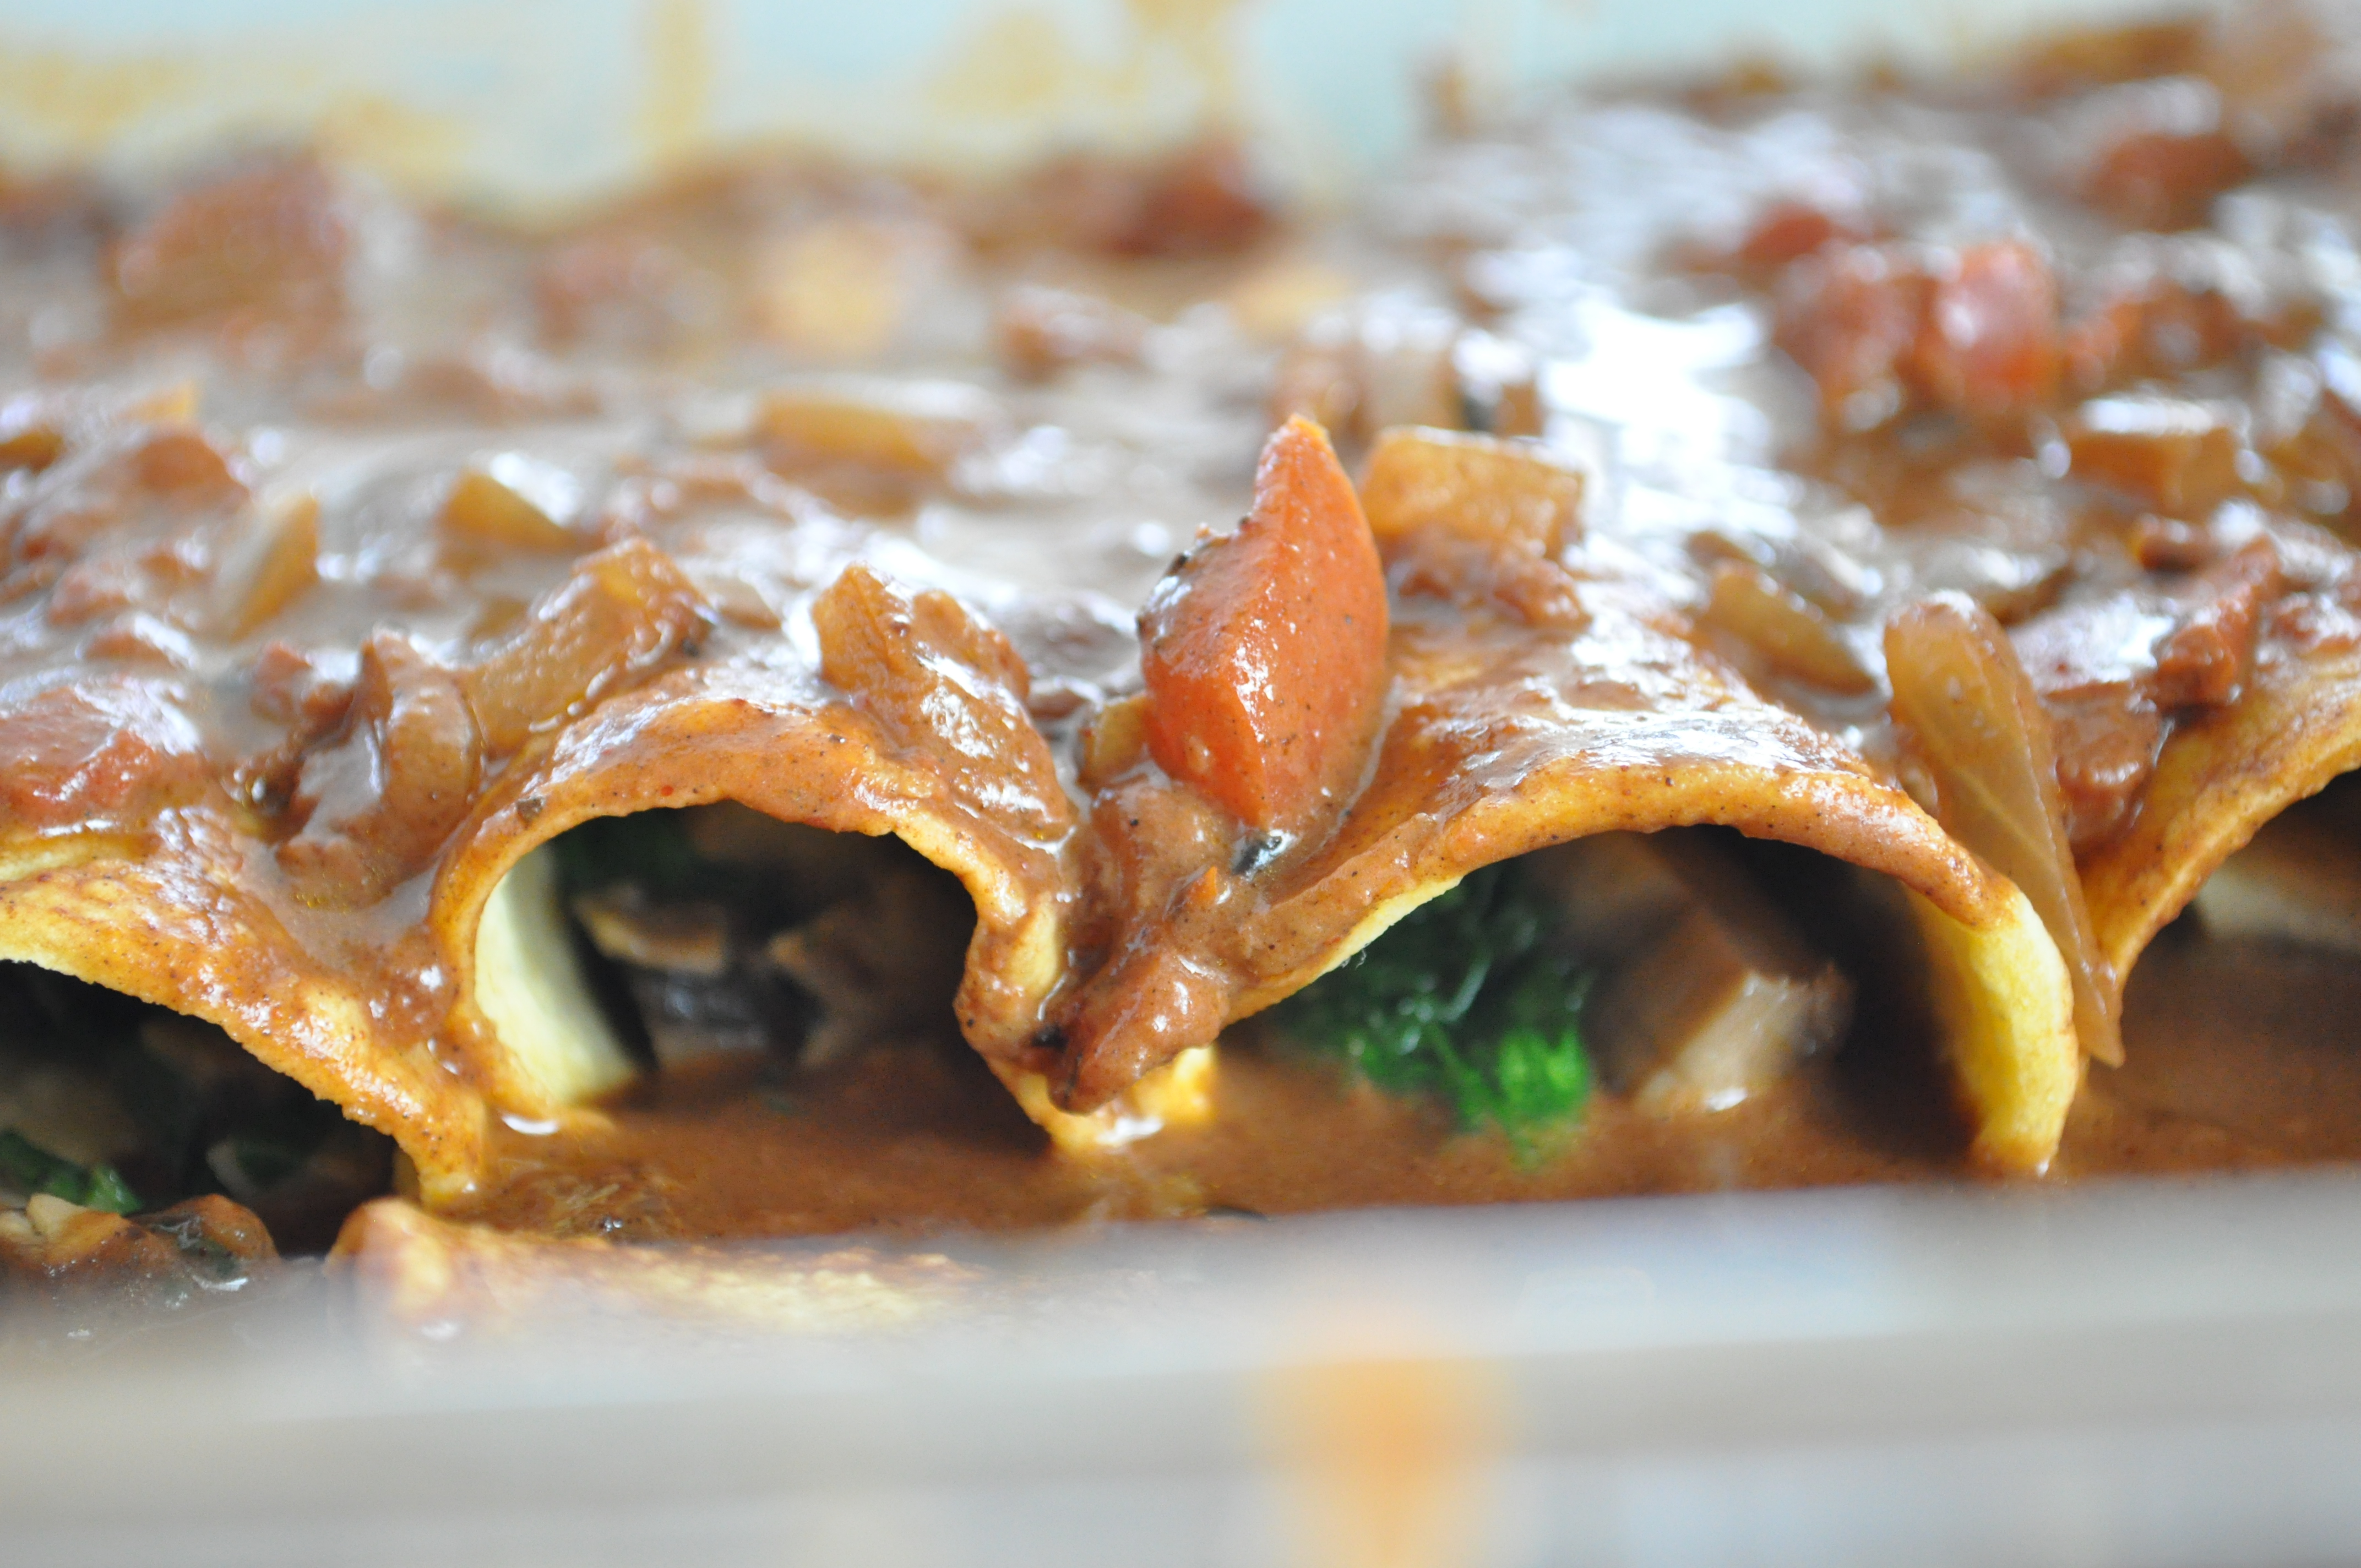
Same sauce unblended on spinach and mushroom enchiladas. Much much prettier, eh?
Crunchy Amaretto French Toast
Posted: July 7, 2013 Filed under: Breads, Breakfast Foods, Desserts, Uncategorized, Vegan Options, Vegetarian | Tags: almond, amaretti, amaretto, butter, crunchy, French Toast, maple syrup, vegan 2 Comments
I don’t know exactly when it happened, but at some point Sunday nights became our traditional Breakfast-for-Dinner Night. In addition, when someone is feeling poorly, breakfast may be summoned at anytime of day. There’s something comforting about a bowl of soft scrambled eggs and buttered toast when you aren’t feeling quite up to par
Yesterday, my six-year-old grandson Georgie battled a headache off and on all day. By evening, when I got him in our tub — usually a special treat because it is so big — he looked a sad figure, sitting there in the water, holding his forehead in his hand. “Nonny,” he said pitifully,”will you please go to my Mom’s bathroom and get the Ocean Breeze soap that she usually uses? I just can’t deal with other people’s soap right now.”
I am pretty sure this will be our family’s new phrase in response to generic overwhelm: “I just can’t deal with other people’s soap right now.” Whether your family enjoys a traditional “Breakfast for Dinner Night,” or someone’s needing a little comfort food or “you just can’t deal with other’s people’s soap anymore,” here’s a dish sure to comfort and please, anytime of day or night.
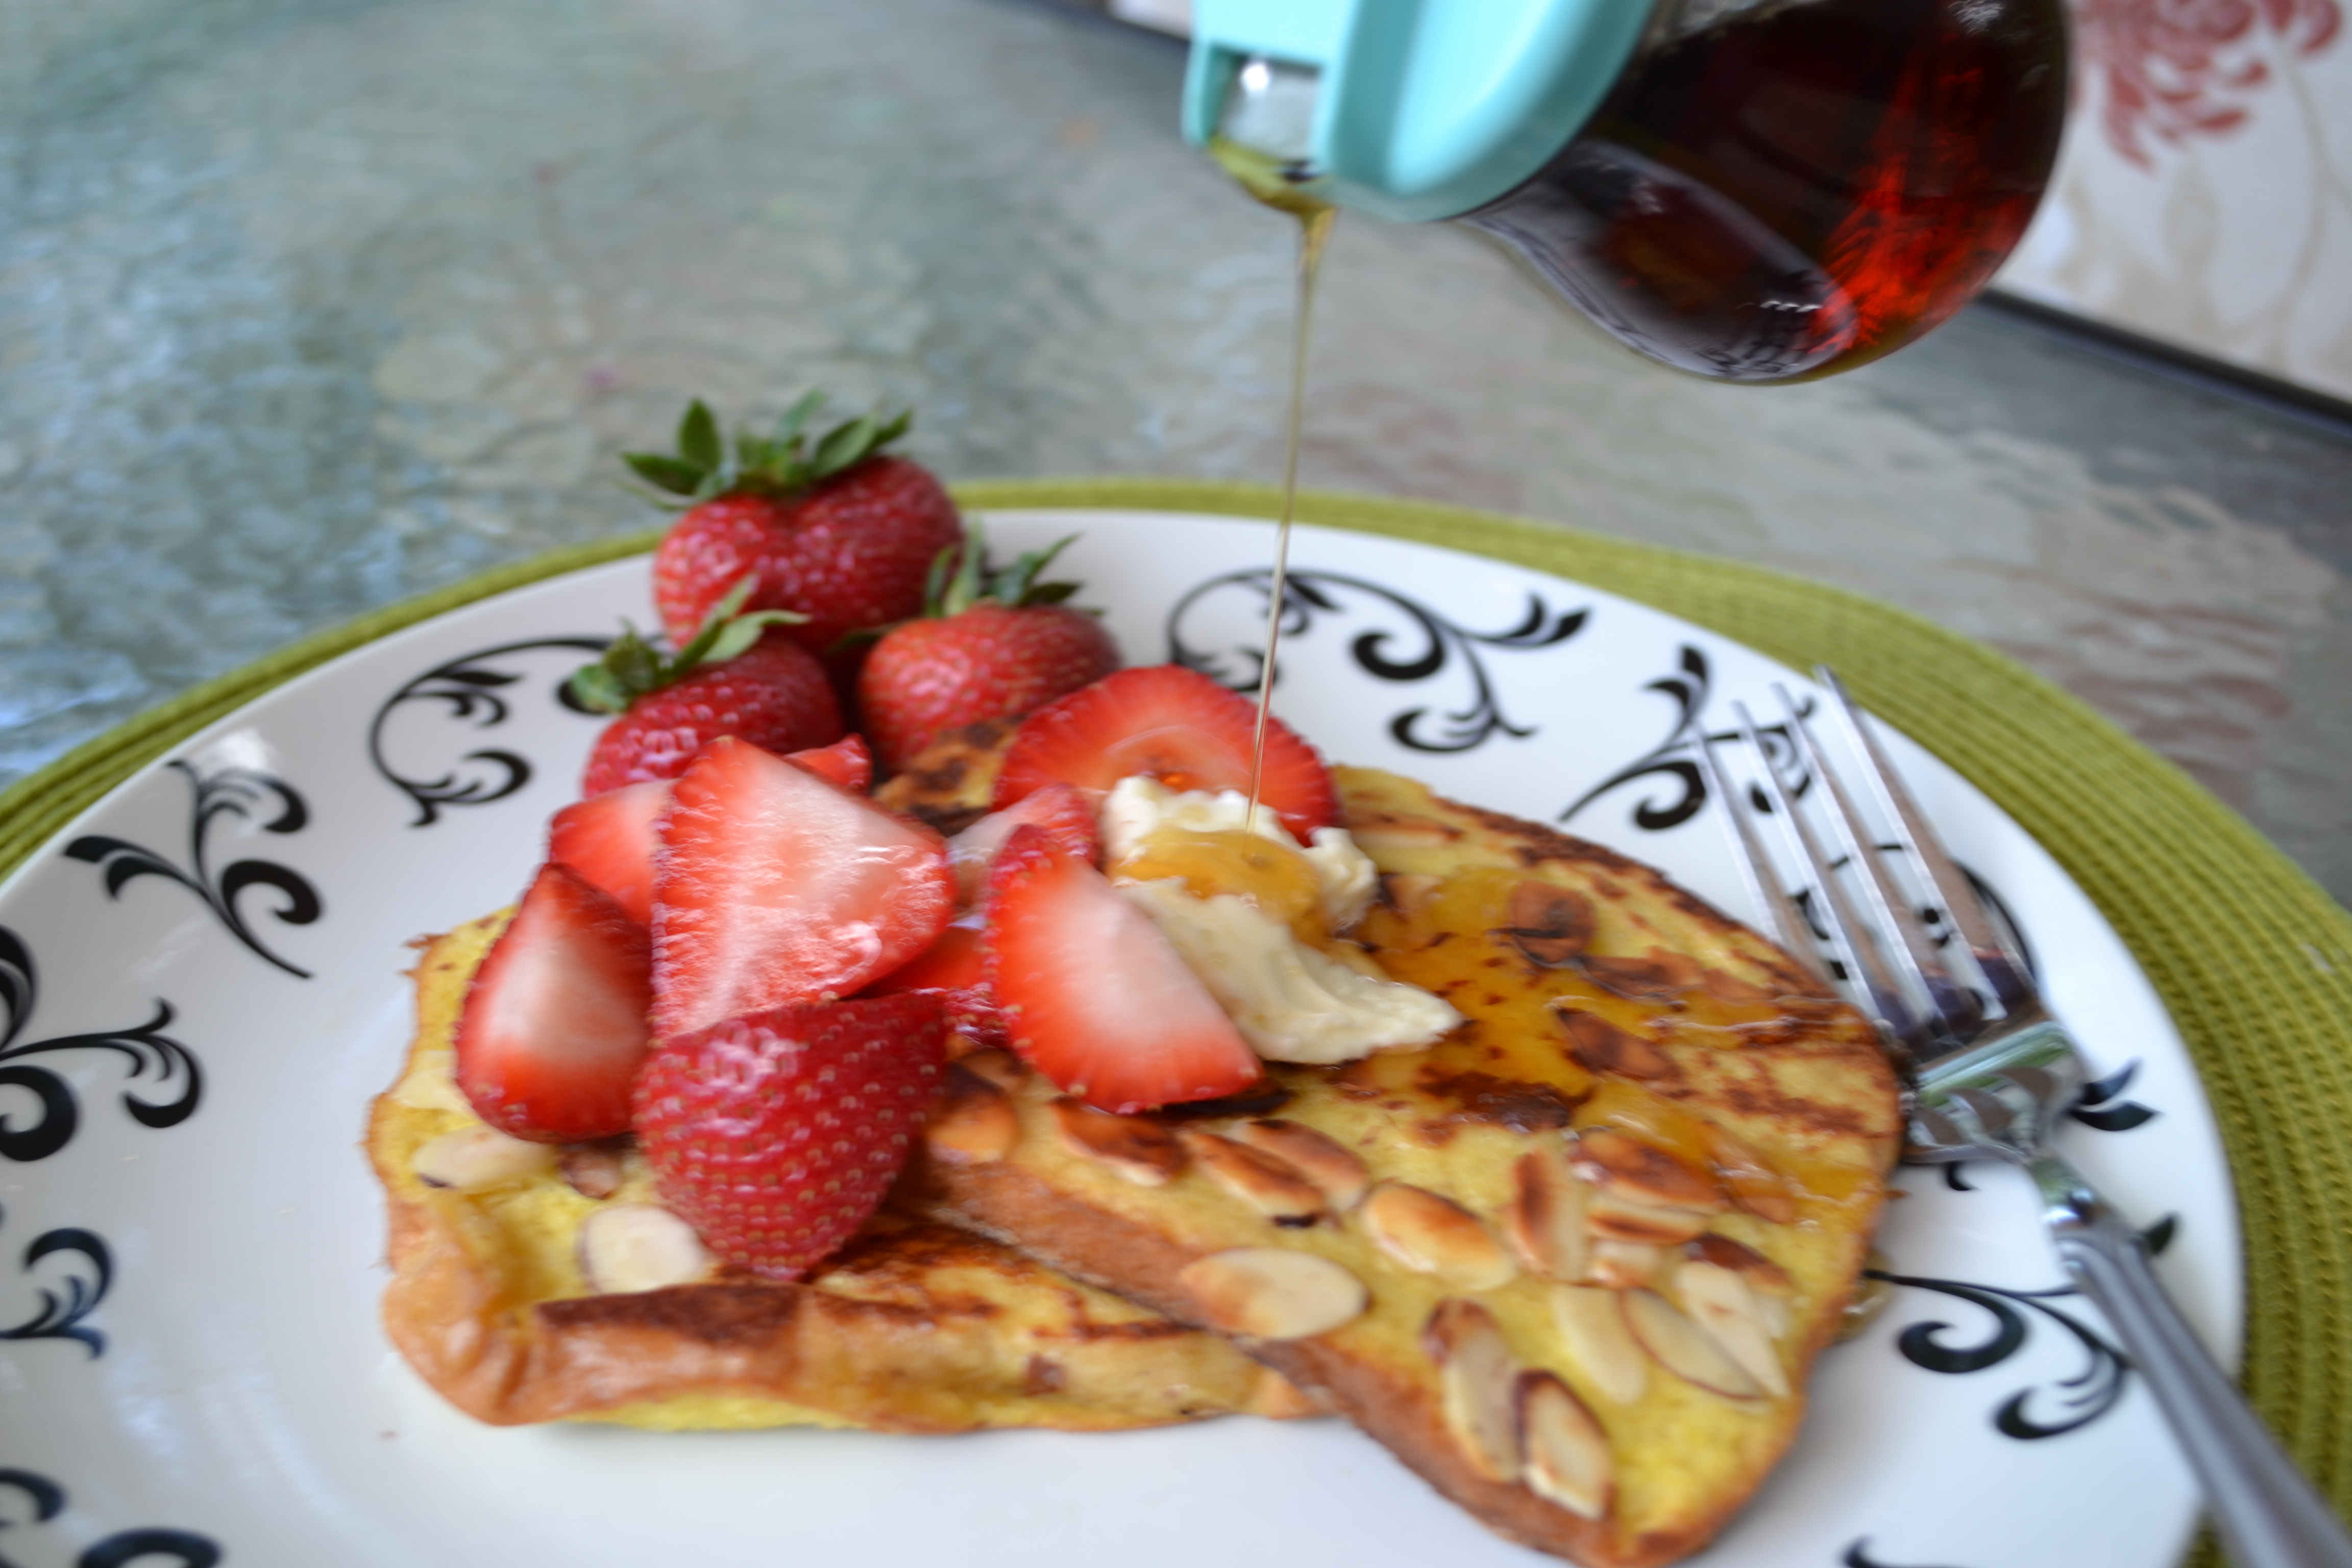
I love French Toast, but when the bread has not only been dipped in egg (flavored with Amaretto) but also coated with a thin layer of sliced almonds before being grilled in butter… well, as my husband Greg said, “That’s the best French toast I’ve ever had in my life.” Top these crunchy, almondy French toast with butter, fresh sliced strawberries, real maple syrup and serve with a side of sizzling bacon or sausage and your day (whether it’s morning or evening) will take a sharp and instant turn for the cheerier. And vegans, do not worry! There’s a terrific vegan alternative for this recipe at the end of the post.
Crunchy Amoretto French Toast
Serves Two (Makes 4 pieces of toast)
4 slices bread (I’m partial to potato bread for French toast)
2 large eggs, beaten
2 T. almond milk (or dairy milk)
1 t. almond flavoring or amaretto liqueur
Small pinch salt
¼ c. sliced almonds
2 t. butter plus 1 t. olive oil for pan
Sliced fresh strawberries (or any kind of berries you like) – about ¼ cup per person
Softened butter and genuine maple syrup
Heat skillet to medium high, melting the butter with the olive oil and mixing in the pan with the edge of a pancake turner. In a low wide bowl mix beaten eggs, milk, almond flavoring or liqueur and pinch salt. Dip bread, both sides, into the egg mixture, shaking off excess. Lay each piece carefully in the hot skillet, and then sprinkle the tops, evenly, with about a tablespoon of the sliced almonds. Using the back of the spatula pat the nuts into the bread with gentle pressure (this will help them stick when you turn the bread). When the bottom of the toast is getting golden brown, gently turn the bread with a wide pancake turner, and cook until the almond-side of the toast is golden, fragrant, toasty and crunchy. Top with berries, soft butter and a nice drizzle of real maple syrup.
Vegan Version. Use 1 cup of unsweetened almond milk plus 1 T. flour, 1 T. nutritional yeast (gives it an “eggy flavor”) and 1 T. maple syrup and 1 t. almond flavoring or amaretto for the “egg mixture.” Substitute vegan butter for the dairy butter. This will actually coat six pieces of French toast rather than four.
More Variations: Try adding cinnamon or nutmeg to the egg batter; or use orange juice instead of almond milk and a bit of orange zest. Thawed, heated sweetened previously frozen dark sweet cherries would also be wonderful with this. Substitute vanilla or rum flavoring for the amaretto or almond.
Banana Nut Soft Serve [Two Ingredients, Dairy-Free, Sugar Free]
Posted: June 8, 2013 Filed under: Breakfast Foods, Desserts, Fruit Dishes, Gluten Free, Snacks, Toddler-Approved, Uncategorized, Vegan, Vegetarian | Tags: banana nut soft serve, banana soft serve recipe, dairy-free, gluten-free, peanuts, sugar-free, vegan Leave a comment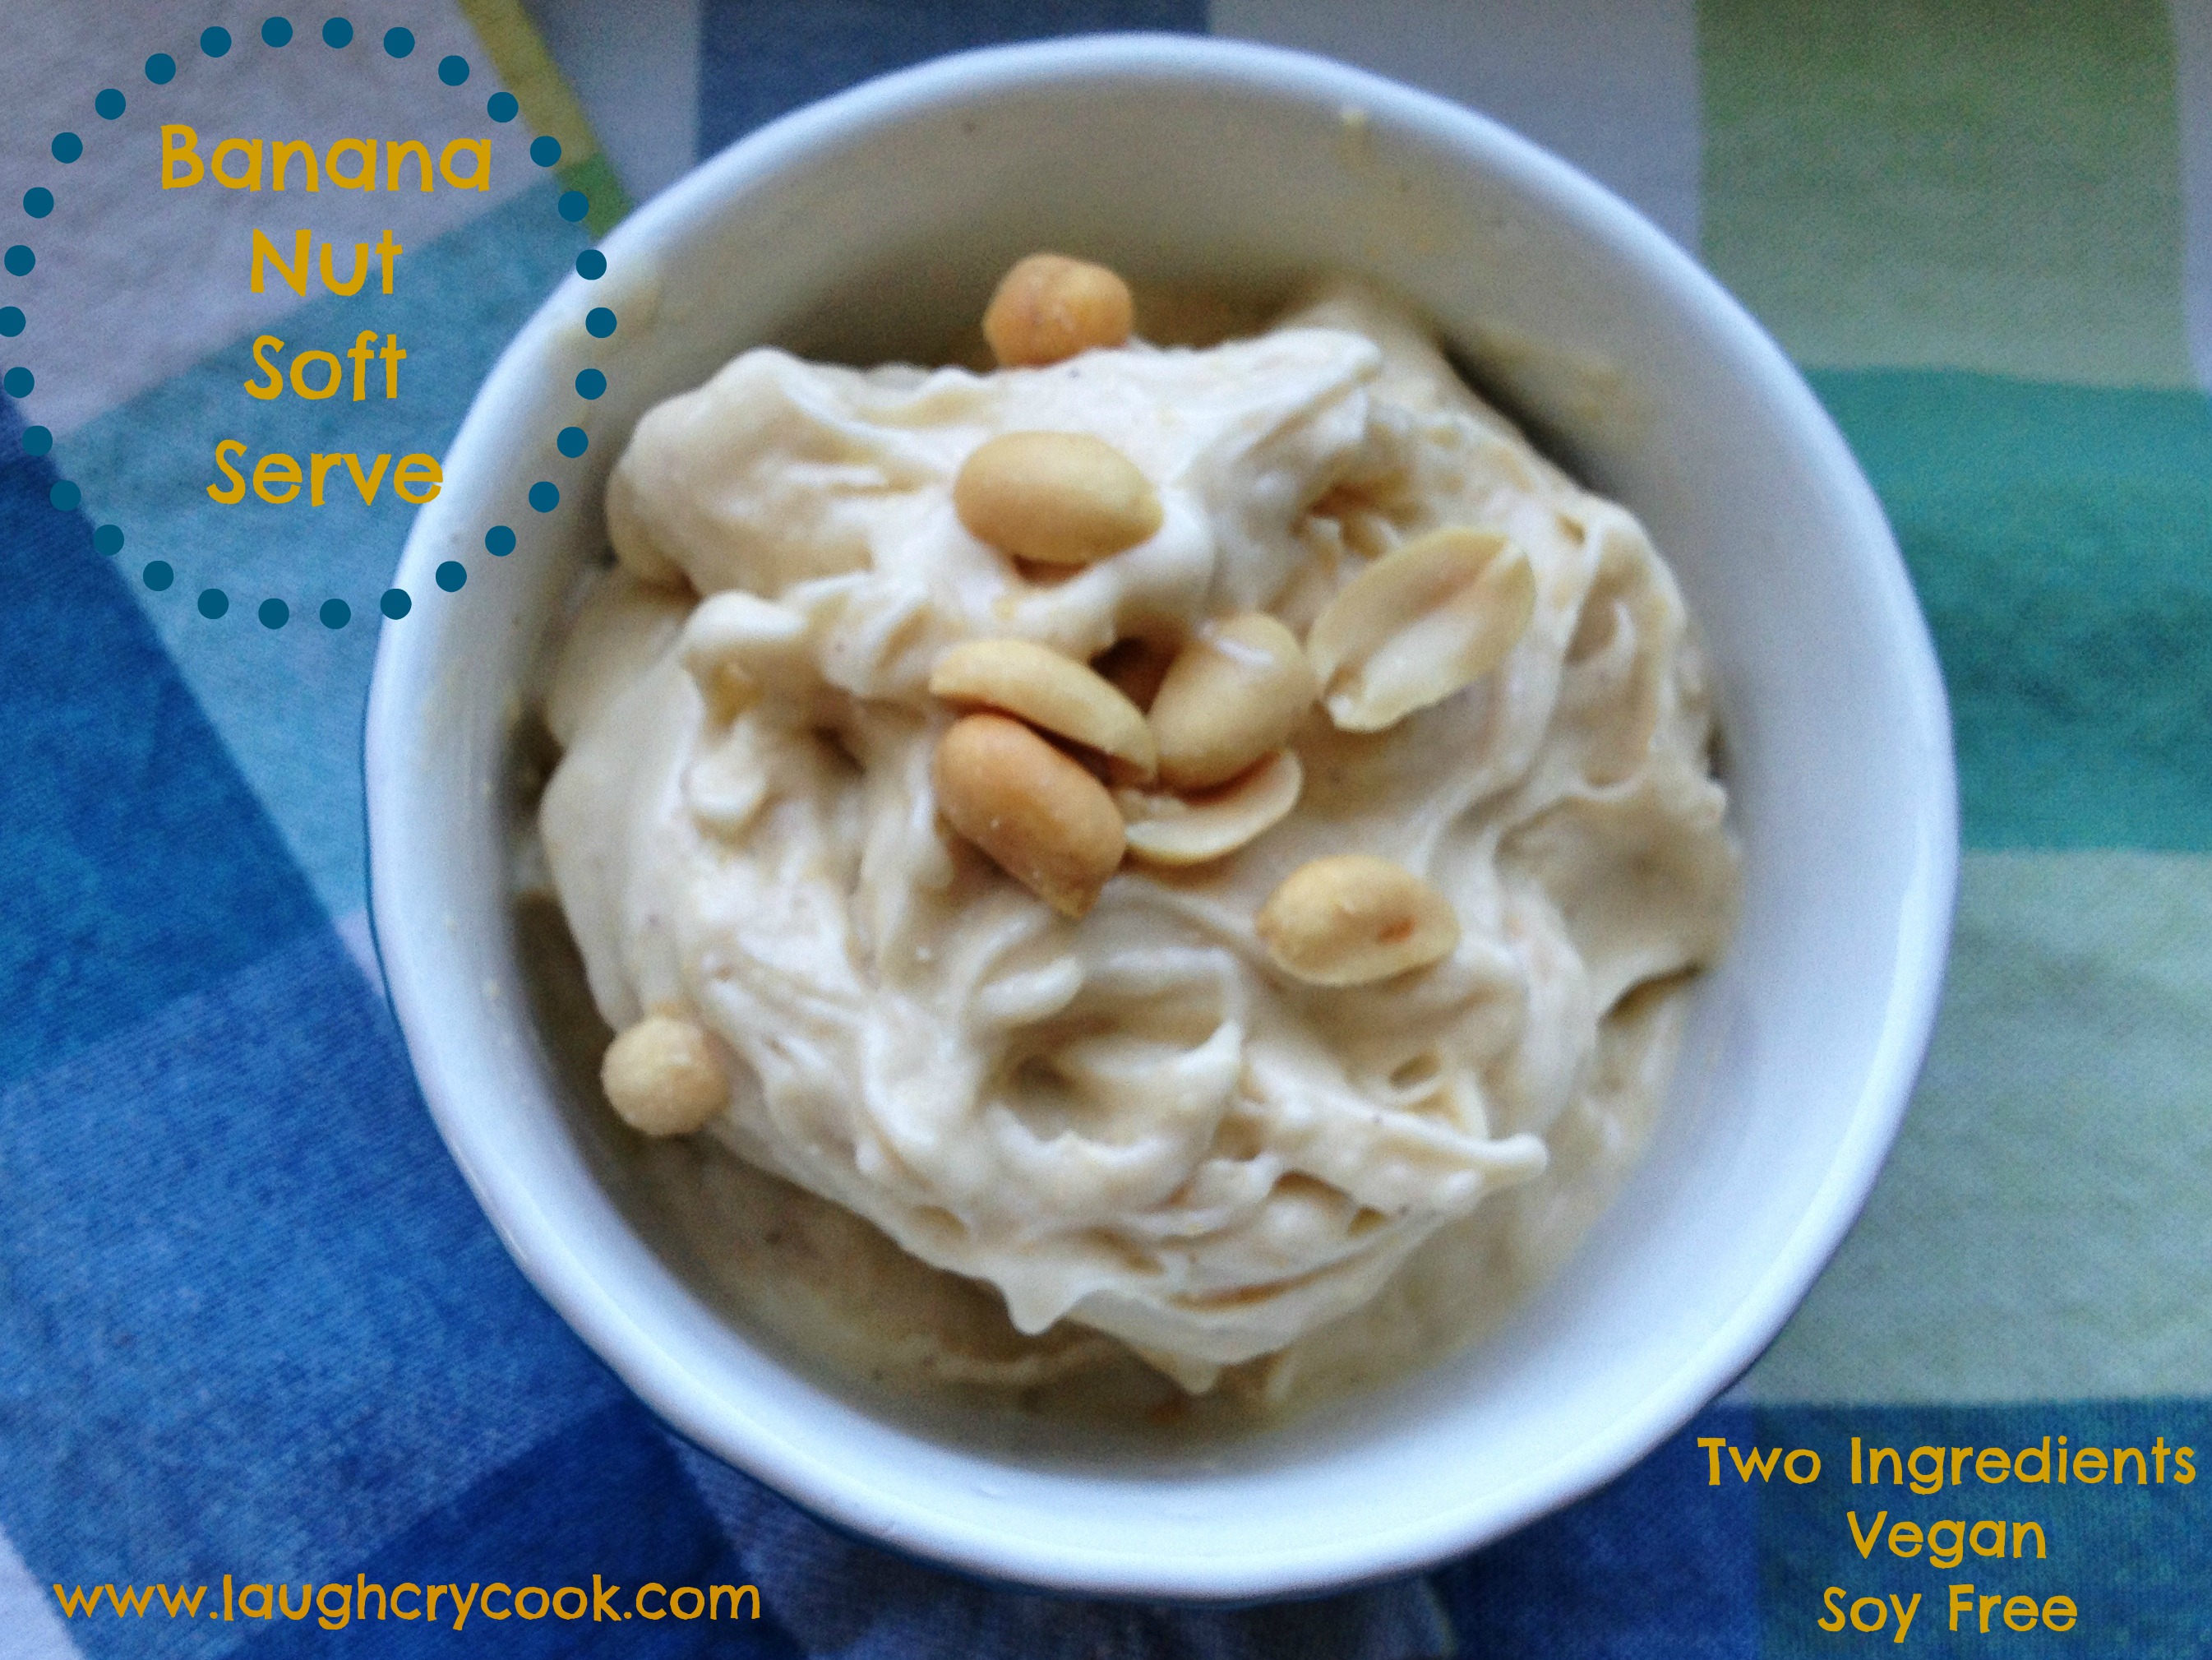
Jackson is 22 months old now and at that stage where he’s learning new words every day and starting to string together words to make phrases and sentences like these:
“Hoo Hoo” (Whoohoo whith his hands thrown in the air.)
“Cool man” (I don’t know where he picked up this phrase, but it’s super cute.)
“Yayyy, I did it!” (Even if he didn’t actually do whatever IT is, he celebrates every little effort with such enthusiasm. It’s contagious.)
“Leeeeeet’s GO!” (That combined with “Run momma” is turning him into a little personal trainer!)
“Yes.” (Finally, he is saying “yes,” instead of always “no,” in the most adorably assertive and confident way.)
Of course, with this precious phase, also comes the less than adorable phrases, like “Chur turn” (Your turn…which actually means my turn. And it’s always “chur turn”) and “Miiiine!”
My favorite phrase of late, though, is “Tank choo ma ma.” He emphasizes each syllable and I can tell he really has to work to say it. It’s a sweet labor of love and it’s reserved for his truly most satisfying moments of deep gratitude, like when I served him chocolate “ice cream” made of bananas and cocoa for a morning snack last week. “Choc! Tank choo ma ma!”
This idea for banana soft serve has been circulating for years. It’s not new, but I’ve turned a few people toward it this week with my Instagram picture of Jackson enjoying his morning ice cream treat and thought maybe some of our readers have yet to try it as well. The basic recipe is just frozen bananas processed in a blender. It’s magical! The bananas just whip right into a thick creamy soft serve that is delicious on it’s own. You can make all sorts of flavors: chocolate peanut butter, strawberry banana, cinnamon and sugar…wherever your taste buds take you. This version is one of my favorites. You can use peanut butter instead of peanuts, but I really love the texture and flavor from the whole peanuts.
Ready in under five minutes, it makes the perfect healthy summer snack, or even breakfast. You’ll earn some serious cool mom or dad points putting a bowl of this in front of your kids first thing in the morning!

Banana Nut Soft Serve
Serves 2
Ingredients
2 frozen bananas, cut into 1-2 inch pieces
2 tablespoons peanuts (I used organic unsalted)
sprinkle of sea salt (unless peanuts are salted)
Directions
Put ingredients in a food processor and blend, stopping and scraping the sides as needed until it turns to the texture of a thick soft serve ice cream. Then stop. You don’t want to over blend or it will have more of a melty soft serve texture (not bad, but not as good either).
For this portion size, I use the smallest bowl on my food processor so I don’t have to stop and scrape the sides as often. (It will be very loud at first, that’s okay, just be prepared.)
Serve immediately with a few extra peanuts and another sprinkle of sea salt on top for some extra crunch. I’ve heard this does not refreeze well, though I’ve never had any left to try. 🙂 You can buy yourself a little time keeping it chilled in the freezer, but it’s best to serve right away.
This was printed from: We Laugh, We Cry, We Cook
The site URL: http://welaughwecrywecook.com
The Title: Banana Nut Soft Serve
The URL: http://wp.me/p1UwM9-ZP
Have you made Banana Soft Serve?
What are your favorite flavor combinations?
What are your favorite toddler phrases and phases?
A little book update:
Zondervan, our publisher, has been so supportive of our book (coming out August 6). We’re having such a great publishing experience! They just decided to do an audio version of We Laugh, We Cry, We Cook and invited my mom and I to record it. One of us will be recording in the studio most of the week, each of us having two 5-7 hour days in studio. Prayers for good health appreciated. The following week I’m heading to Colorado (with Jackson in tow) to join mom for a photo shoot for a major Christian publication. We’re so grateful for all the encouragement and support we’ve received…and for our fabulous readers at the blog.
We also got all of the endorsements in for the book. Wow! We are floored by the generosity of our fellow authors. Click on the picture of the book above to read the endorsements and find lots of knew authors to friend and follow.
Tofu Scramble Tacos
Posted: October 23, 2012 Filed under: Breakfast Foods, Gluten Free, Main Dishes, Mexican Dishes, Uncategorized, Vegan, Vegetarian, Veggies | Tags: gluten-free, savory breakfast, scrambled egg substitutes, scrambled tofu taco, vegan, vegan breakfast taco, vegetarian mexican food 7 Comments
(Rachel, the daughter)
Jared, Jackson and I went to the Texas State Veggie Fair this weekend. I’m a terrible blogger and didn’t take any pictures of my food. I blame my hungry toddler. We scoped out all the food trucks and booths and contemplated fresh squeezed juice or mac-n-cheese and a barbeque sandwich, but our eyes kept venturing to the long line behind the Corn Dogs and Fried Cinnamon Rolls. When in Rome, right? What’s a fair without fried food? I stood in the 20 minute line while Jared took Jackson to play on the playground.
Finally, I returned to my boys juggling two corn dogs, a fried cinnamon roll and a handcrafted root beer. We sat on the lawn and indulged. If you’re having trouble imagining how good it was, here’s Jackson’s face after his first bite of fried fair food.

“Fried food, where have you been all my life!?!”
I think this picture says it all. Yum.
That deep fried cinnamon roll was worth every glorious calorie, but as soon as I got home, I whipped up a big kale salad for dinner. My body felt like it was shutting down from all the grease, sugar, and processed fake-meat products I had consumed. Sometimes you just have to give your body what it wants and then deal with the consequences.
For months after going vegan, I continued to crave eggs. I couldn’t get them off my mind. One night, after a wedding with nothing vegan on the menu, we went with some friends to a bar with a midnight breakfast burrito buffet. I was so hungry and finally caved and ate an egg and potato breakfast burrito. My stomach was in knots for two days, proving wrong the myth that if we are craving something our body must need it.
Lucky for me, I finally discovered a breakfast burrito that satisfied my craving for eggs without sacrificing my vegan diet or my stomach lining. Tofu scramble looks and feels just like pale scrambled eggs and with a little seasoning tastes eerily similar. Jared has been nagging me to make this all week. It’s truly crave-worthy. If you’re curious about tofu or have had bad experiences with it before, try out tofu scramble.

Tofu Scramble Tacos make a hearty savory vegan breakfast or an easy weeknight dinner.
Tofu Scramble Tacos
Serves 4
Ingredients
2-4 T. Olive Oil
2 small red potatoes, diced (or any veggies of your your choice — onions, bell peppers, broccoli, zucchini…)
1 clove of garlic, minced or chopped
1/2 c. frozen corn
1/2 block of tofu
1 t. salt (divided)
1/2 t. pepper
1 t. smoked paprika
1/2 t. onion powder
2 c. baby spinach
8 tortillas (I really like the new Artisan Corn & Whole Wheat Blend by Mission)
16 oz Black Beans
1 avocado, sliced or diced (optional garnish)
salsa (optional garnish)
cilantro (optional garnish)

I used potatoes, spinach, corn, and garlic, but you can easily modify this to whatever veggies or greens you have on hand — bell peppers, poblano peppers, onions, broccoli, carrots, summer squash, zucchini, kale, swiss chard, and collard greens would all be delicious.
Directions
Heat oil in a non-stick skillet, use enough to generously coat the bottom of the pan. Pan-fry potatoes (or any other veggies) with 1/2 t of salt on medium heat until they are tender, stirring often. I covered the potatoes to help them cook quicker, other veggies may not need to be covered though. Bring heat down and add the garlic. Stir continuously to keep garlic from burning.
As soon as the garlic is translucent, crumble the tofu into the pan (just squish it up in your hands and break into little crumbles). Add smoked paprika, onion powder, pepper, and remaining salt. Return heat to medium and stir and cook for about five minutes. Add corn and cook until corn is heated through ( a few more minutes). Stir in the spinach and cook until just wilted.

Tofu scramble has a texture really similar to scrambled eggs. With the right seasoning, you can hardly tell the difference.
Serve in tortillas with black beans, avocados, cilantro, and salsa.
This was printed from: We Laugh, We Cry, We Cook
The site URL: http://welaughwecrywecook.com
The Title: Tofu Scramble Tacos
The URL: http://wp.me/p1UwM9-Lk
© Copyright 2012 – All Rights Reserved
Luscious Pumpkin Mousse Pie (Vegan)
Posted: October 6, 2012 Filed under: Desserts, Vegan, Vegetarian | Tags: chiffon, coconut, cream, gingersnaps, mousse, pie, pumpkin, vegan 3 Comments
(Becky, the Mama.)
I went to visit my daughter Rachel in September, just as the days began to cool with the promise of Fall. Though, in Texas where she lives, this means the temperatures were in the low 90’s rather than over 100. .
Still, every Starbucks on our route from Denver to Oklahoma to Texas was advertising their famous Pumpkin Spice Lattes which always puts me in the mood anything made of pumpkin, ginger and cinnamon. I know that by January 1, I’ll be declaring, “I never want to see another pumpkin as long as I live,” because I will have overdone the nonstop parade of pumpkin lattes, breads, muffins, waffles, cookies and pies through the holidays.
But for now, I can’t seem to get enough of the plump orange gourds. I created this vegan pumpkin mousse pie for the Two Texas Rachels in my life (My daughter and my sister) with a crust of crushed gingersnaps and salted roasted almonds, a filling of whipped coconut cream, canned pumpkin and spices.
May I just say, ever so humbly, this may be my favorite of all pumpkin desserts? Ever.
I make an amazing traditional pumpkin pie, which I thought was the best pumpkin dessert in the universe, and I promise to share that recipe on this blog before Thanksgiving. But I like this pie even better. It needs to be served very cold, and when you do that, it slices like a dream – like chiffon mousse, like a cloud made of pumpkin.
I love it when a plan comes together. And I love it even more when I can create a recipe that people with special dietary needs can enjoy alongside everyone else. This recipe has no eggs or milk. If you use gluten-free cookies, your gluten-free guests can also dig in without worry.
Update from Thanksgiving 2013: Served this pie to a big family gathering. Off all the desserts on the table, this one disappeared first and was voted the best — and most of those in attendance were not vegan or on special diets.


Luscious Pumpkin Mousse Pie (Vegan)
Ingredients
1 16 oz. can chilled can of coconut milk, cream only (Thai Kitchen full fat ORGANIC brand always separates and works well for whipping. When I see it, usually at Whole Foods, I buy a few cans and keep them in the fridge. If in a hurry you can pop a can in the freezer for a couple of hours.) You want to have at least 2/3 cup of the cream (which will look like Crisco shortening when you remove it from the can), and more if there’s more in the can.

1 1/2 cup mashed, cooked pumpkin (canned or fresh)
2 t. cinnamon
1 t. nutmeg
1 t. ginger
¾ t. salt
¼ c. brown sugar (or coconut sugar) (more if you prefer it a bit sweeter, do a taste test)
2 T. maple syrup
Crust:
16 Gingersnap cookies (or crumbs to equal 1 c.)
1 T. sugar
1/3 c. roasted whole almonds
3 T. Earth Balance butter (or regular butter if you aren’t vegan)
Directions:
Whip the coconut cream in a mixer until light and smooth.

Add pumpkin, spices, brown sugar and maple syrup.


Microwave butter until melted in an 8 inch glass pie pan. (You can use a 9 inch pan but the pie will not be as thick.)
Put cookies, almonds and sugar in a blender or food processor and blend until they approximately as fine as graham cracker crumbs. Reserve 2 T. for garnish. Add cookie/almond mixture to melted butter in the pan, mixing with a fork until the crumb mixture is evenly moistened with butter. Using the back of a spoon, create a pie crust shell in the pan. Bake at 350 for about 8 minutes or until firm. Let cool completely before filling.

Using a large spoon, gently spoon pumpkin-coconut mixture into the shell. Smooth the top. Sprinkle with bit more cinnamon. Swirl gently with a knife. Sprinkle with reserved crumb mixture. Cover lightly with plastic wrap and put in fridge for at least two hours before cutting and serving.
Hint: This is best served the same day as it is made, as the crust is crunchiest then.
Optional Additional Garnish: ¼ c candied ginger, ground in blender to texture of course salt; 3 T. toasted pumpkin seeds
Variations: Rather than make a pie, you can make individual mousse desserts by alternating layers of pumpkin filling with crumbs and candied ginger bits.
Use chocolate or lemon cookies instead of gingersnap cookies if you prefer.


This was printed from: We Laugh, We Cry, We Cook
The site URL: http://welaughwecrywecook.com
The Title: Luscious Pumpkin Mousse Pie (Vegan)
The URL: http://wp.me/p1UwM9-Jf
© Copyright 2012 – All Rights Reserved
Creamy Tomato Basil Soup (Vegan & Regular Version)
Posted: September 28, 2012 Filed under: Soups, Vegan, Veggies | Tags: basil, creamy, soup, tomato, vegan 3 Comments
(Becky, the Mama.)
About a year and a half ago my daughter Rachel was in town, pregnant, and craving Tomato Basil Soup. The trick was to find a place that served a vegan version so she could indulge but still avoid dairy or meat-based broth. I think we drove to three restaurants before we finally found the place that served the soup she had in mind. And yes, she and her unborn child were absolutely worth it. But I determined that day to come up with a creamy vegan version of Tomato Basil Soup that we could make at home.
I, too, adore Tomato Basil Soup, especially the thick creamy version served at La Madeleine’s, a favorite French chain restaurant in the Dallas area. Alas, it is loaded with cream and butter and thus, with calories. The problem with trying to make any tomato-based soup with milk instead of cream (to cut calories), is that the acid in the tomatoes curdles the milk yielding a yucky mess you’ll have to sigh heavily about, just before you put it down the disposal. (Ask me how I know this.)
So I experimented with a can of coconut milk in place of cream and butter. Perfection. You really can’t taste the coconut flavor at all; it fades to neutral when paired with the strong tastes of the ingredients in the rest of the recipe. Even if you use the full fat can of coconut milk, this soup only about a 100 calories a cup. But you will not believe it when you taste it! On top of being delicious and easy, it is also vegan-friendly and nutritious. Pretty much the Perfect Recipe to keep in your Go-To Classic Recipes file.
I threw this soup together for a friend who dropped by unexpectedly for lunch one day, and she swore it was the best soup she’d ever tasted. Could not believe I whipped it up in just a few minutes. Plus it was ready to serve by the time our grilled cheese sandwiches came off the stovetop.
P.S. I hurriedly planted basil in a big pot on the porch this summer and it is still yielding oodles of leaves, which I used in this recipe. Greg spent a full day, in June, putting together three Topsy Turvy upside down tomato plants (as “Seen on TV”), put them on a fancy planter, then hooked them up to a complicated irrigation system. God bless him, the tomato you see in this picture is the one and ONLY tomato we’ve harvested, picked yesterday. But it sure was a pretty one.

Easy, Creamy Tomato Basil Soup (Vegan)
Yields about 10 cups of soup
Ingredients:
1 28 oz can crushed tomatoes (with basil, if you can find it)
1 c. very lightly packed fresh basil leaves (or a good generous hand full) — I sometimes use 2 T. of jarred pesto instead of fresh basil if that is all I have on hand
¼ c. onion
2 garlic cloves
3 c. veggie broth (or chicken broth if you aren’t vegetarian and prefer this)
1 can coconut milk (Full fat version makes a creamier soup, but lite will also work. If desired, reserve a little for garnishing soup once it is in a bowl. You’ll find cans of coconut milk in the Asian section of almost all grocery stores now.) Note: You can also make a the more traditional soup by omitting coconut milk and add 1/2 cup of regular cream, at the very end of cooking the soup
1 ½ t. salt
1 T. sugar (or brown sugar or coconut sugar)
1 t. pepper
Directions:
Put ½ the can of crushed tomatoes into a blender or food processor. Add basil leaves, onion and garlic. Blend until basil leaves are still individual but tiny specks of green.
Pour this mixture into a soup pot. Add the rest of the can of tomatoes, veggie broth, coconut milk, salt, pepper and sugar. Stir and simmer uncovered for about 10 minutes. Check to see if it needs more salt. Serve in bowls, and garnish if desired with a “squiggle” of reserved coconut cream.

Raspberry Mocha Pudding
Posted: September 5, 2012 Filed under: Breakfast Foods, Snacks, Uncategorized, Vegan, Vegetarian | Tags: coconut yogurt, coffee, dairy-free, gluten-free, mocha pudding, nuvia instant coffee, so delicious chocolate yogurt, vegan Leave a comment
Rasberry Mocha Pudding, a seriously energizing snack.
Rachel, the daughter
I used to be organized. My house used to be clean. I used to be prompt. I loved those things about me. I was that girl, that girl that appeared to have her life together.
Motherhood is humbling. I’ll leave it at that, without describing the current condition of my home.
This morning was Jackson’s first day of Mother’s Day Out. Last week at Meet the Teacher the teachers gave me a big cut out construction fish with, I’m sure, instructions on what to do with it.
At 11:00pm last night, just as my head finally hit the pillow, I remembered something about family photos for the fish. I think he needs pictures so they can decorate the fish, I thought. Of course, I’ve yet to print a single one of the 2,000 (I wish I was exaggerating) photos I’ve taken since Jackson was born. So I crawled out of bed and ordered some from a 24 hour Walgreens and set my alarm 20 minutes earlier so I could pick them up in the morning. I was so proud of myself for remembering the instructions and for pulling it off, even if I by the skin of my teeth. And though slightly late, we weren’t the last ones to arrive. I’ll take it.
I walked in and bumped into a friend whose daughter is in Jackson’s class. She was holding her daughter’s fish and it was the most beautifully decorated construction paper fish I’d ever seen. It had her daughter’s name in cute little die cut patterned letters, glitter, and a perfectly placed collage of their family’s recent professional photos.
We were supposed to decorate the fish?, I sighed. I thought the kids were going to decorate them!
I didn’t pull it off. I wasn’t the mom who had it all together. On the first day of “school,” Jackson had a sad blank fish.
Fortunately, he’s one and had no idea he was that kid with that mom.
Later, I got a text from his teacher that said “Good eater! He has done sooo well this morning! Perfect child. :)” And when I picked him up the teachers commented at how delicious his lunch looked. I may not be the craftiest mom or the most prompt mom, but I’m raising a good eater! He ate up most of his spinach, bean, and avocado rice pilaf and all of his grapes, and most of his coconut yogurt sprinkled with hemp seeds. He was happy and played well and didn’t cry when I left. He even took a nap on his big boy mat.
Maybe I’m not failing, maybe my priorities have just shifted with motherhood.
But you better believe he’ll have a pimped out fish to bring to school on Thursday morning.
After Mother’s Day Out, Jackson stood at the counter in his FunPod stool and munched on Super Green puffs, while I whipped up this deceptively healthy afternoon pick-me-up for myself. If I still worked at an office, I would totally pack this as my afternoon snack for that slump when you just need a little something to nibble on and a gentle jolt of energy to get through the rest of the day.

When you don’t have time for coffee and breakfast (or a snack)…
Raspberry Mocha Pudding
Ingredients
- 1 container of So Delicious Chocolate Cultured Coconut Milk (or chocolate pudding)
- Slightly less than 1 T. of instant coffee
- 3/4 cup organic raspberries (divided)
- Coconut milk (I used canned coconut milk, but I think any creamer would work — half and half, whipping cream, regular coconut or almond milk)
- Chopped nuts (I used hazelnuts)

Chocolate Coconut Yogurt, Nuvia Instant Coffee, Organic Raspberries
Directions
Blend the chocolate yogurt or pudding and instant coffee. Add 1/2 c. rasberries, pulse for a few seconds. With a spoon, stir in remaining raspberries, cream to taste, and top with chopped nuts (not pictured.)

This was printed from: We Laugh, We Cry, We Cook
The site URL: http://welaughwecrywecook.com
The Title: Rasberry Mocha Pudding
The URL: http://wp.me/p1UwM9-FP
© Copyright 2012 – All Rights Reserved
Powerhouse Chocolate Pudding Pie
Posted: August 15, 2012 Filed under: Breakfast Foods, Uncategorized, Vegan, Vegetarian | Tags: baby friendly desserts, cashew crust, chia seeds, chocolate chia pudding, cocoa powder, gluten-free, guiltless desserts, healthy desserts, healthy snacks for toddlers, no bake, vegan 10 Comments
This treat is sweet and creamy and crunchy and chocolately and HEALTHY. Not just healthy for a dessert or healthy-ish. Every ingredient is nutritious. You could eat it for breakfast or feed it to your kids for breakfast. They’ll think you are the coolest mom, and you will be (for reasons they’ll understand when they are 30).
(Rachel, the daughter)
There’s this cake my mom used to make. You’ve probably had a version of it. It has a shortbread crust, a layer of chocolate pudding and whipped cream topping, and maybe a sweetened cream cheese layer too. In some circles it’s known as “Better Than Sex in a Pan.” I’ve never had sex in a pan, so I can’t attest to that, but I do remember sitting on a bar stool at the kitchen island eating it strait out of the pan and being very satisfied.
It’s been a long time since I’ve had it (the dessert, that is), but I’ve been craving that shortbread crust and chocolate pudding combination for the last few weeks and trying to think of a healthy vegan version. Yesterday, I saw a recipe for chocolate chia pudding on the Engine 2 Diet’s Facebook page. They had frozen it into “fudgsicles.” Clever. Immediately, I was reminded of my favorite crust that I use in my frozen No Bake Apricot Bars. Made out of cashews and oats, it is rich and buttery like a shortbread cookie. It would be perfect for a cold puddin’ pie.
Chia seeds are like a nutritional powerhouse and they have virtually no taste. I put a tablespoon in my oatmeal and my smoothies. They basically offer all the nutrition of flax seeds, except they don’t have to be ground for our body to absorb the nutrients and they don’t have a strong taste like I find flax often does. The seeds absorb liquid and become gel-like, which is how they turn almond milk into “pudding.”

Chia Seeds
Jackson devoured the pudding and the frozen bar I gave him. I used dates to sweeten it, so I had absolutely no reason to feel guilty for giving my one-year old this dessert. In fact, it’s good for him. He needs the healthy fats from the cashews, coconut oil, and coconut milk; the fiber and protein from the oats; the omegas from the chia seeds; and the heart and skin protection from the flavonoids in cocoa powder (a super food for toddlers).

My little puddin’ pie. Why do boys always get the long eyelashes?
Oh, and I assure you, I don’t post a recipe I don’t love…so you know I loved it just as much as Mr. Long Lashes up there did.

Served frozen (as shown here) or refrigerated (as shown at the top of the post).
Powerhouse Chocolate Pudding Pie
Inspired by FatFree Vegan and Oh She Glows (two of my favorite vegan bloggers)
(NOTE: Plan ahead for this recipe. The pudding must sit for at least an hour and up to overnight.)
Pudding
- 1 c. nondairy unsweetened milk
- 3 T. full fat coconut milk (from a can)*
- 3 dates, pitted and chopped (soak in a little warm water if they are tough or your blender isn’t very strong)
- 2 t. unsweetened cocoa powder
- 1/2 t. vanilla extract
- 3 T. chia seeds
Crust:
- 3/4 c. whole cashews (raw, toasted, roasted – whatever you have)
- 3/4 c. regular oats (for Gluten-free, use GF oats)
- 1/4 t. kosher salt (omit if cashews are salted)
- 3 medgool dates, roughly chopped
- 1/8 cup coconut oil, melted
Optional Toppings
- Sliced Bananas
- Toasted coconut
- Toasted almonds
- Whipped coconut cream
Kitchen Gadgets
- Blender
- Food processor

Pudding Ingredients
Directions
Pudding
In a blender, combine the first five pudding ingredients. Pour into a tupperware bowl with a lid and add chia seeds. Use a whisk or fork to stir in chia seeds. Stir every five minutes or so until all the chia seeds have started to swell a little and turn light grey. Cover and store in the refrigerator for a minimum of an hour, overnight is best. Stir it every so often if you can. You are looking for the seeds to lose all of their crunch and absorb the liquid until it looks like pudding.

The chia seeds immediately start to thicken the almond milk mixture. This is after stirring a couple of times.
Crust
Spray an 8×8 pan with non-stick cooking spray. In a food processor, process cashews, salt, and oats until a fine crumble forms. Add dates and process until crumbly again. Add coconut oil and process until sticky. Press into pan to form a crust. Freeze for five minutes to harden or until the pudding is ready.

My favorite crust for no-bake desserts.
Pour the pudding over the crust and either refrigerate or freeze. Either way is delicious. The refrigerated version is a little crumblier and I’m assuming only keeps for a day or two. I loved it with a few sliced bananas on top. The frozen version comes out in nice bars and if kept covered tightly should keep for a few weeks.
(Update: After two batches and several taste tests, I decided I prefer it refrigerated rather than frozen. Both are good, but the refrigerated version reminds me of chocolate cream pie…mmmm.)
*Freeze leftover coconut milk in an ice cube tray. You can add it to smoothies, oatmeal, or make coconut covered cherries with it later.
This was printed from: We Laugh, We Cry, We Cook
The site URL: http://welaughwecrywecook.com
The Title: Powerhouse Chocolate Pudding Pie
The URL: http://wp.me/p1UwM9-CK
© Copyright 2012 – All Rights Reserved
Chicken Tortilla Soup
Posted: July 16, 2012 Filed under: Chicken, Gluten Free, Mexican Dishes, Soups, Uncategorized, Vegan Options, Vegetarian | Tags: beans, chicken tortilla soup, corn, meals for a crowd, mexican soup, vacation, vegan, vegetarian tortilla soup 2 Comments
Becky’s Chicken Tortilla Soup
(The Mama)
Greg and I are in Neskowin, Oregon this week — a tiny little beach town with impossibly cute houses surrounded by brilliantly colored flowers, some blossoms as big as dinner plates. I hit the beach cooking, barely having time to gather in a car load of groceries before cooking dinner for a dozen on Saturday night (sour cream chicken enchiladas). Yesterday, I cooked lunch for 22 of Greg’s extended family members dropping by to hug, share stories and sit a spell between strolls to the beach. Greg lost both of his parents when they were just in their 50’s (our age!) so connections to them now — people and places — are doubly meaningful. Since Greg and his siblings were young, Neskowin was the family vacation spot and is where all of them return to, as Greg says, “fill our souls.” So while they are filling their souls, I am filling their tummies.
For the lunch crowd, I served sandwiches and tortilla soup, with blueberry-raspberry bars for dessert. It was perfect for a cool, foggy day at the beach, huddled up with people we love. Plus it makes a bunch!!

Becky’s Chicken Tortilla Soup
Becky’s Chicken Tortilla Soup
Ingredients
1 seeded red bell pepper
1/2 red onion
3 cloves garlic
2 t. poultry seasoning
2 t. cumin
1 T. brown sugar
1 to 2 chipotle peppers in adobo sauce (medium to hot heat level), available in small cans in Mexican and Spanish food section of market.*
1 28-ounce can fire roasted crushed tomatoes, divided in half
4 cups chicken or veggie broth (divided 1 and 3)
3 to 4 cups roasted chicken, pulled off bone and diced or shredded ( roasted chickens are available in most grocery delis)
1 cup frozen corn
1 zucchini, dice
steak or grill seasoning (or salt and pepper), to taste
1/4 cup bar-b-que sauce
1/2 cup heavy cream (optional)
Topping Options:
crushed tortilla chips
grated cheese
chopped green onions
diced avocados
sour cream or Greek Yogurt
wedges of fresh lime
cilantro
Directions
In a blender or food processor put the first seven ingredients (bell pepper through chipotles), half of the crushed tomatoes, and one cup of broth. Blend well.
Pour this mixture into big soup pot and add the rest of the crushed tomatoes and broth.
To this add frozen corn, chicken, and zucchini.
Simmer over medium heat until zucchini is tender and soup is heated through. Season with Steak or Grill Seasoning (or salt and pepper) to taste. To make a creamier soup, you can add 1/2 cup of cream.
To serve, put a handful of crushed tortilla chips in the bottom of each soup blow. Carefully ladle on soup, then top with your choice of toppings.
Vegetarian Version: Use veggie broth, pinto, ranch or black beans in place of chicken. Vegans omit cheese and cream
*I keep the leftover Chipotles in Adobo Sauce in a small Ziploc bag in the freezer and break off what I need to add depth of flavor and heat to other Mexican dishes.
This was printed from: We Laugh, We Cry, We Cook
The site URL: http://welaughwecrywecook.com
The Title: Chicken Tortilla Soup
The URL: http://wp.me/p1UwM9-wA
© Copyright 2012 – All Rights Reserved


