
Baked Zucchini Fries (Vegan)
Posted: November 20, 2013 Filed under: Uncategorized | Tags: baked zucchini fries, dairy-free, egg-free, healthy sides, vegan Leave a comment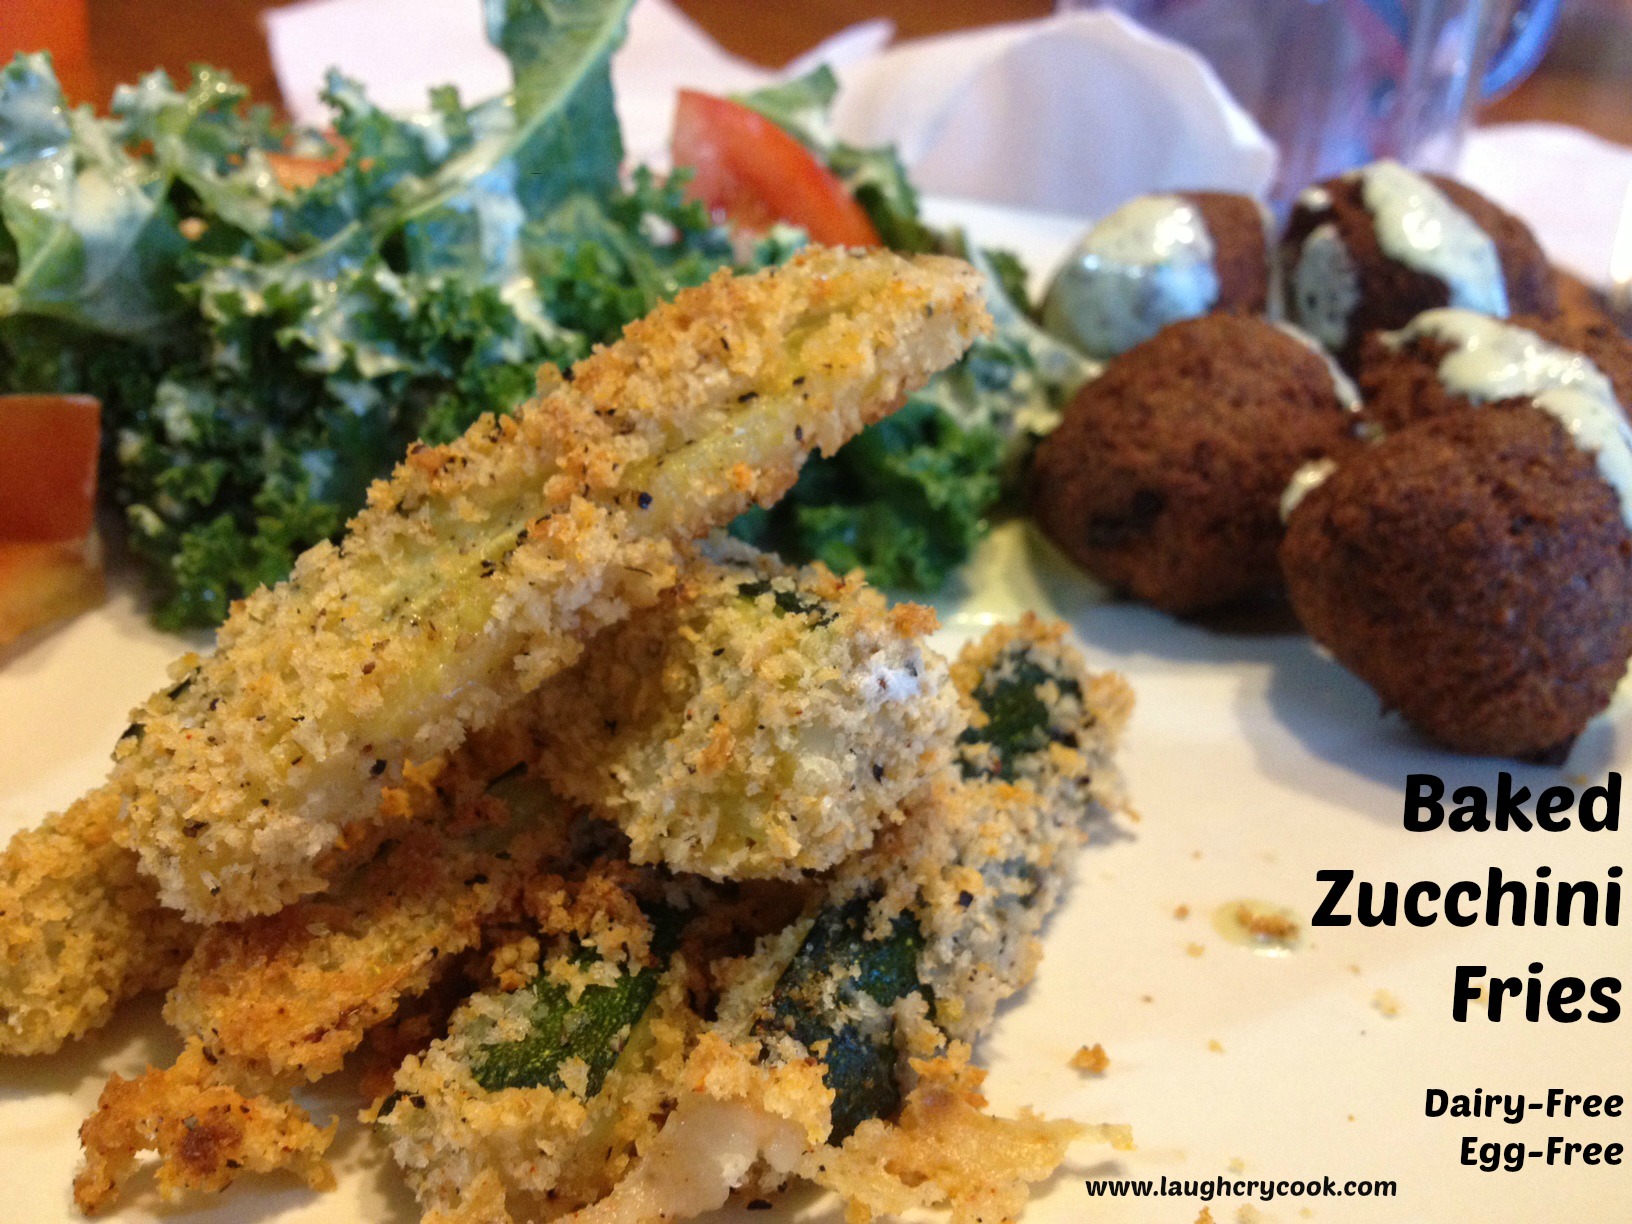
These Baked Zucchini Fries have started making a regular appearance on our family’s menu . When they cook, the zucchini gets soft and almost buttery, but the outside creates a crunchy shell. It’s a little like biting into a nutty chocolate truffle. You have to bite down with a little force to get through the crunchy exterior and then your mouth gets a surprise as your teeth quickly sink into the pillowy soft middle.
Sorry if I just took you from craving zucchini to craving chocolate in one paragraph. Come back! You won’t be disappointed. In fact, I’d pick a box of zucchini fries over a box of chocolate truffles any day. Unlike a box of chocolates, I know exactly what I’ll get in each bite…and it’s delicious.
I like serving them instead of garlic bread on pasta night. The bread coating gives you a little carb crunch, but unlike garlic bread, it also sneaks in a serving of veggies. I also paired them with The Gluten-Free Vegan’s Falafel recipe. I don’t recommend making both on one night, as that would be a labor intensive evening, but the falafel freeze wonderfully and can re-heat right in the oven with the zucchini fries.

Baked Zucchini Fries
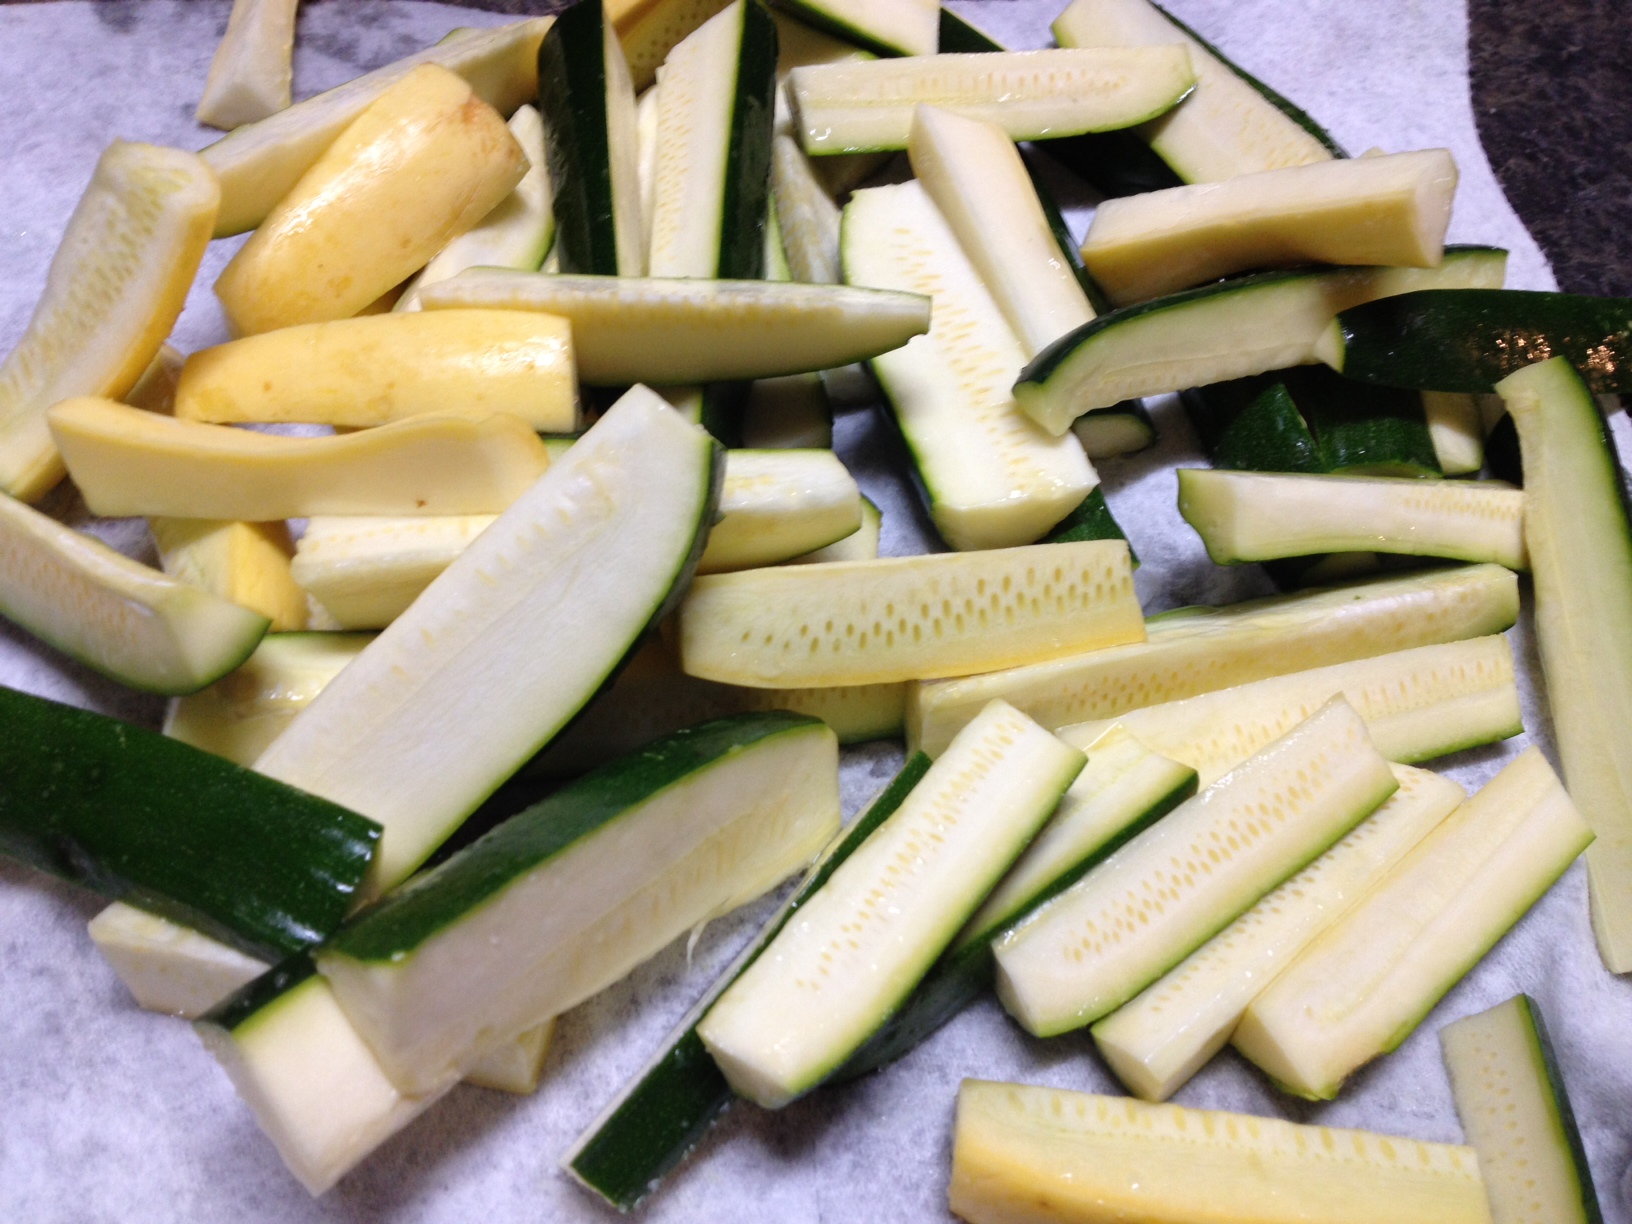
I didn’t do exact measurements here. You can do as few as one zucchini or as many as you want. I usually do three to four for our family of three. Simply refill your dredging station as you run out. If you can’t fit them all on one pan, add another pan and bake at the same time.
Zucchini Squash (cut like steak fries) (Yellow squash works too)
Olive Oil Baking Spray
Flour
Unsweetened Almond Milk (or your choice of milk)
Panko Bread Crumbs
Salt
Pepper
Smoked Paprika (or regular paprika)
Italian Seasoning (you could also use a steak seasoning or any other favorite spice blend)
1.Preheat oven to 400.
2. Line cut squash on a bed of paper towels. Sprinkle with salt and let sit for 20 minutes.
3. Spray a baking sheet with olive oil spray.
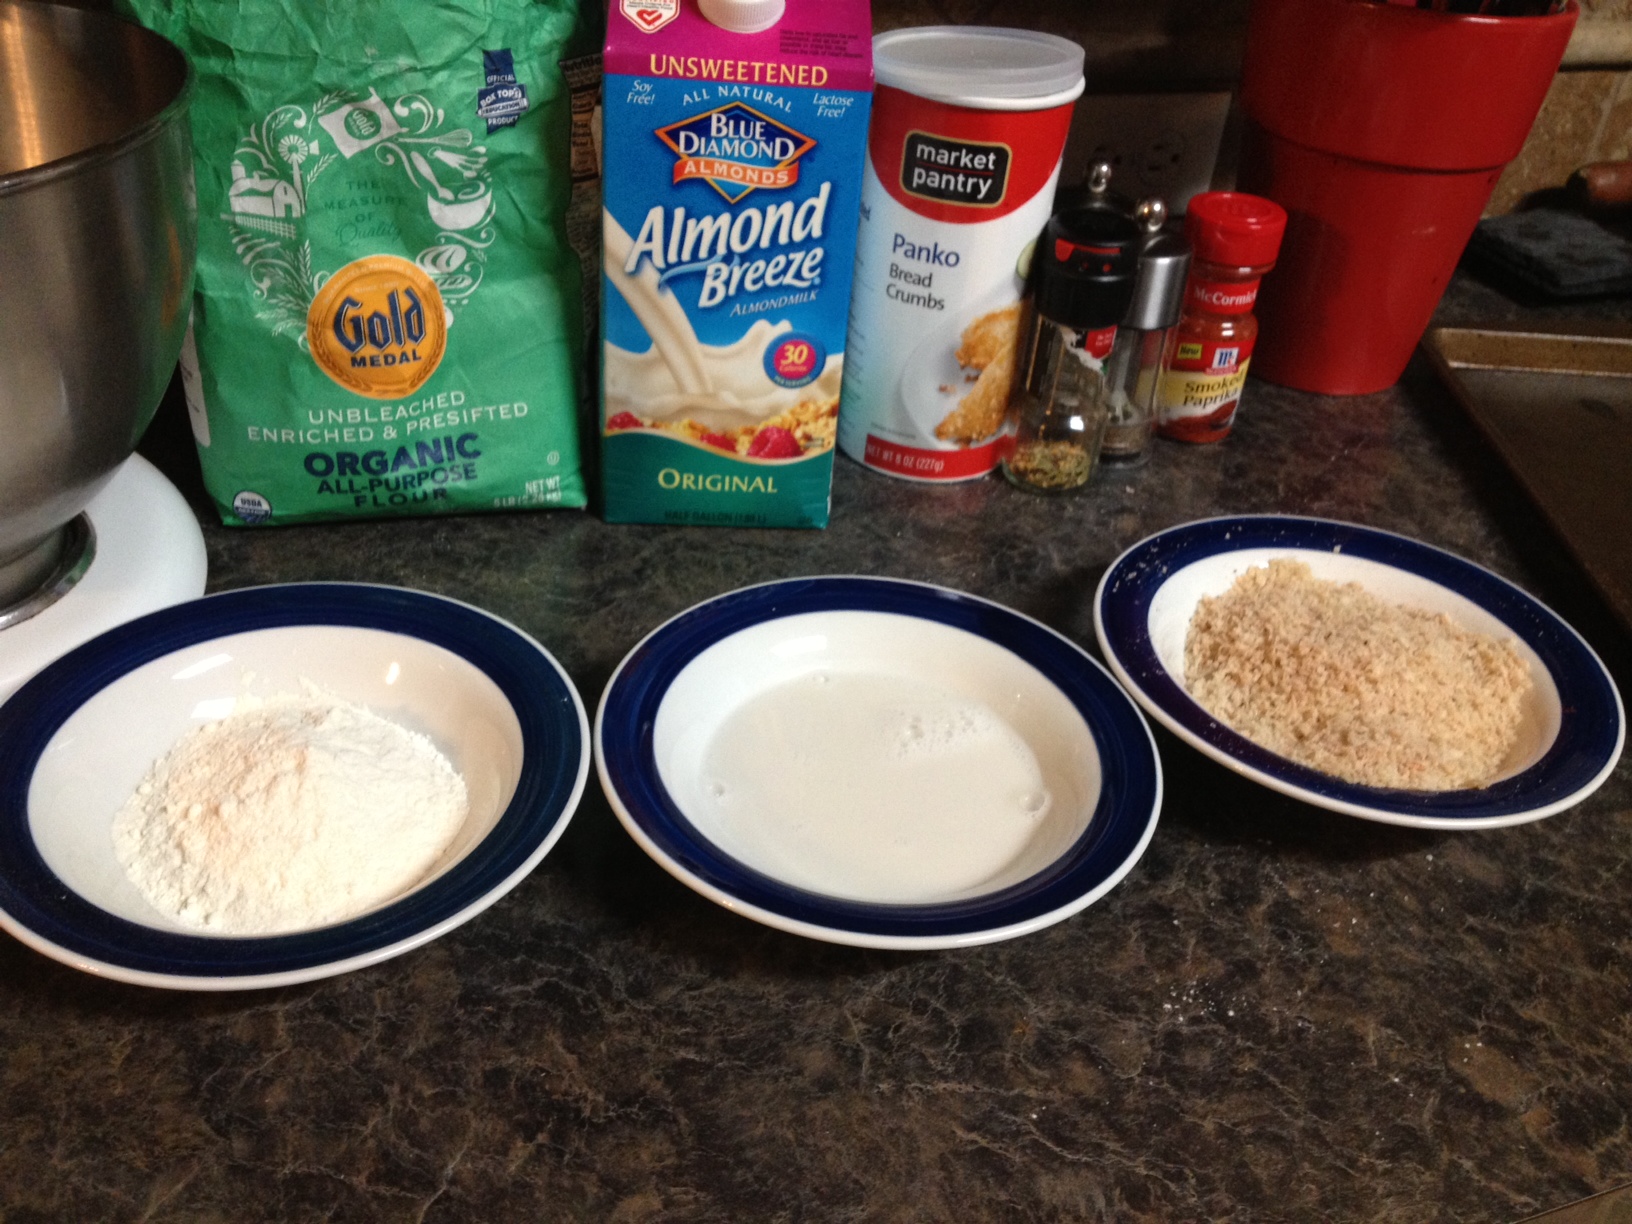
4. Make dredging station: Put flour in a bowl, milk in a bowl, and bread crumbs in a bowl. Stir in salt, pepper, smoked paprika, and Italian seasoning into the bread crumbs (about 1/2 teaspoon each seasoning to 1 cup of bread crumbs).
5. Pat the zucchini dry.
6. Dredge: Dip them one or two at a time into the flour. Tap off excess flour. Dip into milk. Dip into bread crumbs. Place on baking sheet. Repeat until all zucchini are dredged.
7. Spray zucchini generously with olive oil baking spray.
8. Bake for 20-25 minutes until coating is crispy and brown and the inside is soft and buttery.
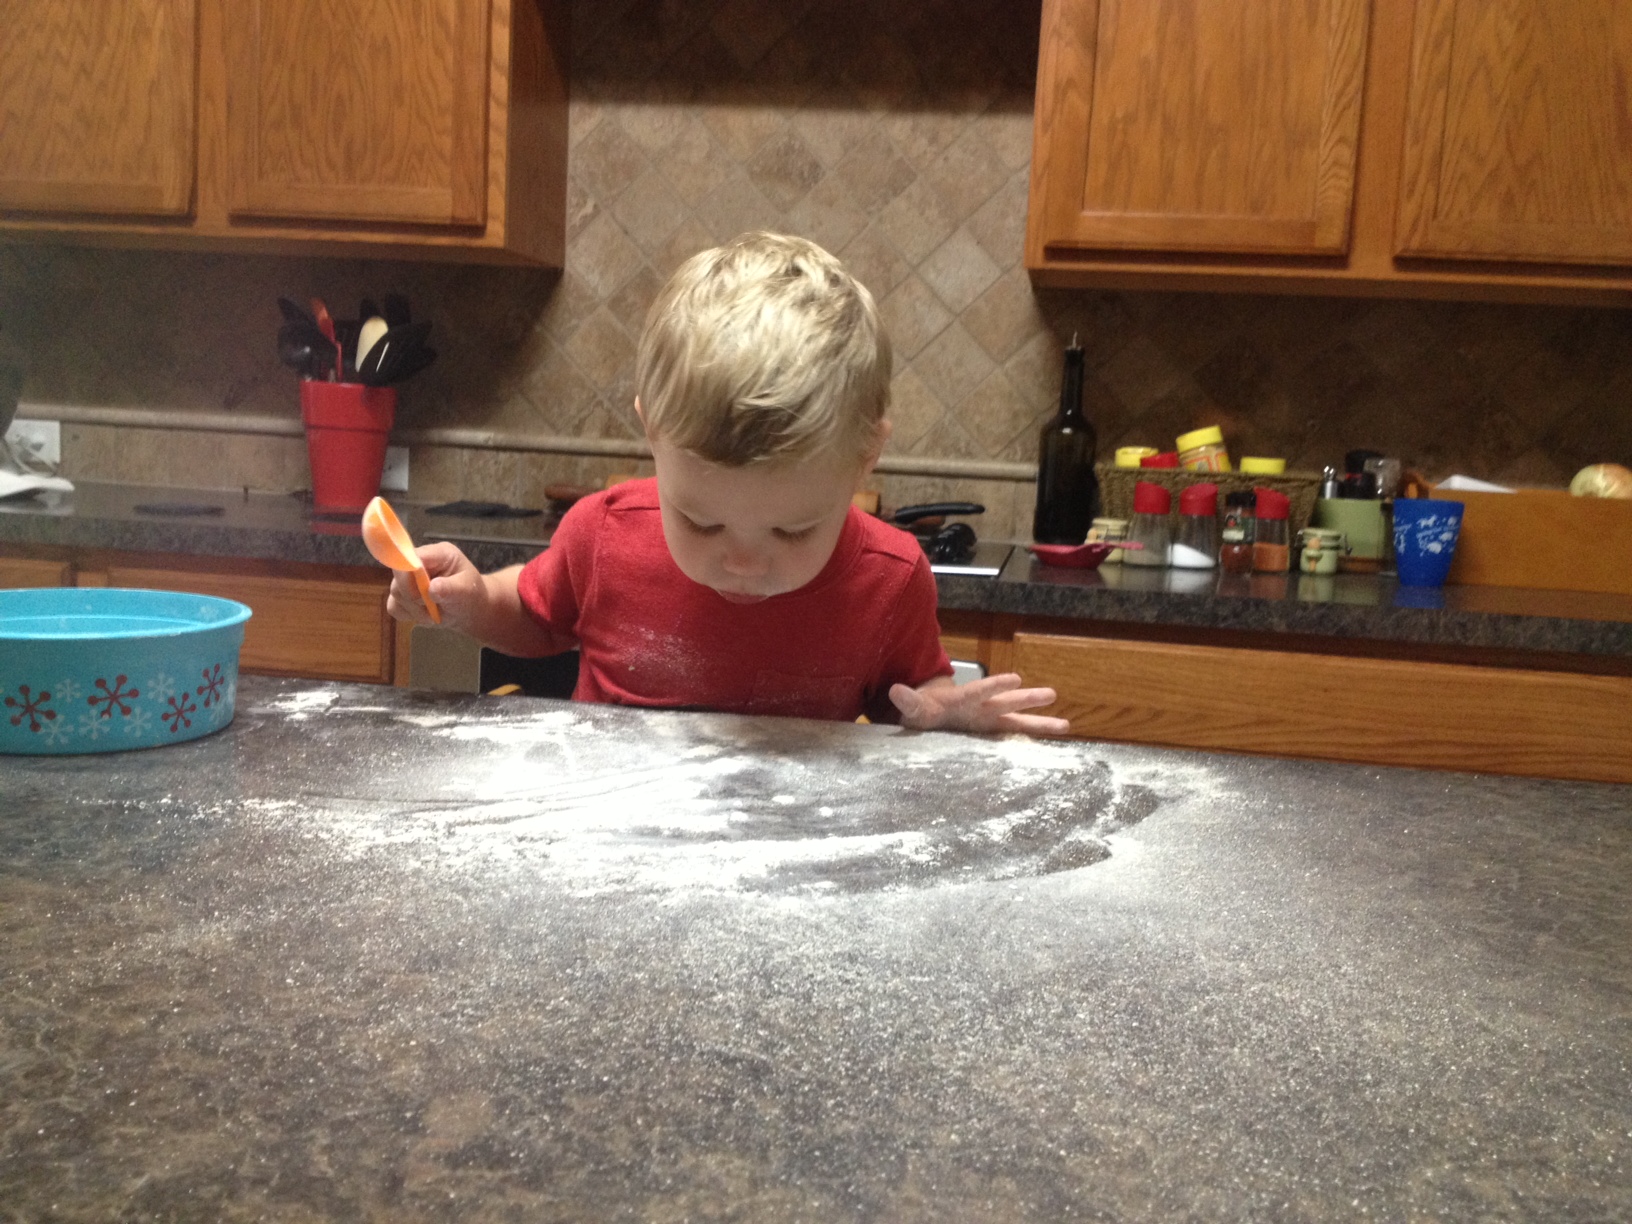 If you end up with extra flour, your child or grandchild will get a big kick out of blowing it across the counter. Embrace it. You’ll have to sweep after this dish anyway. 🙂
This was printed from: We Laugh, We Cry, We Cook
The site URL: http://welaughwecrywecook.com
The Title: Baked Zucchini Fries
The URL: http://wp.me/p1UwM9-16G
Banana Nut Soft Serve [Two Ingredients, Dairy-Free, Sugar Free]
Posted: June 8, 2013 Filed under: Breakfast Foods, Desserts, Fruit Dishes, Gluten Free, Snacks, Toddler-Approved, Uncategorized, Vegan, Vegetarian | Tags: banana nut soft serve, banana soft serve recipe, dairy-free, gluten-free, peanuts, sugar-free, vegan Leave a comment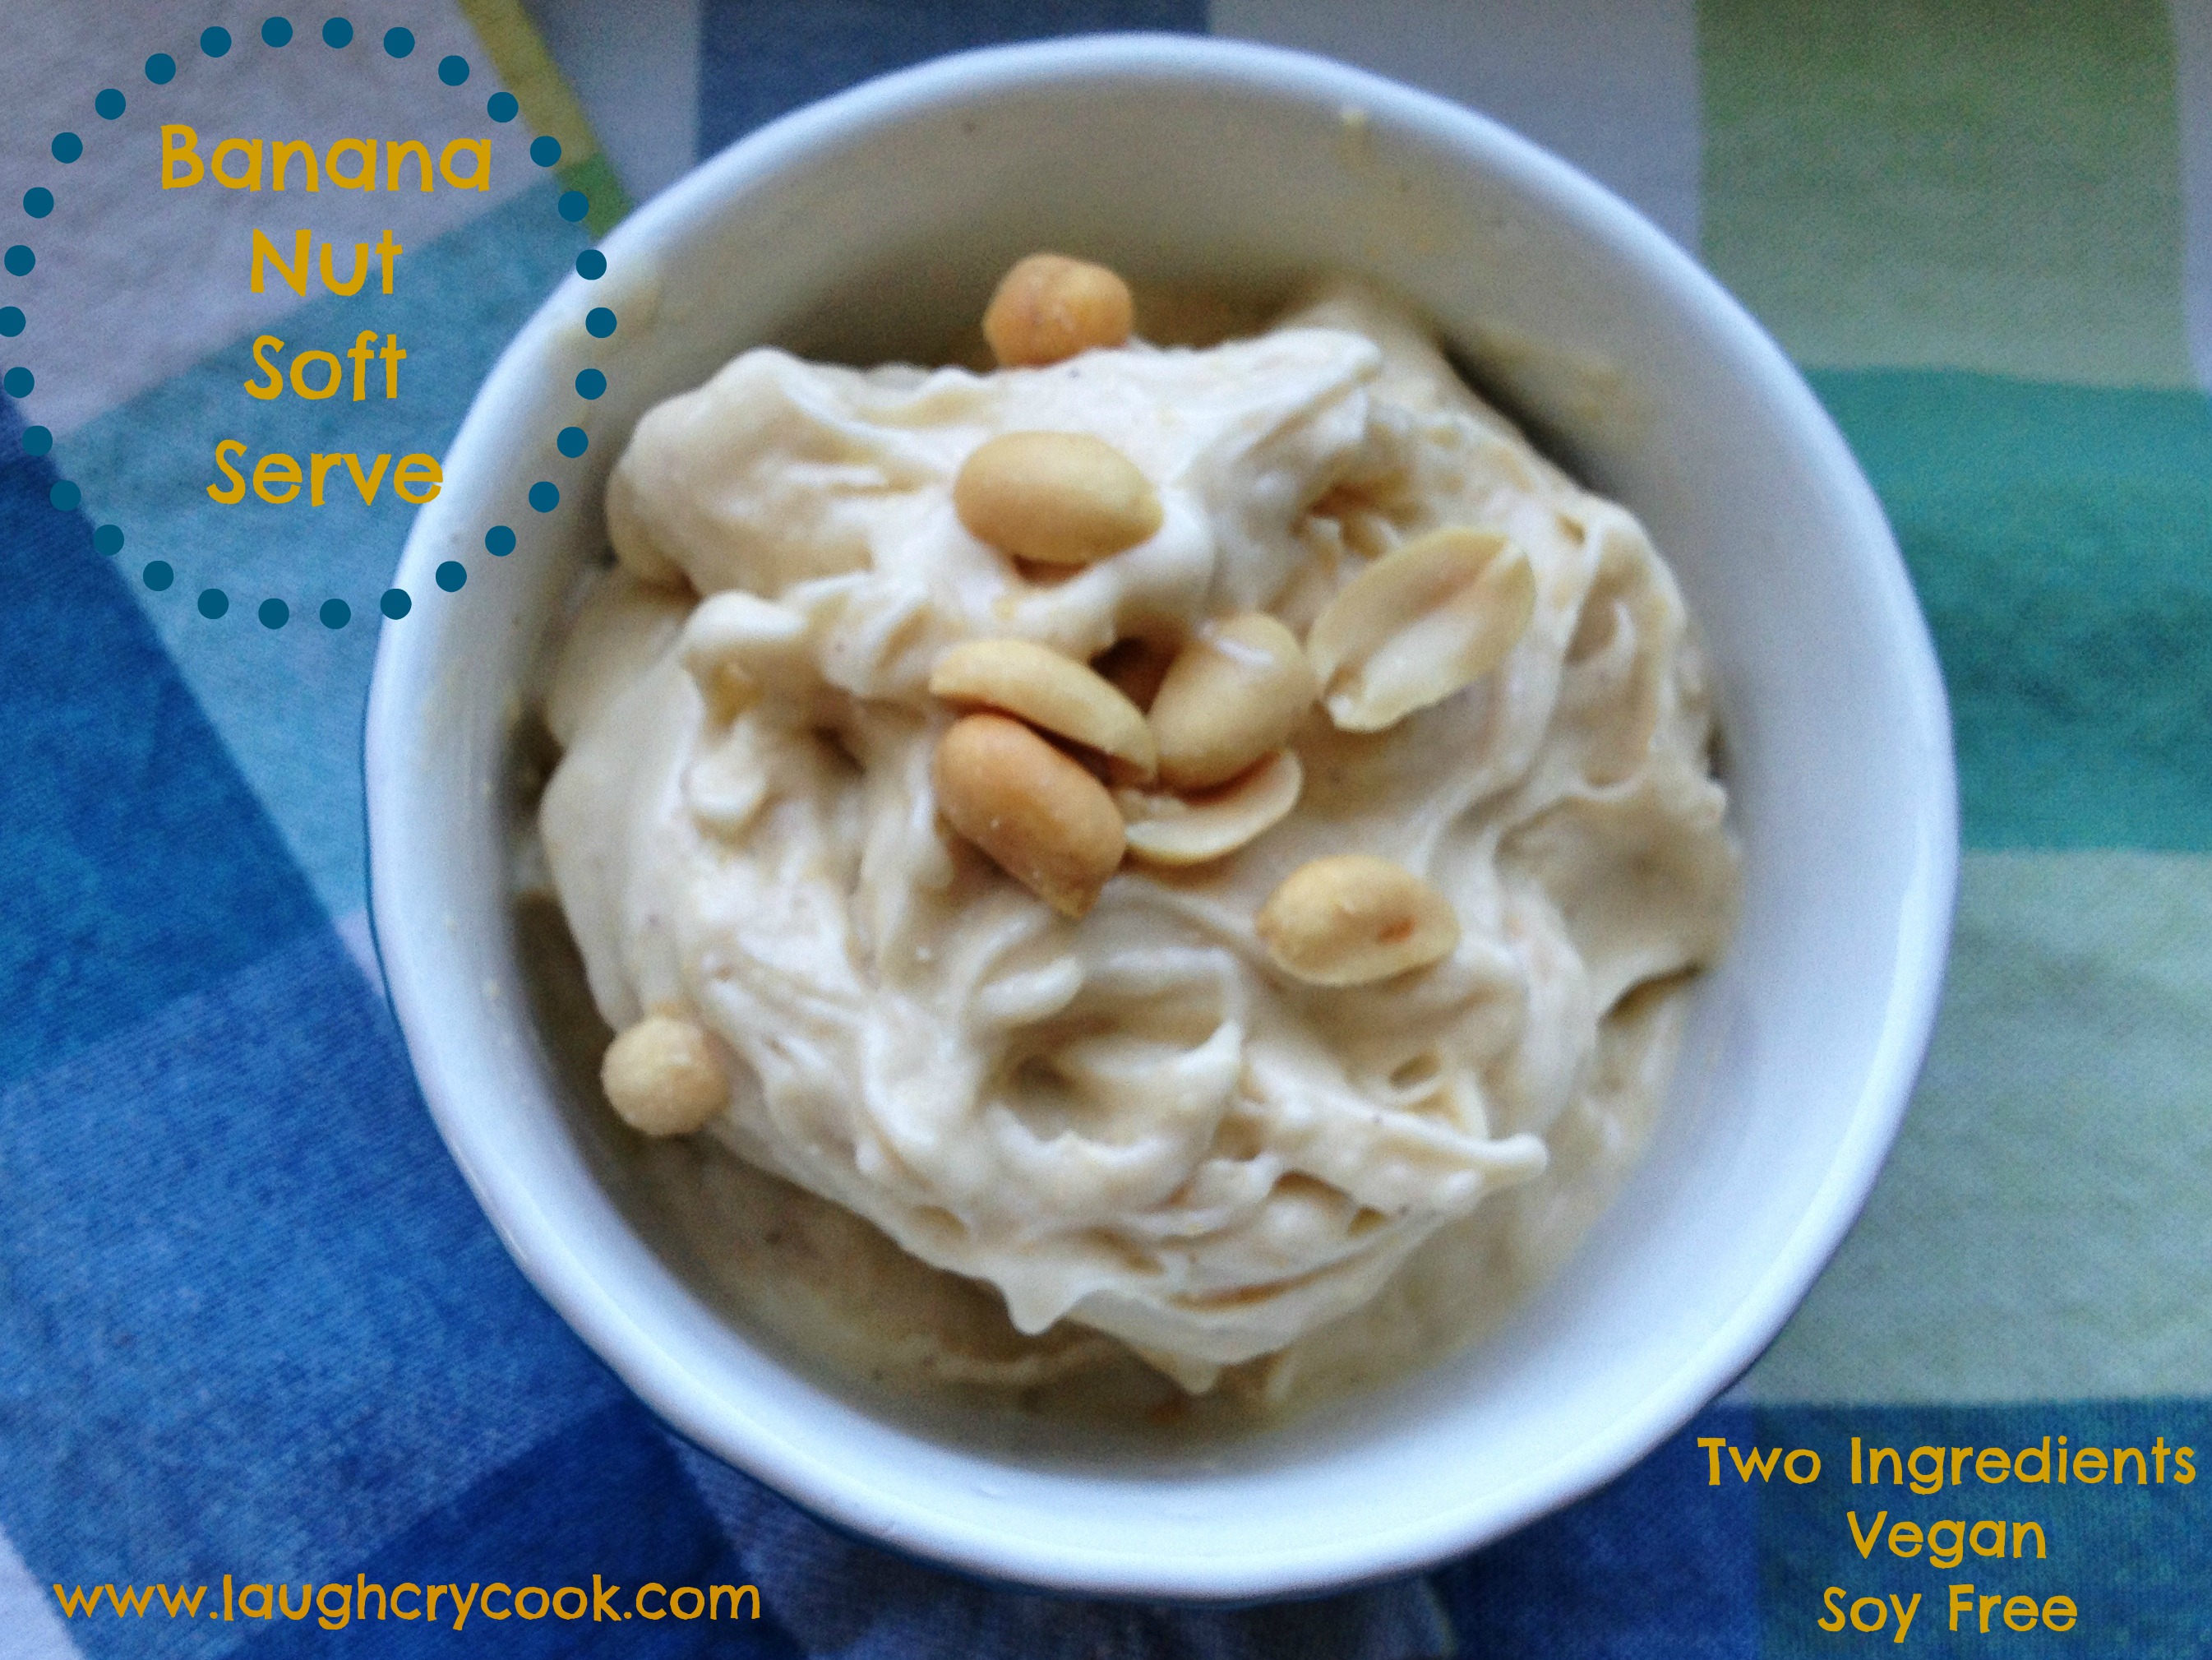
Jackson is 22 months old now and at that stage where he’s learning new words every day and starting to string together words to make phrases and sentences like these:
“Hoo Hoo” (Whoohoo whith his hands thrown in the air.)
“Cool man” (I don’t know where he picked up this phrase, but it’s super cute.)
“Yayyy, I did it!” (Even if he didn’t actually do whatever IT is, he celebrates every little effort with such enthusiasm. It’s contagious.)
“Leeeeeet’s GO!” (That combined with “Run momma” is turning him into a little personal trainer!)
“Yes.” (Finally, he is saying “yes,” instead of always “no,” in the most adorably assertive and confident way.)
Of course, with this precious phase, also comes the less than adorable phrases, like “Chur turn” (Your turn…which actually means my turn. And it’s always “chur turn”) and “Miiiine!”
My favorite phrase of late, though, is “Tank choo ma ma.” He emphasizes each syllable and I can tell he really has to work to say it. It’s a sweet labor of love and it’s reserved for his truly most satisfying moments of deep gratitude, like when I served him chocolate “ice cream” made of bananas and cocoa for a morning snack last week. “Choc! Tank choo ma ma!”
This idea for banana soft serve has been circulating for years. It’s not new, but I’ve turned a few people toward it this week with my Instagram picture of Jackson enjoying his morning ice cream treat and thought maybe some of our readers have yet to try it as well. The basic recipe is just frozen bananas processed in a blender. It’s magical! The bananas just whip right into a thick creamy soft serve that is delicious on it’s own. You can make all sorts of flavors: chocolate peanut butter, strawberry banana, cinnamon and sugar…wherever your taste buds take you. This version is one of my favorites. You can use peanut butter instead of peanuts, but I really love the texture and flavor from the whole peanuts.
Ready in under five minutes, it makes the perfect healthy summer snack, or even breakfast. You’ll earn some serious cool mom or dad points putting a bowl of this in front of your kids first thing in the morning!

Banana Nut Soft Serve
Serves 2
Ingredients
2 frozen bananas, cut into 1-2 inch pieces
2 tablespoons peanuts (I used organic unsalted)
sprinkle of sea salt (unless peanuts are salted)
Directions
Put ingredients in a food processor and blend, stopping and scraping the sides as needed until it turns to the texture of a thick soft serve ice cream. Then stop. You don’t want to over blend or it will have more of a melty soft serve texture (not bad, but not as good either).
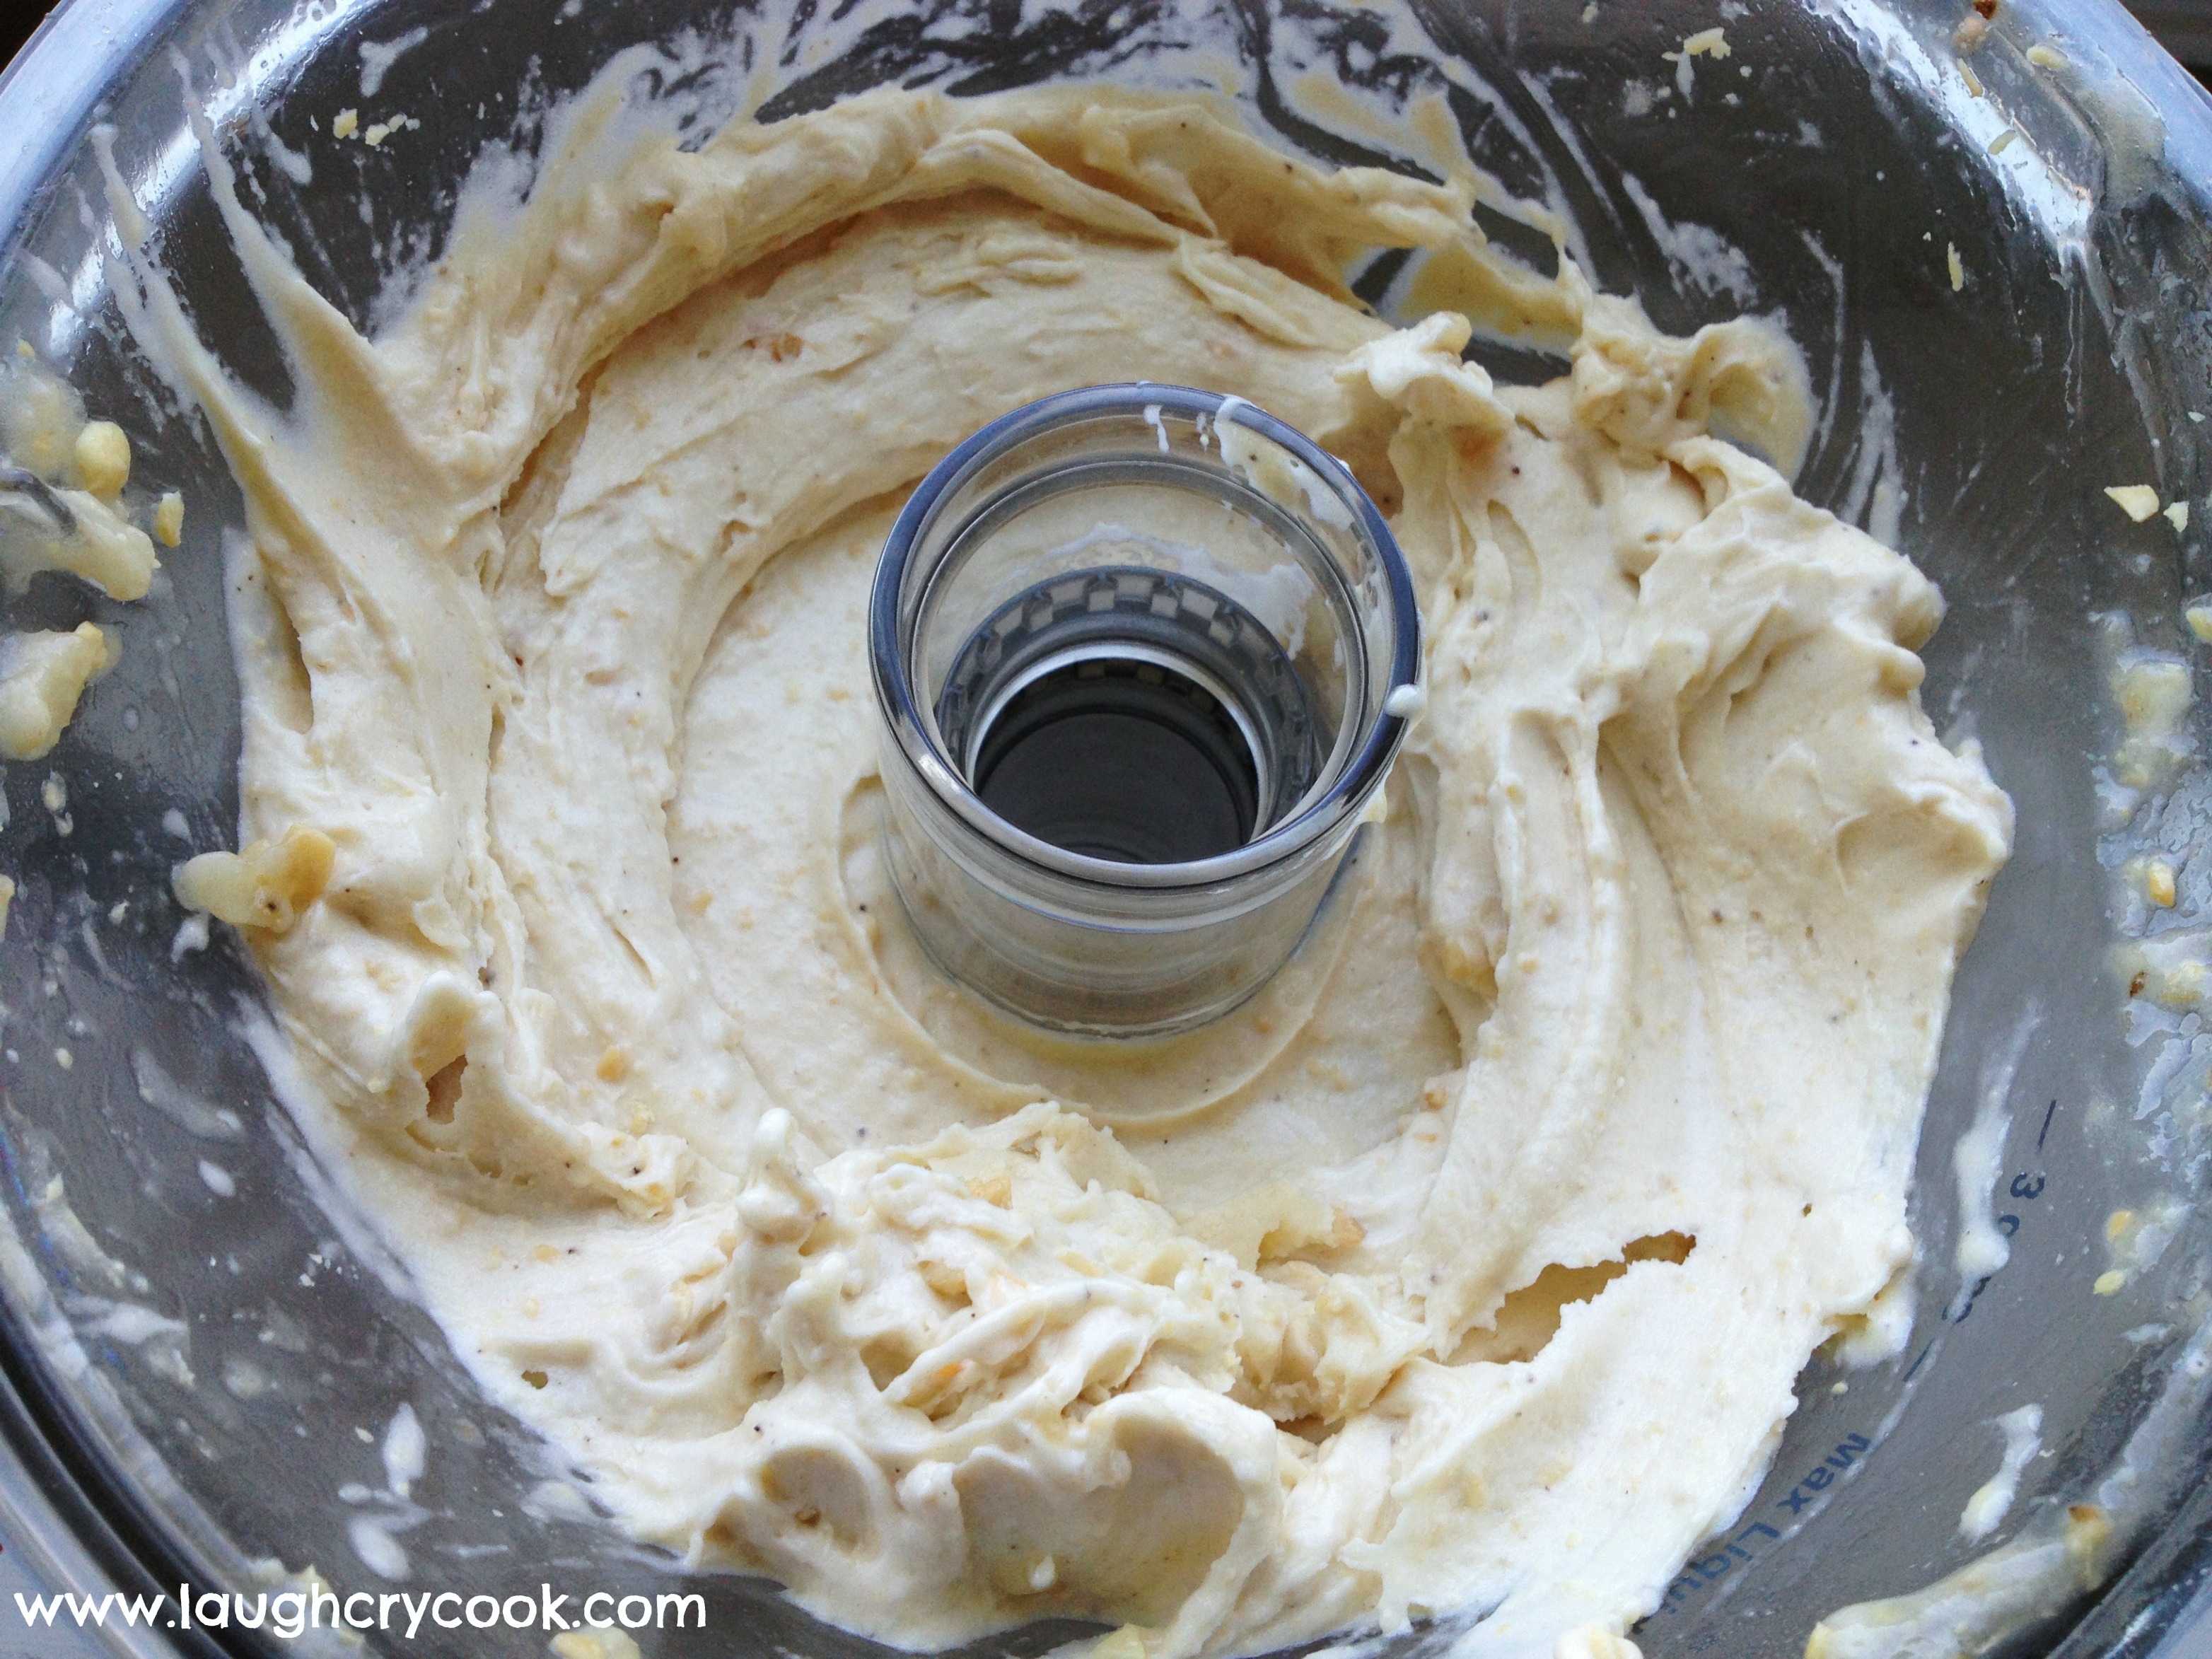
For this portion size, I use the smallest bowl on my food processor so I don’t have to stop and scrape the sides as often. (It will be very loud at first, that’s okay, just be prepared.)
Serve immediately with a few extra peanuts and another sprinkle of sea salt on top for some extra crunch. I’ve heard this does not refreeze well, though I’ve never had any left to try. 🙂 You can buy yourself a little time keeping it chilled in the freezer, but it’s best to serve right away.
This was printed from: We Laugh, We Cry, We Cook
The site URL: http://welaughwecrywecook.com
The Title: Banana Nut Soft Serve
The URL: http://wp.me/p1UwM9-ZP
Have you made Banana Soft Serve?
What are your favorite flavor combinations?
What are your favorite toddler phrases and phases?
A little book update:
Zondervan, our publisher, has been so supportive of our book (coming out August 6). We’re having such a great publishing experience! They just decided to do an audio version of We Laugh, We Cry, We Cook and invited my mom and I to record it. One of us will be recording in the studio most of the week, each of us having two 5-7 hour days in studio. Prayers for good health appreciated. The following week I’m heading to Colorado (with Jackson in tow) to join mom for a photo shoot for a major Christian publication. We’re so grateful for all the encouragement and support we’ve received…and for our fabulous readers at the blog.
We also got all of the endorsements in for the book. Wow! We are floored by the generosity of our fellow authors. Click on the picture of the book above to read the endorsements and find lots of knew authors to friend and follow.
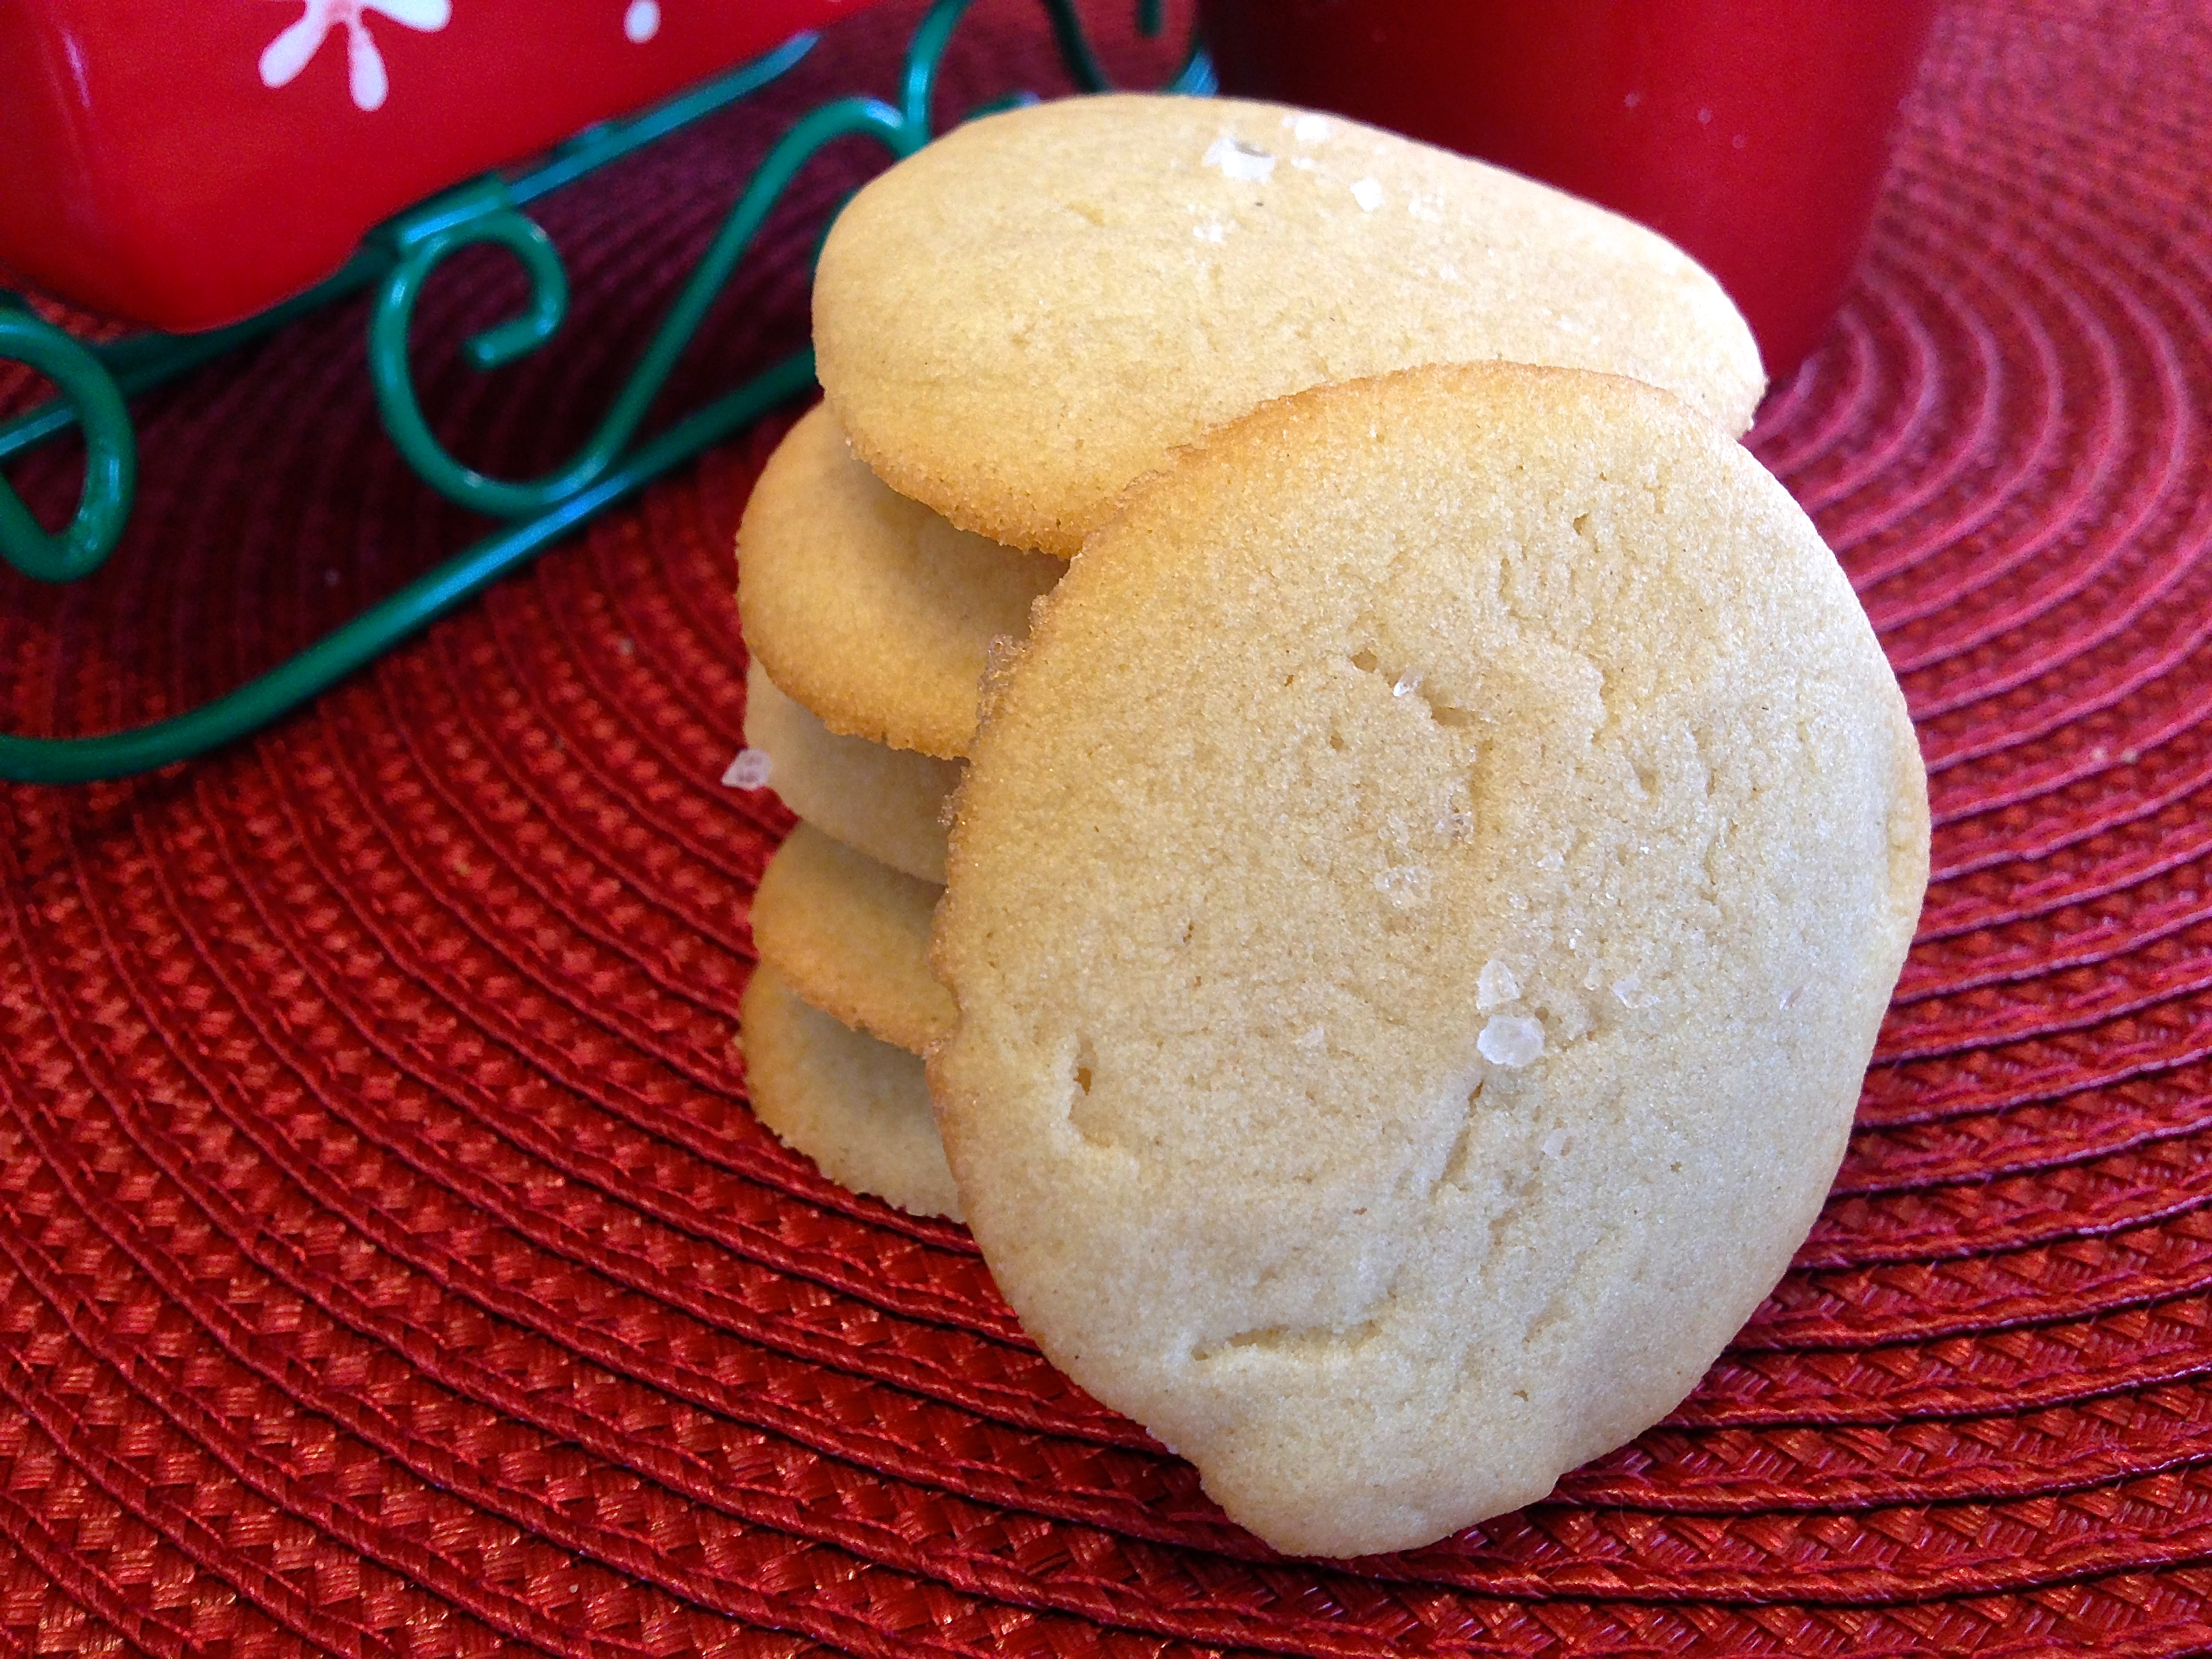
Five-Ingredient, 10-minute Sugar Cookies (dairy-free, egg-free)
Posted: December 6, 2012 Filed under: Desserts, Vegan, Vegetarian | Tags: agave sugar cookies, dairy-free, egg-free, maple syrup sugar cookies, quick and easy five-ingredient sugar cookies, vegan sugar cookies 2 Comments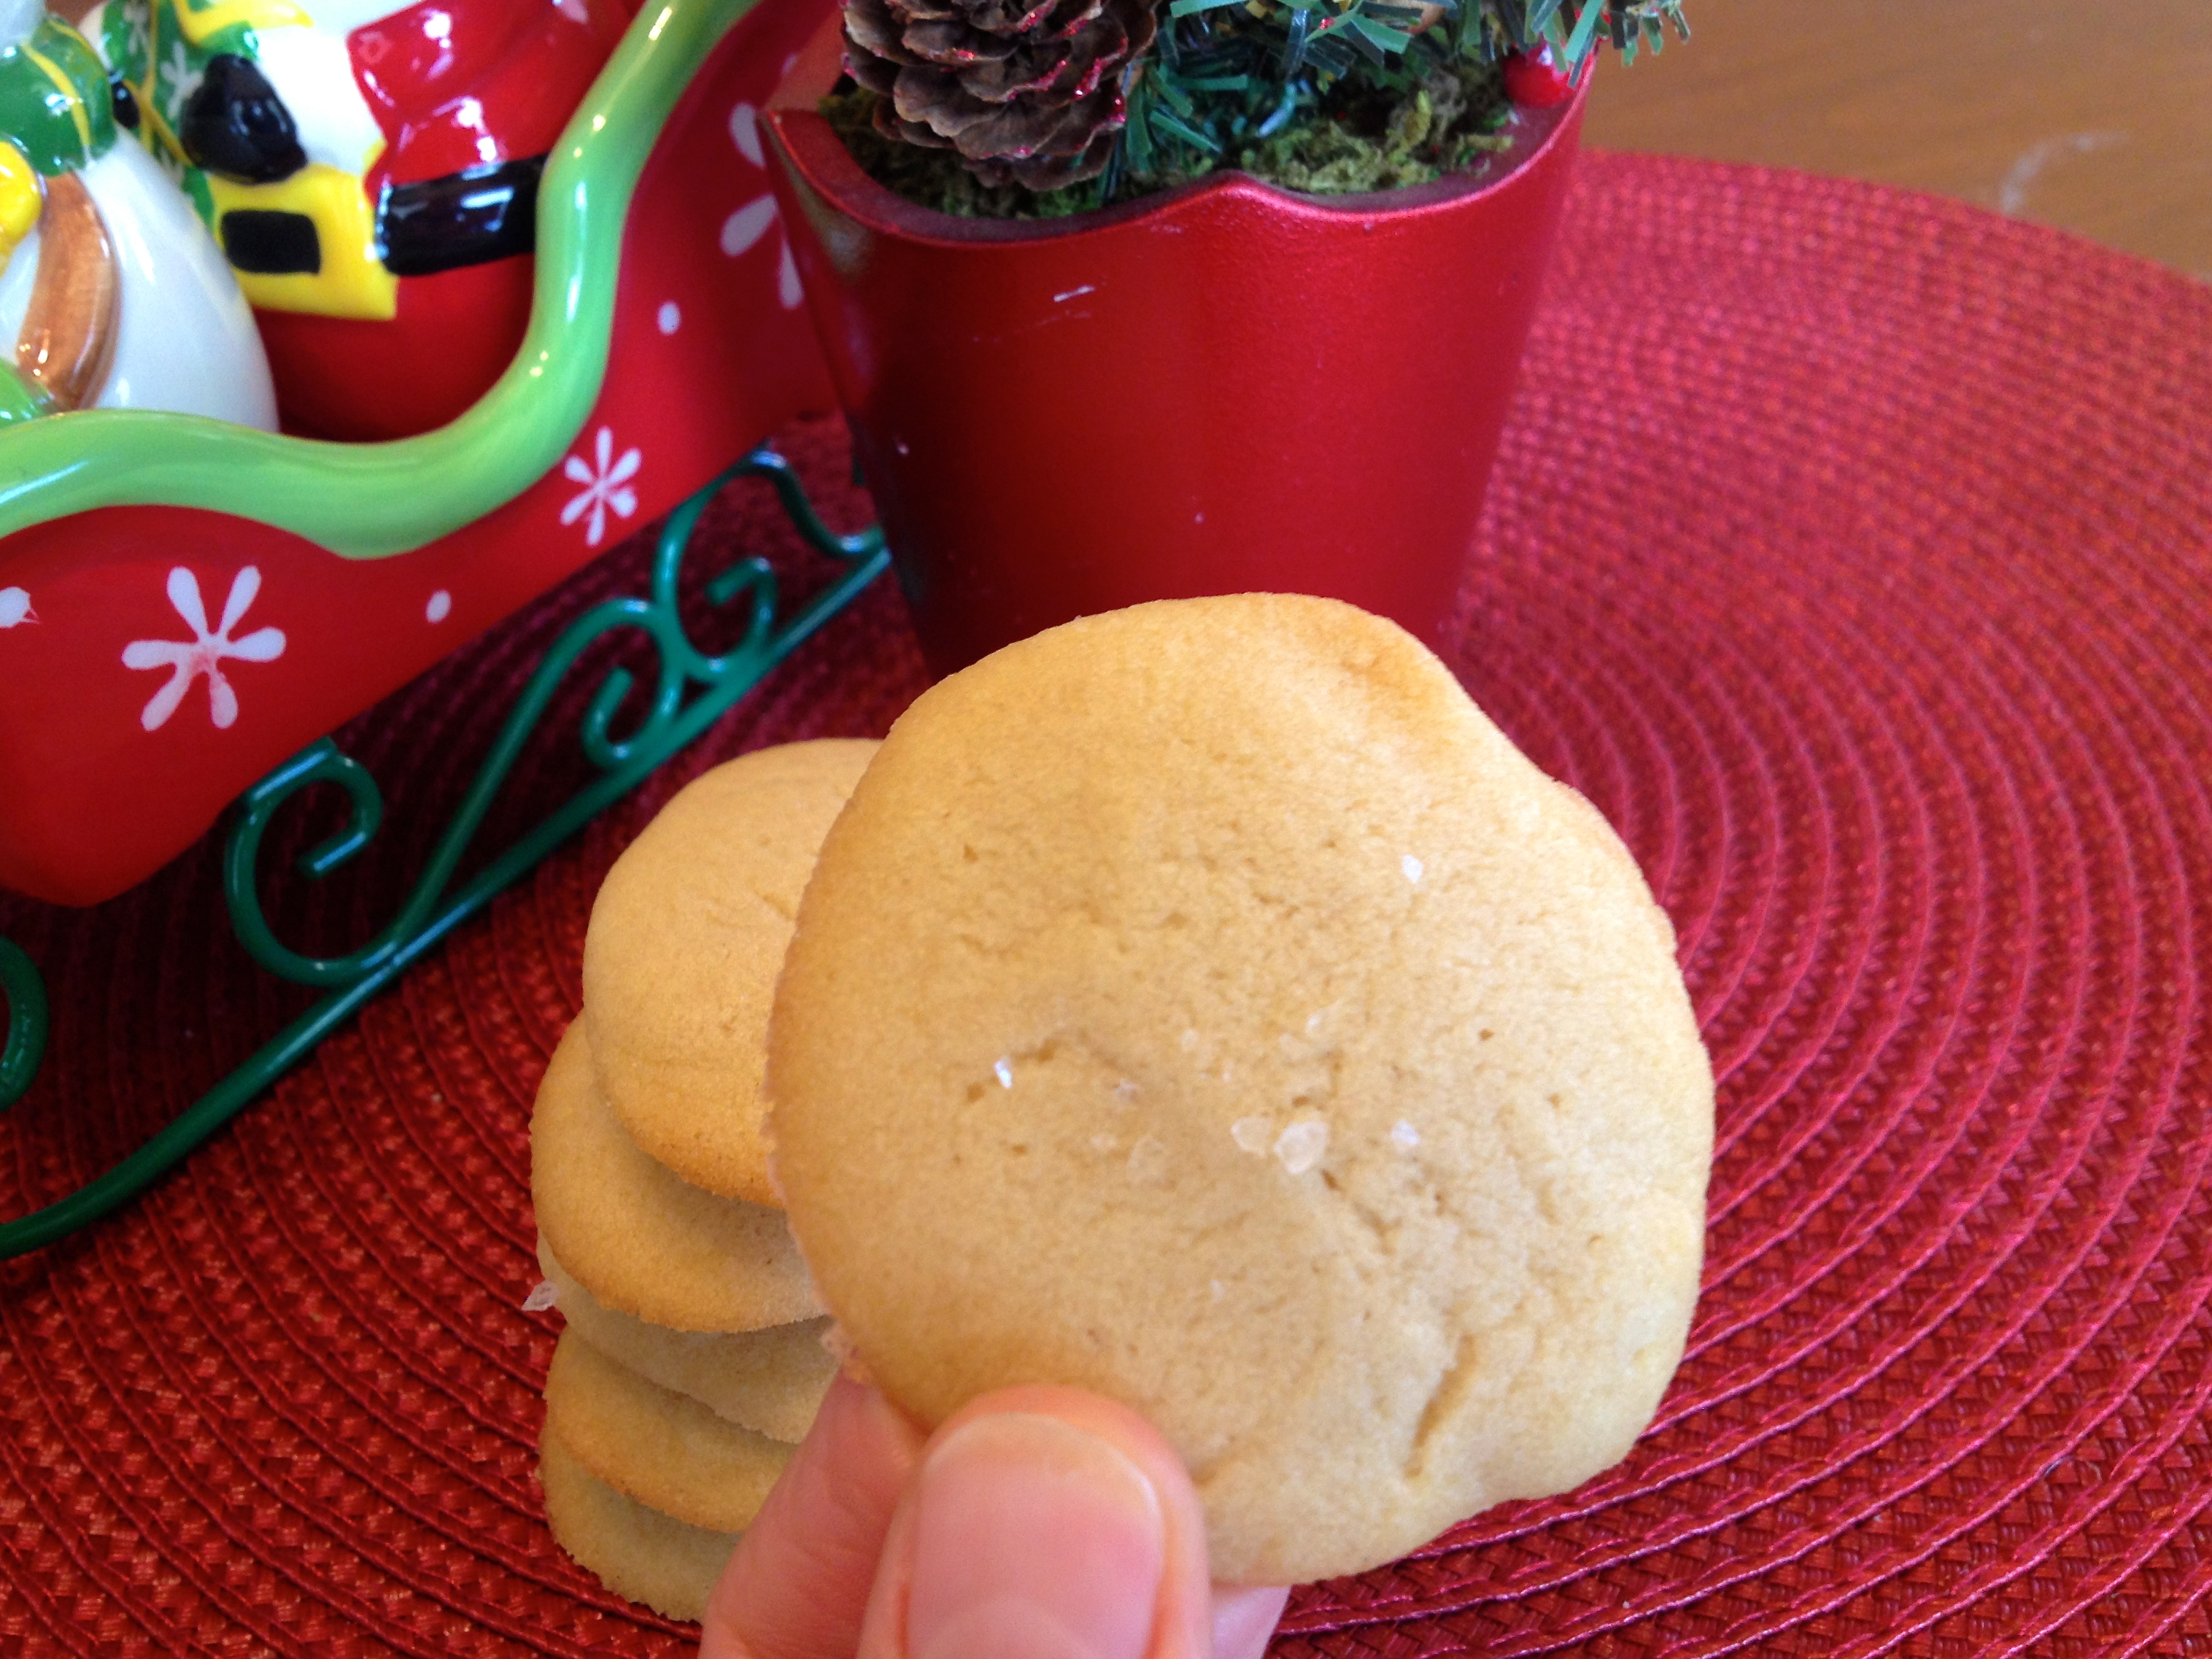
Dangerously quick and easy “sugar” cookies. The sugar is really maple syrup or agave and the recipe is designed for small batches so you don’t have to be tempted by a whole dozen cookies when you really just want one or two.
(Rachel, the daughter)
To offset recipe testing for the book, holiday parties, and of course Christmas baking, I’ve been exercising outdoors for 30 minutes a day. A couple of nights ago Jared and I took Jackson for an early evening walk and stopped to look at the neighborhood Christmas lights along the way. One particular house is lit up like the Griswald’s and has a constant stream of onlookers. We stopped and took Jackson out of the stroller to take pictures and show him the dancing and singing Santa Clause. As I turned to cross the street back to the stroller, I stepped into a pothole and fell hard all the way to the ground. The other onlookers hollered out their car windows a concerned, “Are you okay?” Thankfully, Jared had Jackson and my ego stung more than my hands and scratched up hip did. With a can-do attitude, and a “Let’s get the St. Nick out of here” plea, I held my head high and jogged the whole way home.
In the spirit of stumbling, I also stumbled across something amazing this week, a delicious easy sugar cookie using just five basic ingredients: butter or margarine, maple syrup or agave, flour, vanilla extract, and sea salt. On a whim, I just threw these ingredients in a bowl and into the oven, thinking surely an egg-replacer or at least some baking soda or powder would be needed. But they turned out so delicious!
Because I can’t be trusted with more than a few cookies at one time (seriously, it’s a problem), I made a recipe that could easily be modified to make as few as two cookies at a time. Instead of actual sugar, I used maple syrup in one batch and agave in another. The agave’s flavor is more subtle, but the maple syrup gives a nice depth of flavor. Both are winners.
I have three holiday parties and a MOPS meeting to bring food for this week. It’s that time of year! These are so easy that I’m sure I’ll bring them to at least one of the events.
*****Congratulations to Lori McClellan, the winner of the $25 Wayfair.com gift certificate. We emailed your gift certificate to you. Thank you for all who stopped by and are still here from the WeAreTeachers Blog Hop. What a fun day!******
Everyone needs a good go-to sugar cookie recipe for the holidays right?
Five-Ingredient, 10-minute Sugar Cookies
Makes 2 cookies (easily doubled or quadrupled for bigger batches)
Ingredients
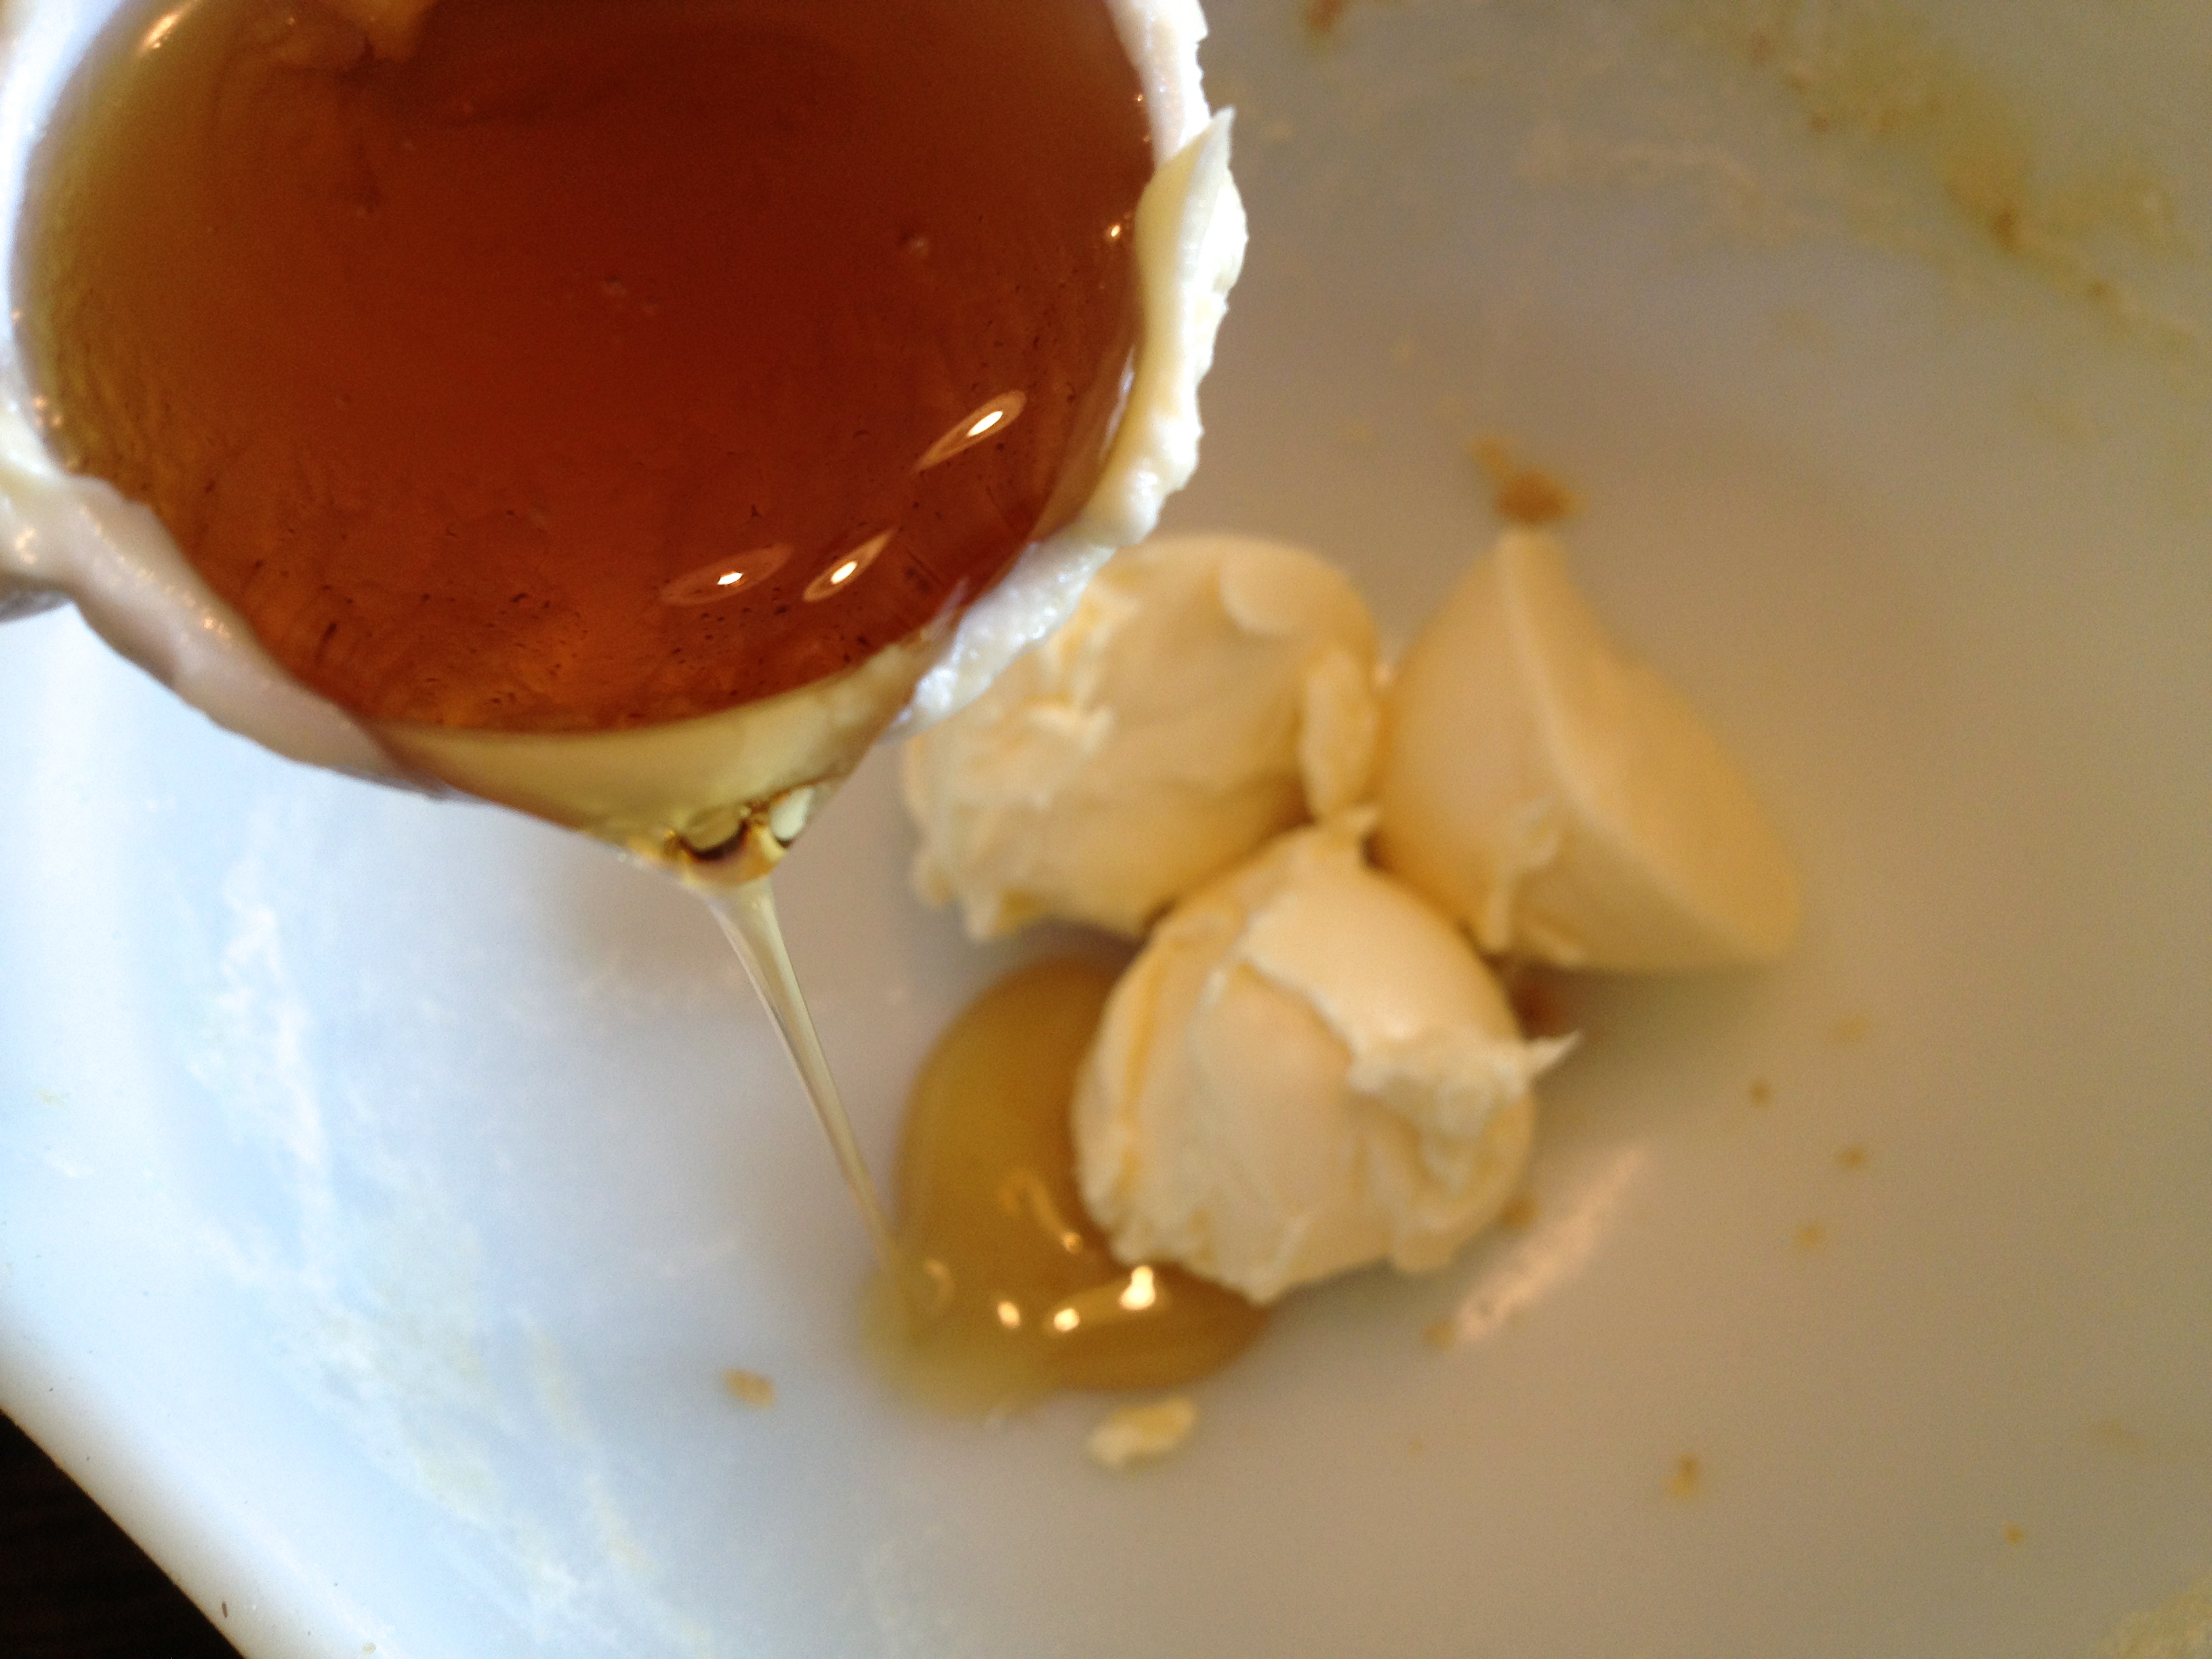
1 T. butter or Earth Balance
1 T. maple syrup or Agave Syrup
1/8 t. vanilla
2 T. all-purpose flour
Sprinkle of sea salt (optional)
Directions
Preheat oven to 350.
With a whisk or spoon, mix the butter and maple syrup or agave. Stir in the vanilla.
Mix the wet ingredients.
Stir in the flour one tablespoon at a time.
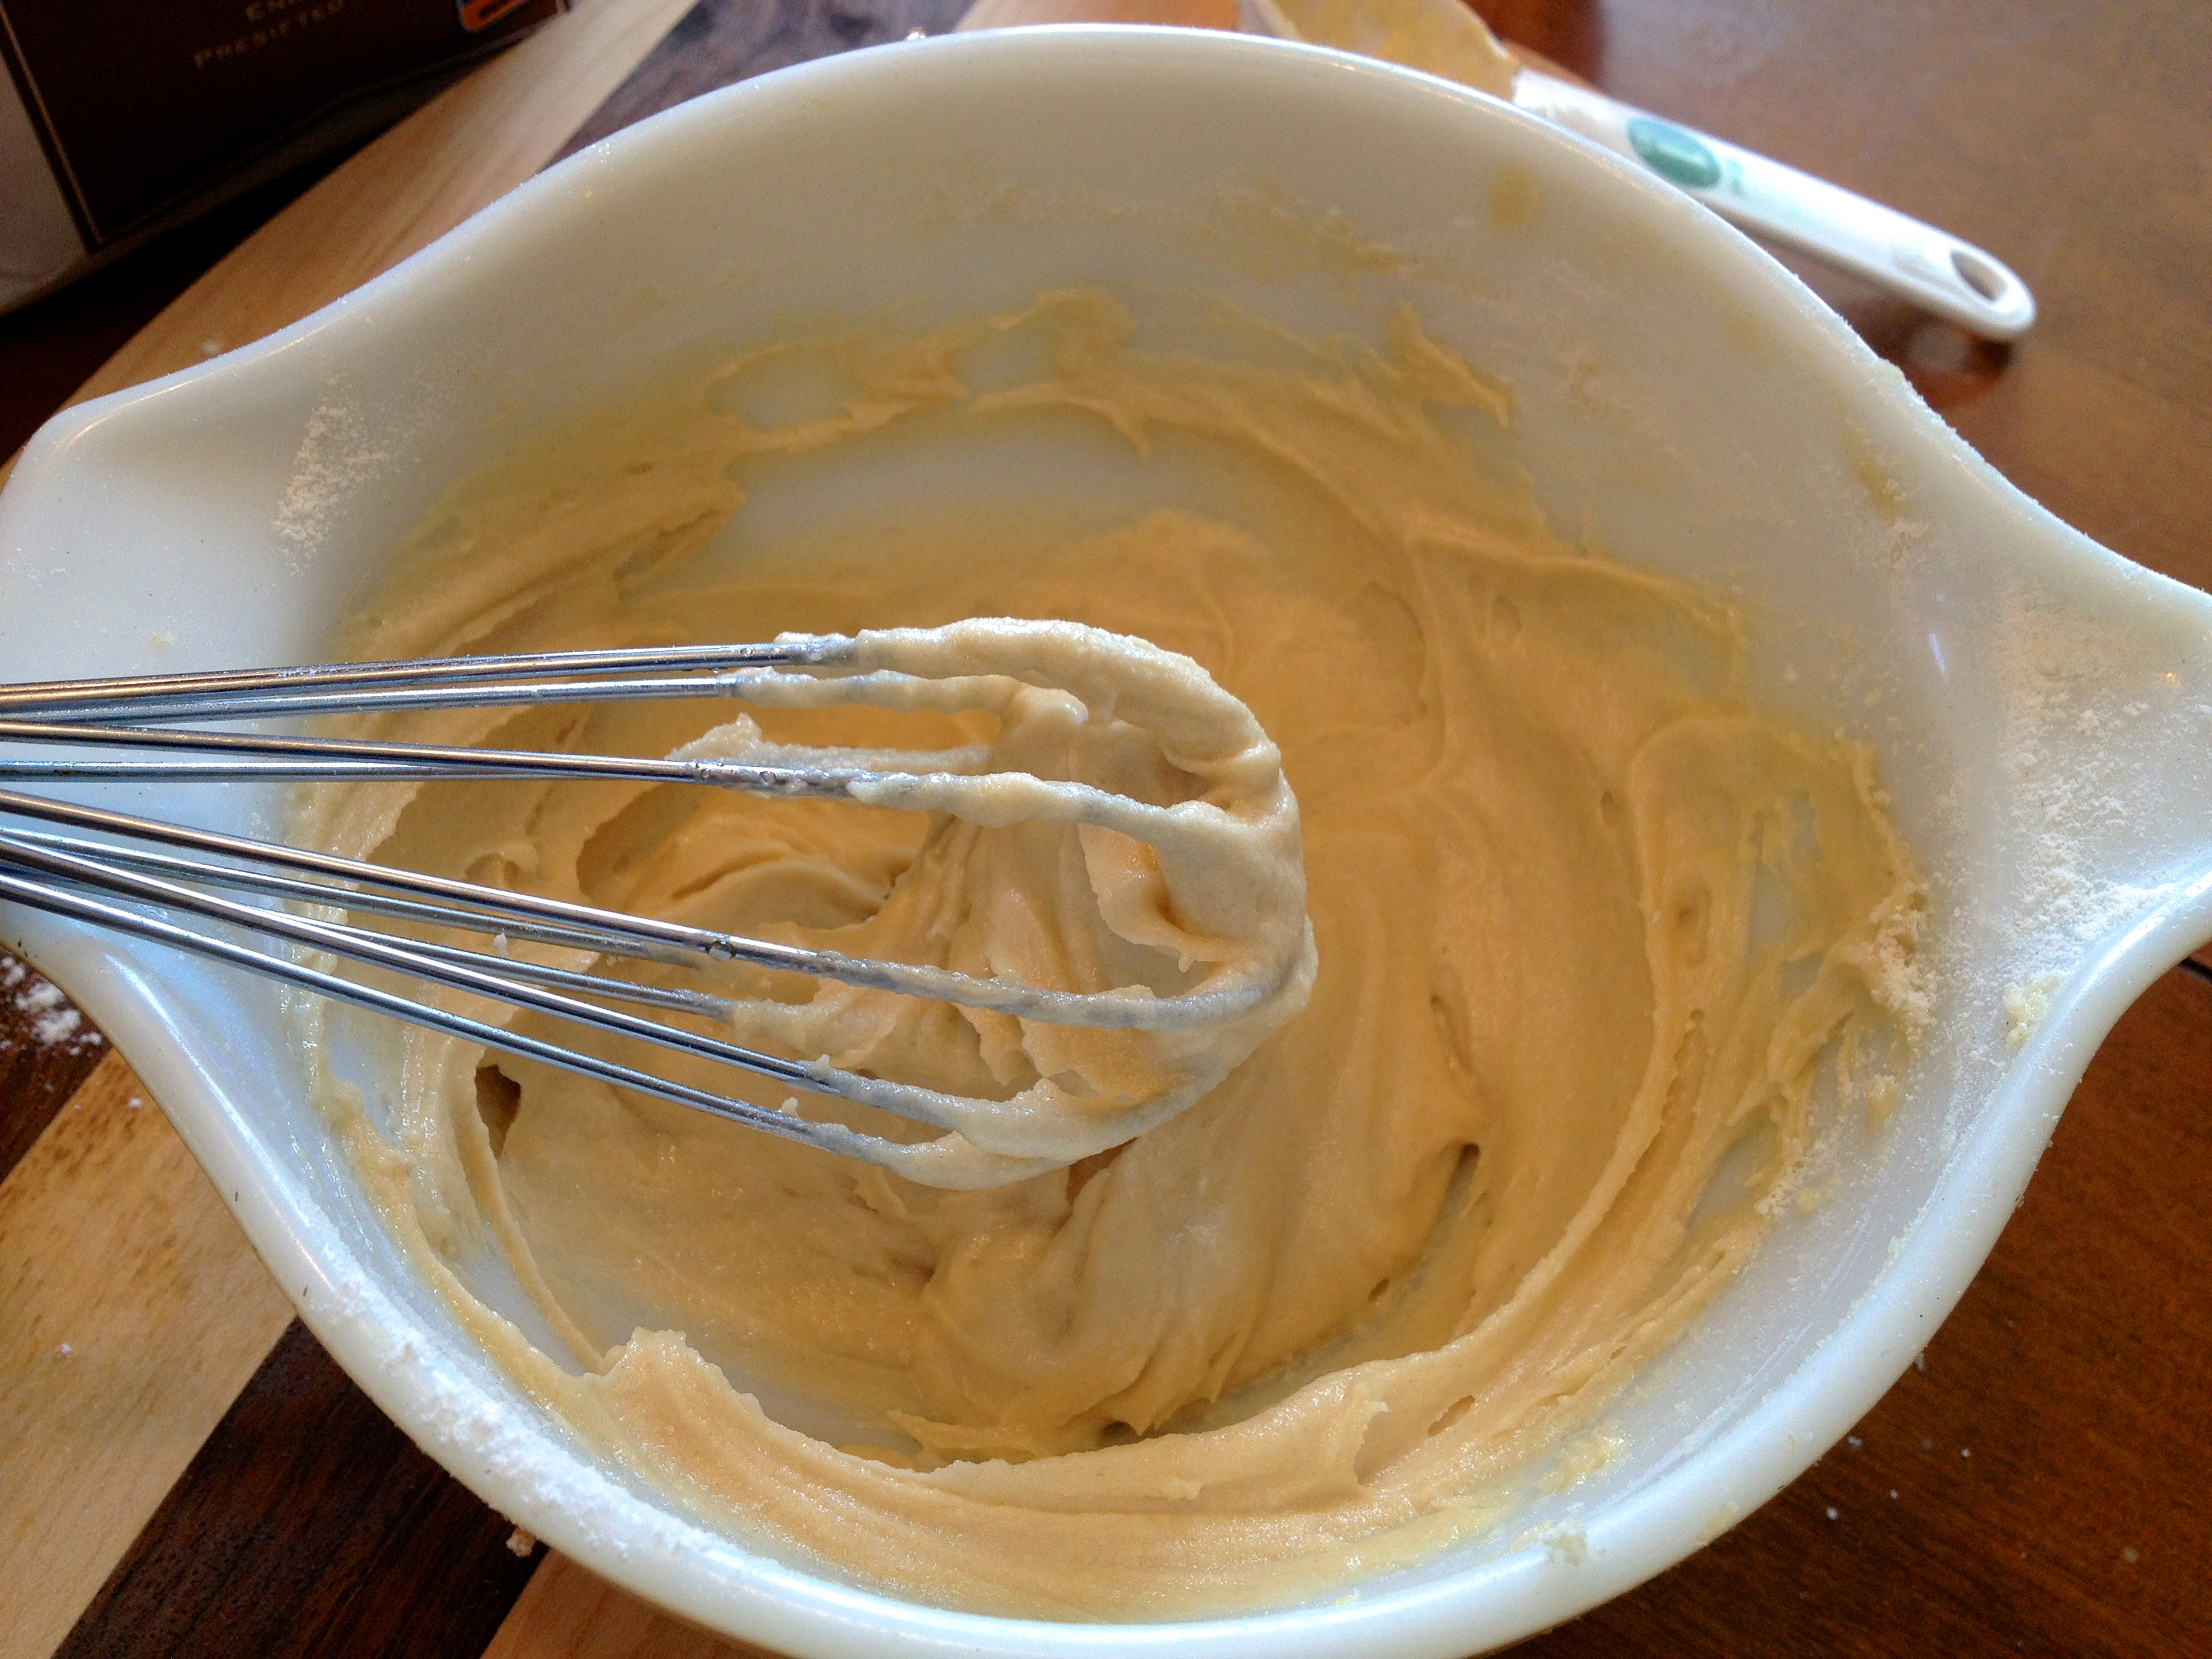
Mix the flour into the wet ingredients.
Line a pan with parchment paper or a silicon baking mat and scoop out tablespoon size drops two inches apart.
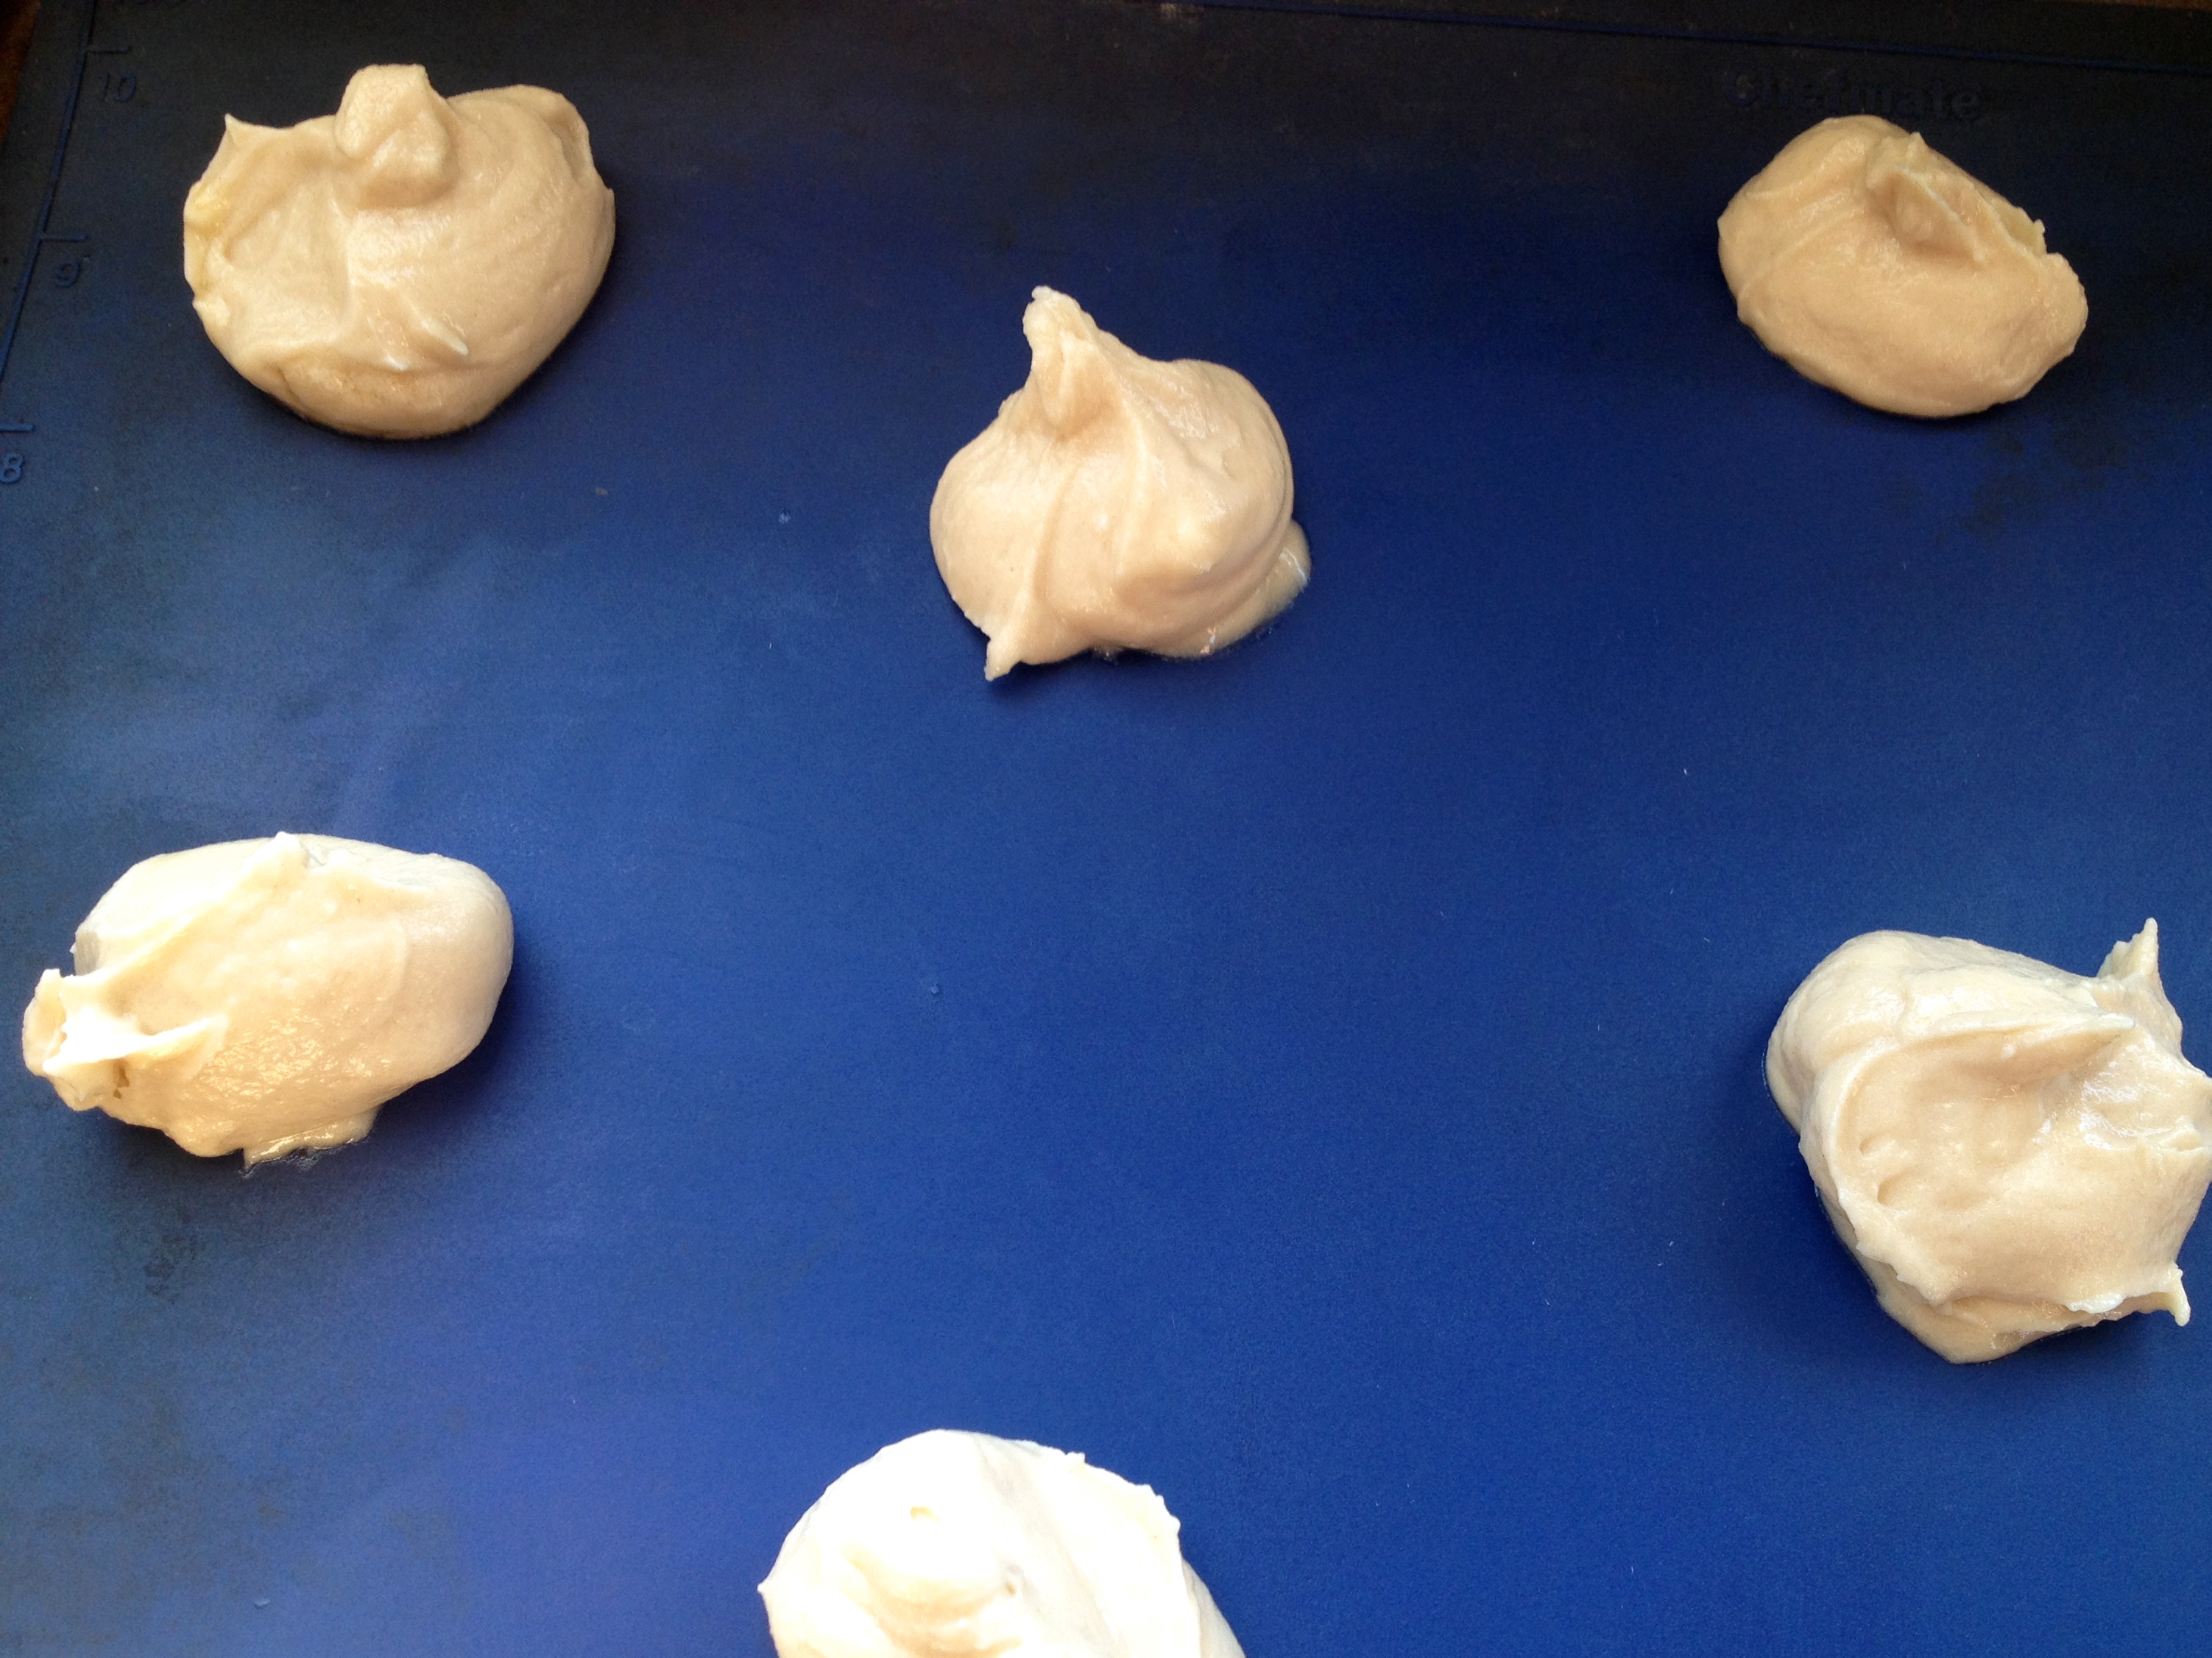
If you don’t have parchment paper or a silicon baking mat, an ungreased cookie sheet works fine. The cookies will be a little darker on the bottom and may spread a little more. But they are just as tasty. In fact, if you like your cookies with a little crunch, you may like them better straight on a pan.
Sprinkle with just a touch of sea salt and bake for eight minutes or until slightly brown around the edges.
Modifications
*Add a pinch of cinnamon and dust the tops with cinnamon sugar before baking for snickerdoodles.
*Sub almond extract (just a touch goes a long way and sprinkle the top with slivered almonds.
*Make a powdered sugar icing and add sprinkles on top.
This was printed from: We Laugh, We Cry, We Cook
The site URL: http://welaughwecrywecook.com
The Title: Five-Ingredient, 10-minute Sugar Cookies (dairy-free, egg-free, sugar-free)
The URL: http://wp.me/p1UwM9-PQ
This was printed from: We Laugh, We Cry, We Cook
Nut Butter Banana Hemp Shake (Vegan, High-Protein, Kid-Friendly)
Posted: October 13, 2012 Filed under: Beverages and Smoothies, Uncategorized, Vegan, Vegetarian | Tags: dairy-free, gluten-free, hemp seeds, high protein vegan shake, nut-free, peanut butter banana smoothie, soy-free, sunflower seed butter 2 Comments
When your kid begs you for a drink of your high-protein, high-fiber shake full of essential aminos and omegas, you call it quits on your food blog photo shoot and hand over the shake.
(Rachel, the daughter)
I just wrote a long boring post about how exhausting this week has been. Then I hit delete. #boringsnoring #toughenup #writersblock #speakinginhashtagsiswayeasierthanwritingblogsandbooks
I think Instagram and Twitter are ruining my ability to write in full sentences. I mean, do you really need a full explanation when a hashtag and a picture say it all?

#badidea #meltdownonaisletwo #tinycartsarethedevil

#lifewithatoddler #enoughsaid

#joy #bubbles #lovehim
In the spirit of quick and easy, here’s a recipe that has saved me on many an exhausted morning or afternoon this week. High in protein, fiber, and healthy fats, it’s the perfect breakfast or post-park snack for adults and little ones.

#simple #healthy #kid-friendly #10gramsofprotein #6gramsoffiber
Nut Butter Banana Hemp Shake
Makes one 1-cup serving
Ingredients
1 banana (Frozen or thawed)
2 T. nut butter (Peanut Butter, Almond Butter, Sunflower Seed Butter, or mix of any combination)
1/2 c. unsweetened almond milk (or your preferred milk)
1/2 T. hemp seeds
1/2 c. ice
Directions
Blend first four ingredients together for 60 seconds. Add ice and blend until ice chunks are gone. That’s it. Enjoy!

Almond milk + nut butter + banana + hemp seed = #mynewfavshake
I did some quick pen and paper calculations on the one I made today (not pictured). I used half sunflower seed butter and half organic peanut butter. It had about 19 grams of fat, 300 calories, 10 grams of protein, and 6.5 grams of fiber. Remember the fat comes from seeds and nuts, which are good healthy fats.
This was printed from: We Laugh, We Cry, We Cook
The site URL: http://welaughwecrywecook.com
The Title: Nut Butter Banana Hemp Skake (Vegan, High-Protein, Kid-Friendly)
The URL: http://wp.me/p1UwM9-Kg
© Copyright 2012 – All Rights Reserved
Raspberry Mocha Pudding
Posted: September 5, 2012 Filed under: Breakfast Foods, Snacks, Uncategorized, Vegan, Vegetarian | Tags: coconut yogurt, coffee, dairy-free, gluten-free, mocha pudding, nuvia instant coffee, so delicious chocolate yogurt, vegan Leave a comment
Rasberry Mocha Pudding, a seriously energizing snack.
Rachel, the daughter
I used to be organized. My house used to be clean. I used to be prompt. I loved those things about me. I was that girl, that girl that appeared to have her life together.
Motherhood is humbling. I’ll leave it at that, without describing the current condition of my home.
This morning was Jackson’s first day of Mother’s Day Out. Last week at Meet the Teacher the teachers gave me a big cut out construction fish with, I’m sure, instructions on what to do with it.
At 11:00pm last night, just as my head finally hit the pillow, I remembered something about family photos for the fish. I think he needs pictures so they can decorate the fish, I thought. Of course, I’ve yet to print a single one of the 2,000 (I wish I was exaggerating) photos I’ve taken since Jackson was born. So I crawled out of bed and ordered some from a 24 hour Walgreens and set my alarm 20 minutes earlier so I could pick them up in the morning. I was so proud of myself for remembering the instructions and for pulling it off, even if I by the skin of my teeth. And though slightly late, we weren’t the last ones to arrive. I’ll take it.
I walked in and bumped into a friend whose daughter is in Jackson’s class. She was holding her daughter’s fish and it was the most beautifully decorated construction paper fish I’d ever seen. It had her daughter’s name in cute little die cut patterned letters, glitter, and a perfectly placed collage of their family’s recent professional photos.
We were supposed to decorate the fish?, I sighed. I thought the kids were going to decorate them!
I didn’t pull it off. I wasn’t the mom who had it all together. On the first day of “school,” Jackson had a sad blank fish.
Fortunately, he’s one and had no idea he was that kid with that mom.
Later, I got a text from his teacher that said “Good eater! He has done sooo well this morning! Perfect child. :)” And when I picked him up the teachers commented at how delicious his lunch looked. I may not be the craftiest mom or the most prompt mom, but I’m raising a good eater! He ate up most of his spinach, bean, and avocado rice pilaf and all of his grapes, and most of his coconut yogurt sprinkled with hemp seeds. He was happy and played well and didn’t cry when I left. He even took a nap on his big boy mat.
Maybe I’m not failing, maybe my priorities have just shifted with motherhood.
But you better believe he’ll have a pimped out fish to bring to school on Thursday morning.
After Mother’s Day Out, Jackson stood at the counter in his FunPod stool and munched on Super Green puffs, while I whipped up this deceptively healthy afternoon pick-me-up for myself. If I still worked at an office, I would totally pack this as my afternoon snack for that slump when you just need a little something to nibble on and a gentle jolt of energy to get through the rest of the day.

When you don’t have time for coffee and breakfast (or a snack)…
Raspberry Mocha Pudding
Ingredients
- 1 container of So Delicious Chocolate Cultured Coconut Milk (or chocolate pudding)
- Slightly less than 1 T. of instant coffee
- 3/4 cup organic raspberries (divided)
- Coconut milk (I used canned coconut milk, but I think any creamer would work — half and half, whipping cream, regular coconut or almond milk)
- Chopped nuts (I used hazelnuts)

Chocolate Coconut Yogurt, Nuvia Instant Coffee, Organic Raspberries
Directions
Blend the chocolate yogurt or pudding and instant coffee. Add 1/2 c. rasberries, pulse for a few seconds. With a spoon, stir in remaining raspberries, cream to taste, and top with chopped nuts (not pictured.)

This was printed from: We Laugh, We Cry, We Cook
The site URL: http://welaughwecrywecook.com
The Title: Rasberry Mocha Pudding
The URL: http://wp.me/p1UwM9-FP
© Copyright 2012 – All Rights Reserved
High Protein Granola Bars
Posted: August 22, 2012 Filed under: Breakfast Foods, Gluten Free, Snacks, Uncategorized, Vegan, Vegetarian | Tags: dairy-free, gluten-free protein bar recipe, healthy high protein granola bar, pea protein, soy-free, vegan breakfast bar recipe Leave a comment
High protein granola bars. Easy to store, pack, and send to work or school.
Rachel, the daughter
Jared started back to school this week. He’s been back to coaching duties for awhile, but Monday was his first official school work day, dressed in his khakis and polo and reporting for a new position (same school, new role). And after my mom, Jackson, and I get back from the International Food Blogger Conference in Portland this weekend, Jackson will be starting “school” too. It’s really just a Mother’s Day Out program two days a week, so I can go to my “office” (ie, Panera Bread or Starbucks) and write. It still means getting him his first nap mat and backpack and lunchbox, which is totally what getting ready for school is all about, right? Do you think he’ll need a Trapper Keeper, too!? I seriously fought the urge to buy one when I was at the store the other day. Ten years later and August still feels slightly incomplete without picking out a new Trapper Keeper and non-skid sneakers for gym class. 🙂
Since our lives are about to be on-the-go, I’m testing some grabbable, packable, reheatable recipes for our work and school days. Several of our easy-to-pack lunch recipes were featured a couple of weeks ago on We Are Teachers, a site full of great resources for teachers, and it inspired me to do the same for snacks and breakfasts.
I’m quite adjusted to Jackson and I’s leisurely morning routine of coffee & cereal or a smoothie for me and oatmeal for him. I sip my second cuppa joe while Jackson plays outside. We share a mid-morning snack. I shower. And before we know it, it’s time for Jackson’s first nap. Most days, I really don’t start being productive until 10:00 or 11:00 when he’s gone down for his nap. Breakfast is going to have to be super easy in order to get me up, dressed, and out of the house by 8:30 am.
One of our favorite on-the-go snacks or breakfasts are Luna Bars (Yep, my manly husband is not ashamed to eat The Whole Nutrition Bar for Women). I do love them, but they are processed and aren’t organic and their shiny wrapper gets my one-year old son completely excited and he insists on having a bite too. Then I have to either deal with a meltdown or give him a bite and feel guilt that my toddler adores packaged processed foods. The last two mornings, he has brought me a box of cornbread mix and ended up in tears trying to get me to open it for him. I don’t know what he thinks is in there, but he’s pretty certain if it comes in a box or a wrapper it must be delicious.
I made my own granola bars today that I feel completely fine sharing with my toddler and that my husband can feel truly manly about eating. They are gluten-free, dairy-free, and soy-free and have almost 8 grams of protein per bar. The only sugar is 1 T. of honey and 2 dates for 8 bars.
Now if I can just figure out how to get them in a shiny package and cardboard box for Jackson.

Easy on-the-go breakfast or snack. (Ignore my unmanicured fingernails!)
High Protein Granola Bars
Makes 8 bars
Ingredients
1/2 c. peanut butter
1/4 t. vanilla extract
1 t. honey
1 T. chia seeds soaked in 3 T. warm water
1/2 c. oats (gluten-free oats will make this recipe entirely gf)
1/2 c. puffed brown rice cereal
1/2 c. finely chopped almonds (or sliced almonds)
1 T. pea protein powder (or your protein powder of choice)
1 T. cacoa nibs
2 dates, finely chopped
1/4 t. cinnamon
Directions
Preheat oven to 350.
Combine peanut butter, honey, and vanilla in a medium sauce pan and warm over medium low heat until melty. Add remaining ingredients and stir until it’s all combined and coated with peanut butter mixture.
Pour onto a parchment-lined pan and spread out to a 1/2 inch thick square. Cut into 8 bars.


Bake for 15 minutes. Remove and let cool completely before moving. They will harden as they sit out, but are not a really crunchy granola bar.

They fit perfectly into this sandwich/snack container. Confession: I bought and used this in high school, long before having a little boy to pack lunch for was on my radar.
This was printed from: We Laugh, We Cry, We Cook
The site URL: http://welaughwecrywecook.com
The Title: High Protein Granola Bars
The URL: http://wp.me/p1UwM9-DC
© Copyright 2012 – All Rights Reserved
Vegan Cajun Red Beans & Rice
Posted: July 17, 2012 Filed under: Gluten Free, Main Dishes, Sides, Vegan, Vegetarian | Tags: crockpot, dairy-free, gluten-free, high fiber, high iron vegan, high protein vegan, meatless meals, slow cooker, smoked paprika, vegan red beans and rice, vegetarian red beans and rice 1 Comment
Red Beans and Rice, a humble, healthy, easy dish, high in protein, fiber, and iron–a perfectly satisfying meatless meal.
(Rachel, the daughter)
I used to be a firm believer that I needed a little meat, or at the least some cheese or an egg, at every meal to keep from getting the shakes and a headache. I’m sometimes still surprised that this wasn’t actually true. I obviously still need protein, but it turns out, my body happily accepts plant-based protein, like from legumes, whole grains, vegetables, nuts and seeds, and occasional unprocessed soy (like organic tofu or edamame).
For most of my young adult life I battled headaches almost daily. Recently, it dawned on me that I very rarely get headaches now, like maybe once every two to three months. I wonder if my old diet high in animal protein could have actually been causing it, rather than helping it. Hmmm… I don’t know. But you know what else dawned on me? I don’t have my old built-in excuse for getting out of certain activities anymore.
“Sorry, I have a headache,” can get you out of watching a loud shoot-em-up-bang-em-up boy movie, cooking dinner, going to your husband’s work banquet, paying the bills, and well, you can probably think of a laundry list of other things.
Because I genuinely did have a headache so often, I could pretty much throw it out there on any given day and it was believable. Who was to say just how severe my headache was? Now, I would probably have to put on a bit of a production to sell that excuse. I might have to throw myself on the bed with a damp towel over my head and moan and groan for awhile, stay off my computer (read: facebook), and go to bed early. It’s really more trouble than it’s worth.
Thank goodness, there’s always the go-to “Sorry, I’m so tired” excuse. Who’s going to question that from the mother of a baby?
This recipe for cajun red beans and rice, very high in plant-based protein (and fiber and iron!), is truly easy enough that you won’t need to come up with an excuse to get out of cooking dinner. It only takes about 10 minutes to make, but does need a couple of hours to simmer. With almost 20 grams of protein, 30% of your daily iron needs, 16 grams of fiber, and only 3 grams of fat, you might even feel energetic enough that you want to tackle that laundry list of to-dos.

Rachel’s Vegan Cajun Red Beans & Rice
Serves 6
Ingredients
1 T. olive oil
1 onion, diced
2 garlic cloves (I used 1 very large clove)
2 jalapeno or serrano peppers
2 T. fresh parsley, chopped (could sub dry parsley)
2 t. smoked paprika
3 dashes liquid smoke
2 t. salt-free cajun seasoning (if yours has salt, add this at the end–salt can make beans tough)
1/2 t. brown sugar
1 lb dried kidney beans, sorted and rinsed (no pre-soak required*)
8 c. water
2 t. salt (use 1/2 smoked salt if you have it)
1 t. pepper
1/4 t. cayenne (optional–adds spice)
1 1/4 c. brown Rice & 3/4 c. wild rice, cooked per package instructions or in a rice maker**
Directions
In a large sauce pan, heat olive oil on medium heat, add onions, garlic, peppers (whole), and saute until onions are soft. Add parsley, smoked paprika, liquid smoke, cajun seasoning, and brown sugar. Stir for one minute. Add kidney beans, stir. Add water, stir, cover, bring to low boil, then reduce heat to med-low. Simmer, stirring occasionally, for 1 1/2 to 2 hours until kidney beans are cooked through. You can remove the lid for the last 15 minutes or so to thicken up the juices if you like. Season with salt, pepper, and cayenne if desired. (I removed some beans for the little one before adding the cayenne.)
Slow Cooker: Saute onions, garlic, peppers, parsley and spices in a skillet as above. (You can do this the night before and just keep in the refrigerator until morning.) Put onion spice mixture, kidney beans, and hot water to the slow cooker. Cook on low for 6-8 hours. When you get home or the beans are cooked to your liking, season with salt, tilt the lid open and turn crockpot to high heat to let some of the liquid evaporate while you get the rest of dinner ready.
Serve over cooked rice.
*No presoak is required, though it could shorten your cooking time if you do. Some beans can be difficult to digest without a presoak and rinse. I’ve eaten two bowls today and have had no, ahem…flatulence or difficulty digesting. More than you wanted to know, right?!
**I combine the wild and brown rice together and cook in the rice maker with a little extra water and about a teaspoon of olive oil. Comes out perfect every time.
This was printed from: We Laugh, We Cry, We Cook
The site URL: http://welaughwecrywecook.com
The Title: Vegan Cajun Red Beans & Rice
The URL: http://wp.me/p1UwM9-wQ
© Copyright 2012 – All Rights Reserved
Mint Chocolate Pistachio Blizzard (Dairy-Free & Soy-Free)
Posted: June 7, 2012 Filed under: Desserts | Tags: banana soft serve, dairy-free, non-dairy ice cream, pistachio ice cream, pistachio mint chocolate ice cream, soy-free, vegan desserts, vegan ice cream recipe 4 Comments
This tasty healthy summer treat is dairy-free, soy-free, only five ingredients, and done in five minutes.
(Rachel – The Vegan-Eatin’ Daughter)
This summer my husband is coaching a select summer baseball team with a rigorous schedule. Since he’ll be so busy, I thought it might be fun for me and Jackson to come along with him for a few of his tournaments. We could check out a new town and spend some family time together between games.
As it turns out, the cities he plays in are a little hard up for entertainment. In my internet search of one town, the highlighted “Family Activity” was a trip to Dairy Queen for ice cream. Sorry honey, we’ll just see you in July when you’re schedule let’s up.
I’m not knocking DQ. If you were raised in a small town in Texas, like I was, you probably do have lots of memories at the local Dairy Queen. I can recall several trips as a child, stopping on our way home from ball games. I remember our high school cross country coach always treated us to Blizzards when the season was over. After months of getting up at 5:00 am to run around a cold dark track and spending our Saturdays running through muddy trails, we’d go celebrate. We lined up and one-at-a-time placed our order, then waited eagerly to be handed an upside down cup filled with thick ice cream blended with our favorite mix-ins.
Now that I don’t eat dairy, being treated to a DQ blizzard is a thing of the past, but with Banana Soft Serve “Ice Cream,” my days of enjoying delicious cool treats with tasty mix-ins are far from over. In just minutes, frozen bananas blended up in the food processor turn into a thick creamy cold treat, just like soft serve ice cream. I combined two of my favorite ice cream flavors, Mint Chocolate Chip and Pistachio, for this sweet, salty, cool combination.
I wouldn’t recommend flipping your cup upside down, but I would totally recommend sticking a spoon in and chowing down. With banana as the main ingredient and healthy mix ins like pistachios and dark chocolate (antioxidants, hellooo!), it’s practically health food.

This soft serve “ice cream” is simply frozen bananas and pistachios blended together, garnished with a mint chocolate swirl and a cherry on top.
Serves 1
Ingredients
2 bananas ~1 cup (chopped and frozen)*
1/4 cup pistachios, roasted and salted
1 t. sugar
3 squares of a mint dark chocolate bar (I used the Endangered Species brand–it’s vegan & delicious)
2 t. coconut cream (~1 t. non-dairy milk would work too)
Optional Garnishes: chopped pistachios, cherries dipped in the chocolate sauce & cooled, fresh banana slices, sprig of mint
Directions
In a food processor, blend bananas until they whip together like soft serve ice cream, stopping to scrape the sides as needed. Add in pistachios and sugar and blend again until pistachios are chopped up.
In a small bowl, combine chocolate and coconut cream. Microwave for 8 second intervals, stirring between, being careful not to let the chocolate burn.
Pour half of the pistachio soft serve into a pretty glass, top with half of the chocolate, then repeat, gently swirling the chocolate at the top. Garnish with chopped pistachios and a cherry on top (optional). Fresh banana slices between the layers of soft serve are good too.
Serve immediately.
Note: This doesn’t re-freeze well.
*Freeze bananas that are ripe, but not overly ripe for this recipe. The ones that are really soft and ripened are great for baking and smoothies, but not for this recipe.
This was printed from: We Laugh, We Cry, We Cook
The site URL: http://welaughwecrywecook.com
The Title: Mint Chocolate Pistachio Blizzard (Dairy-Free & Soy-Free)
The URL: http://wp.me/p1UwM9-o5
© Copyright 2012 – All Rights Reserved
Coconut & Chocolate Coconut Covered Cherries (Vegan)
Posted: May 15, 2012 Filed under: Desserts | Tags: coconut, coconut chocolate covered cherries, coconut covered cherries, dairy-free, freezer desserts, frozen desserts, vegan 10 Comments
Coconut and Chocolate Coconut Covered Cherries
You know those times when you plan to make one thing and then it turns out to be a completely different thing, and the thing you didn’t mean to make is actually better than the thing you tried to make in the first place?
That’s how I discovered these coconut covered cherries. I just wanted a bowl of frozen cherries with a little whipped coconut cream on top, but as the coconut cream covered the frozen fruit, it froze and coated the cherries. Coconut Covered Cherries…yes please! I, of course, had to try a chocolate version too. Who doesn’t love chocolate covered cherries? These frozen delights make a perfect bite-sized treat when you need just a little something sweet.
They are pretty healthy too. There is only 1 teaspoon of sugar in 15 covered cherries. Coconut cream is surprisingly good for you, despite it’s saturated fat content. The medium-chain fatty acids in coconut gets converted to energy as soon as your body absorbs it (unlike saturated animal fat which is difficult for the body to metabolize). It also contains lauric acid which is an immunity booster.
When selecting your can of coconut milk, look for a full fat kind with only coconut and water in the ingredients. Other ingredients like guar gum can keep the cream from separating from the water. Refrigerate the coconut milk overnight so the cream will rise to the top. You want it to look like this with the cream at the top and the coconut water at the bottom. Save the water to use in cooking or smoothies.

When cold, the coconut cream rises to the top.
Life is just a bowl of cherries;
Don’t make it serious;
Life’s too mysterious.
You work, you save, you worry so,
But you can’t take your dough when you go, go, go.
So keep repeating it’s the berries;
The strongest oak must fall.
The sweet things in life
To you were just loaned,
So how can you lose what you’ve never owned?
Life is just a bowl of cherries,
So live and laugh at it all.

Coconut Covered Cherries
Rachel’s
Coconut & Chocolate Coconut Covered Cherries
Makes ~15 Cherries
Ingredients
Frozen Cherries
2 T. cream from full fat coconut milk that has been refrigerated over night (see above for explanation)
1 t. sugar
1/4 t. vanilla extract
1 t. cocoa powder (omit for plain version)
Parchment or wax paper

Only Five Ingredients!
Directions
In a bowl, mix coconut cream, sugar, vanilla and cocoa powder (for chocolate version) until the sugar dissolves.


This stuff is seriously delicious as is. It will be hard to keep little (and big) fingers out of it!
Dip the frozen cherries into the cream and place on a parchment or wax lined pan. If the cream isn’t sticking well, pat the cherries dry with a paper towel. Place in the freezer for 20-30 minutes until the cream is completely frozen. Transfer to air tight zip top bag or container. Enjoy straight from the freezer.
Other variations: Try different fruits or flavors like maple cinnamon coconut covered bananas. Or try rolling in sprinkles or shredded coconut. Let me know if you come up with a tasty variation!

The chocolate ones reminded me of chocolate cherry ice cream.
This was printed from: We Laugh, We Cry, We Cook
The site URL: http://welaughwecrywecook.com
The Title: Coconut & Chocolate Coconut Covered Cherries (Vegan)
The URL: https://welaughwecrywecook.com/2012/05/15/coconut-chocolate-covered-cherries-vegan
Marinated Portobello Burger
Posted: March 27, 2012 Filed under: Main Dishes, Uncategorized | Tags: dairy-free, meatless, mushroom burger, mushrooms, onions, portobello burger, portobellos, sauteed veggies, spinach, vegan, vegetarian, veggie burger, veggies 3 Comments
Marinated Portobello Burgers
When I was about 12, I went on a ski trip with my family. While hanging out at the base, some older teens hollered out to me and my brothers “Hey, you want some shrooms?”
I giggled and naively said, “Those guys must be on drugs or something. Why would they think we want some mushrooms while we are skiing?”
My big brothers busted out laughing.
I didn’t know how right I had been until they finally stopped laughing to explain to me what the “shrooms” those dudes spoke of were.
Lucky for me, I didn’t like mushrooms and would have turned down the offer even if my big brothers hadn’t been there to fill me in.
Nowadays, I might be in trouble if someone hollers out and offers me some shrooms, though.
It turns out after more than 25 years of hating mushrooms, I’ve discovered I actually love a good shroom!
The first time I ordered a Portobello Burger was shortly after going vegan. It was the only thing on the menu I could eat, so I figured I’d give it a try. It was thick, chewy, flavorless and spongy. I stayed away from portobellos after that and eased my way into the land of shrooms with baby bellas sauteed in evoo and garlic.
Recently we were at the new plant-based cafe in Dallas, VSPot, and I decided to try their marinated portobello burger. Some people at the neighboring table were raving about it, so I thought I’d give the portobello one more go. It was so succulent it almost melted in my mouth. The mushroom was cooked down really thin so you would never have guessed you were biting into a thick spongy portobello cap.
Tonight I made my own portobello burger and I have to say, it was awesome. The flavors are quite different than the one we had at the VSpot and I didn’t manage to get it quite as thin, but it will definitely hold me over until our next visit!
Wanna shroom?

Rachel’s
Marinated Portobello Burger
Serves 4
Ingredients
4 Portobello Mushrooms, stems removed and gently wiped clean with a damp sponge
4 Buns (I used Whole Grain Ciabatta Sandwich Rolls from our store’s bakery)
1/4 cup Apple Cider Vinegar
1/2 cup of Braggs Aminos (or soy sauce)
1/4 cup Olive Oil
1/4 tsp pepper
1/4 tsp sugar
1/2 tsp crushed red pepper
Topping suggestions: sauteed spinach, caramelized red onions, roasted red peppers
Mix the marinade in a bowl. Pour into a gallon sized zip top bag and add the portobello caps. Shake it up to cover the mushrooms and place in the refrigerator. I let mine marinate for about 5 hours, but I think you could go as little as an hour if you’re short on time or as long as 8-10 if you want to marinate them while you’re at work.
Heat a skillet on medium heat with evoo covering the bottom. Put the mushroom caps in 1-2 at a time bottoms down and with a spatula or the bottom of a sauce pan, gently hold the mushrooms down. Don’t apply too much pressure at first or you’ll tear the edges. Turn the mushrooms over and continue applying gentle pressure. Repeat turning back and forth every few minutes for about 10 minutes until the mushroom cap is only a few centimeters thick.
I ate mine on ciabatta rolls that I smeared with Vegenaise (vegan mayo) mixed with minced garlic and toasted on a lightly oiled saute pan (this gives the bread a nice crunch), topped with sauteed spinach and garlic and caramelized red onions. I thought I was going to need a protein like some beans to add to this, but I was plenty full after one mushroom burger and a side of sauteed yellow squash and zucchini.
This was printed from: We Laugh, We Cry, We Cook
The site URL: http://welaughwecrywecook.com
The Title: Marinated Portobello Burger
The URL:https://welaughwecrywecook.com/2012/03/27/marinated-portobello-burger
© Copyright 2012 – All Rights Reserved


