
Pistachio and Caramelized Onion Pizza
Posted: March 26, 2012 Filed under: Appetizers, Breads, Main Dishes, Uncategorized | Tags: almond cheese, caramelized onions, flat bread, Naan bread, pistachios, pizza, vegan, vegetarian Leave a comment I have been working out fairly consistently since last August, thanks to the encouragement of my good friend Ingrid. I get up by 7:00 am (a great feat for this non-morning person) and meet Ingrid at a local gym at 8:00 where we exercise while solving the world’s problems and…often talk about great food. (Perhaps this is why the pounds aren’t just dropping off of us?)
Here’s our conversation from last week, both of us huffing and puffing on ellipticals, side by side.
“Becky!” says Ingrid. “I was visiting my friend in California who is a vegan, like your daughter. And I came up with the best recipe for a pizza.”
“Let’s hear it.”
“Well, you start with a pizza crust and then sprinkle it with almond cheese.”
“Does almond cheese tastes good? Because I think soy cheese tastes like shredded rubber bands, and I’ve been looking for a good vegan cheese to use when I cook for Rachel.”
“It does! And it melts. Then you cook some garlic and onions in a pan with a little olive oil until they just start to brown and caramelize. Put these on top of the almond cheese, top with a few unsalted pistachios and — hey, Becky, why did you stop walking on your machine?”
I looked down and sure enough, I was so caught up in Ingrid’s description, that I’d completely frozen, thinking of nothing but how those flavors might taste together, my head in a pistachio-caramelized onion pizza cloud.
“Sorry,” I said, resuming my exercise. “What can I say? I brake for food. Even descriptions of it.”
After our gym session, I didn’t even change out of my gym clothes before heading to Whole Foods and gathering the ingredients. I chose garlic Naan bread instead of pizza dough because I was in a hurry to try this feast.
Let me just say, this new pizza recipe may cost me a few extra miles of exercise.
And it will be totally worth it. You have to try this!
 Ingrid’s Pistachio and Caramelized Onion Pizza

Ingredients:
Serves Two
2 pieces Naan Bread (I love Whole Food’s Garlic Naan Bread. But it is not vegan, so if you want to be pure vegan here, you may want to use Whole Food’s pizza dough.)
1-2 T. olive oil, divided
1. c grated almond cheese (or Mozzerella cheese, but if you are a vegan and haven’t tried almond cheese, it is the best tasting vegan cheese I’ve tried thus far)

1 red onion, sliced thin
2 cloves garlic, minced
1/4 c. roasted, unsalted pistachio nuts
Directions:
Using a grill pan and a little olive oil, grill the Naan bread on both sides until it is crispy and has light golden grill marks. Set aside on a heavy duty cookie sheet or clay pizza pan.

In a skillet, saute the onions and garlic in a tablespoon or so of olive oil until onions have started to caramelize but still have a little bite/crunch to them.
Put 1/3 cup grated cheese on each piece of Naan. Top each with half of the onion-garlic mixture. Sprinkle each pizza with 2 T. roasted, unsalted pistachios.
Bake at 375 until cheese melts. (The almond cheese takes a longer to melt than does “real cheese,” and I actually ended up nuking the pizza in the microwave a few seconds to get it to “melty” consistency. It is much better than soy cheese, very good –but not as yummy as the Real Mozerella McCoy.) Cut in wedges and serve alongside fresh fruits for a light supper or beautiful appetizer to go with your next wine party!
*Besides being handy behind a stove top, Ingrid is also a social media whiz, and serves as a social media consultant for my husband’s literary agency. (Click on her name to read her most recent article on blogging tips.)
Baked Macaroni and Cashew Cheese
Posted: March 22, 2012 Filed under: Main Dishes, Uncategorized, Vegan, Vegetarian | Tags: cashew cheese, cashews, casserole, mac and cheese, macaroni and cheese, non-dairy cheese, vegan, vegan casserole, vegetarian 7 CommentsYesterday was our Vegan Anniversary! We celebrated by making this baked macaroni with cashew cheese, a version of one of our favorite go-to vegan dishes.

Baked Macaroni & Cashew Cheese
Two years ago Jared and I were on a Spring Break vacation at our favorite little island in Florida. Want to see how we celebrated back then? Jared is going to kill me for posting this.

Oh yes, that’s how we rolled! I believe that is a plate of barbeque pork nachos bigger than Jared’s head, a grouper sandwich hanging from his mouth, some grilled shrimp, a side of onion rings, and I don’t think that green St. Patty’s Day beverage is a tall glass of wheatgrass. Though we don’t have a photo to prove it (thank goodness!), I too helped devour this heart attack waiting to happen. Little did we know, this was one of our last meaty meals. We certainly went out with a bang didn’t we!?
On our drive back from Florida to Texas, we listened to some books on CD that I had randomly grabbed from our local library’s limited selection. One of them shared some pretty compelling information from The China Study that had us thinking twice about the dairy and meat in those nachos we’d devoured the week before. As we finished up the book, Jared proposed a challenge.
“Let’s try it. Let’s go vegan for a month and see how we feel,” he said.
A challenge I’d wanted to make myself, but would never have dreamed of proposing to my meat, cheese, and potatoes eating manly man of a man.
“Let’s do it,” I agreed!
And 24 months later, here we are with no plans of turning back.
Jared has even become quite the little vegan chef. He found the original recipe for the macaroni and cashew cheese and made it for us the first time. It was so good I asked him to make it again for both of our family’s Christmas dinners. To our surprise, even his teenage brother, the guy who has to have Kraft shells & cheese at every family gathering, liked it. We made it for my mom and Greg when they visited a few weeks ago and Greg announced “This is better than real mac and cheese.” I like the original a lot, but decided to make some tweaks to it to shake things up a bit.

Who knew you didn't need cheese to make a creamy and delicious macaroni casserole!?
Rachel’s
Baked Macaroni and Cashew Cheese
Inspired by Epicurean Vegan
Serves: 6-8 people
Ingredients
16oz small whole wheat pasta, cooked al dente (shells, rotini, elbow macaroni, or penne are all great)
1-1/4 C raw cashews
1/2 C nutritional yeast
1 tsp onion powder
1 tsp salt
1/2 tsp garlic powder
1/2 tsp white pepper
2 cloves garlic, minced
1 small white onion, chopped
2 Tbs EVOO
4 C unsweetened nondairy milk (I used almond)
3 Tbs cornstarch
1/2 C canola oil
3 Tbs Earth Balance (vegan butter)
1/8 C barley miso (any miso would probably work fine, the original recipe called for light miso)
1 cup dairy free sour cream
2 Tbs lemon juice
1 tsp Tabasco (optional)
Panko break crumbs
Smoked Paprika (optional)
Italian Seasoning (optional)
Directions
Start by boiling your pasta water and preheating the oven to 400 degrees.
In a large saucepan saute garlic & onions in olive oil with a sprinkle of salt over medium heat for five minutes.
Meanwhile, in a large food processor bowl finely grind the cashews, but don’t let them turn to a paste (or you’ll end up with cashew butter–not a bad result, but not what you’re looking for here.) Add the nutritional yeast, onion powder, salt, garlic powder, and white pepper. Pulse a few more times until it looks like a fine powder.

Process until it is a fine powder, but before it turns into cashew butter
Add the onions and garlic to the food processor bowl and pulse a few times.
If the pasta water is boiling, go ahead and drop the pasta and set your timer for 2-3 minutes less than the package recommends. You want to pull out your pasta when it is al dente because it will continue cooking in the oven.
In the same large saucepan as you used for the onions and garlic combine one cup of milk and the cornstarch on high heat. Stir constantly with a whisk until the cornstarch dissolves. Gradually add the rest of the milk, stirring as you go. Finally add canola oil and Earth Balance. Bring the mixture to a simmer then decrease heat to low-medium, cover and simmer, stirring occasionally for 5 minutes. Turn off the burner, add miso and sour cream and stir until incorporated.
With the food processor running, gradually add the wet ingredients to the work bowl. Blend for about 2 minutes or until smooth and creamy. Next blend in the lemon juice and tabasco (optional).
In a large casserole dish, pour the cashew sauce over the pasta. You want to have a lot of liquid because it will reduce as it bakes.

To avoid dry casseroles, always make sure they have have plenty of liquid before they go in the oven to bake. For best results, add a smiling bouncing baby in the background as you cook. 🙂
Cover the top of the dish with a thin layer of panko bread crumbs. I like to add a sprinkle of smoked paprika and Italian seasoning, but it would be just fine without it if you don’t have it. Bake for 30 minutes at 400 degrees or until the bread crumbs are golden. Serve immediately.

Baked Macaroni and Cashew "Cheese"
Notes: If you have leftover cheese sauce, save it and use it on the leftovers since the sauce tends to thicken over time. Add a pat of Earth Balance and a drizzle of nondairy milk to your leftovers before reheating to keep it nice and creamy. I’ve also added chickpeas and veggies to this dish before baking to up the nutritional profile and it was really tasty. It’s a very versatile casserole and hard to mess up. Though I’ve never used dairy milk, butter, and sour cream, I imagine it would work great in this too if that’s what you have on hand.
This was printed from: We Laugh, We Cry, We Cook
The site URL: http://welaughwecrywecook.com
The Title: Baked Macaroni and Cashew Cheese
The URL: https://welaughwecrywecook.com/2012/03/22/baked-macaroni-and-cashew-cheese
© Copyright 2012 – All Rights Reserved
Sesame Broccoli Slaw
Posted: March 20, 2012 Filed under: Uncategorized | Tags: appetizer, asian, broccoli, carrots, gluten-free, salad, sesame, side dish, vegan, vegetarian, veggies 2 Comments
Today, a new mom friend asked when she would ever feel like herself again after quitting her job and becoming a mother full time. At first I chuckled and thought about saying, “I think it will be about 30 years from now!” Then I recalled there was a moment after Jackson was born, when I first felt like my old self again.
He was about three months old and Jared and I were desperate for a night to ourselves. Money was tight, though, now that I wasn’t working and bills for the two day hospital visit were piling up. The amount we owed to doctors was growing faster than Jackson was! Despite our empty bank account, we called the grandparents and asked if they could watch Jackson for the evening. They happily obliged.
We couldn’t afford to go out to eat, but with the few groceries we had on hand and a little creativity I planned to turn our patio into the finest bistro in town. (The competition isn’t too steep in Small Town, Texas!) Before we dropped Jackson off, Jared and I prepped all the food, cleaned the house, hid all the baby gear away, and set up a table on the back patio. I got dolled up, putting on a dress and heels for the first time in months, thrilled to fit into my pre-pregnancy clothes.
When we returned to our home “bistro,” all was ready for wining and dining. It was a perfect fall evening with just the slightest chill in the air. A bowl of delicious homemade vegetable soup and a bottle of Pinot Noir kept us plenty warm while we chatted the night away.
I remember stopping mid-sentence and saying to Jared, “We are talking, like really talking, and I’m actually able to focus on what we are saying!” The newborn haze had lifted for at least an evening and I felt like my old self again. I’d forgotten how much I loved spending the day in the kitchen, and evenings together, with the first love in my life. It was in that moment I realized though motherhood will forever change me, and in ways I’m really grateful for, I still need to make room in my life for the things that inspire and energize me. I’ll be a better mother for it.
One of my favorite creations from our romantic evening was an Asian-inspired Sesame Broccoli Slaw I served as our appetizer salad. It was crunchy, tangy, sweet, and easy to make ahead so it was waiting for us when we arrived at The Back Porch Bistro.

Rachel’s
Sesame Broccoli Slaw
Serves 2 as a side salad or appetizer, probably up to 4 as a side dish.
Ingredients
2 cups Broccoli, thinly sliced into ribbons
2 cups Carrots, thinly sliced into ribbons
4 tbs Rice Vinegar
2 tbs Olive Oil
2 tbs Organic Sugar
2 tbs Sesame Seeds
1 tsp Sesame Oil
1 tsp Salt
Directions
Slice the broccoli and carrots into ribbons as thin as you can. (A vegetable peeler works great to “cut” the carrots really thin. Just start about half way up the carrot and peel, peel, peel lovely little ribbons. Then start over with the upper half of the carrot.) In a bowl, add all of the ingredients and toss. Cover and refrigerate for at least 30 minutes to let the flavors mingle and the carrots and broccoli soften up. Can be served chilled or at room temperature.
This was printed from: We Laugh, We Cry, We Cook
The site URL: http://welaughwecrywecook.com
The Title: Sesame Broccoli Slaw
The URL: https://welaughwecrywecook.com/2012/03/20/sesame-broccoli-slaw/
© Copyright 2012 – All Rights Reserved
Blueberry Raspberry Oat Nut Bars
Posted: March 19, 2012 Filed under: Breakfast Foods, Desserts | Tags: bar cookies, blueberries, blueberry bars, blueberry desserts, blueberry oat nut bars, breakfast, breakfast food, dessert, nuts, oats, snacks, treats, vegan, vegetarian 15 Comments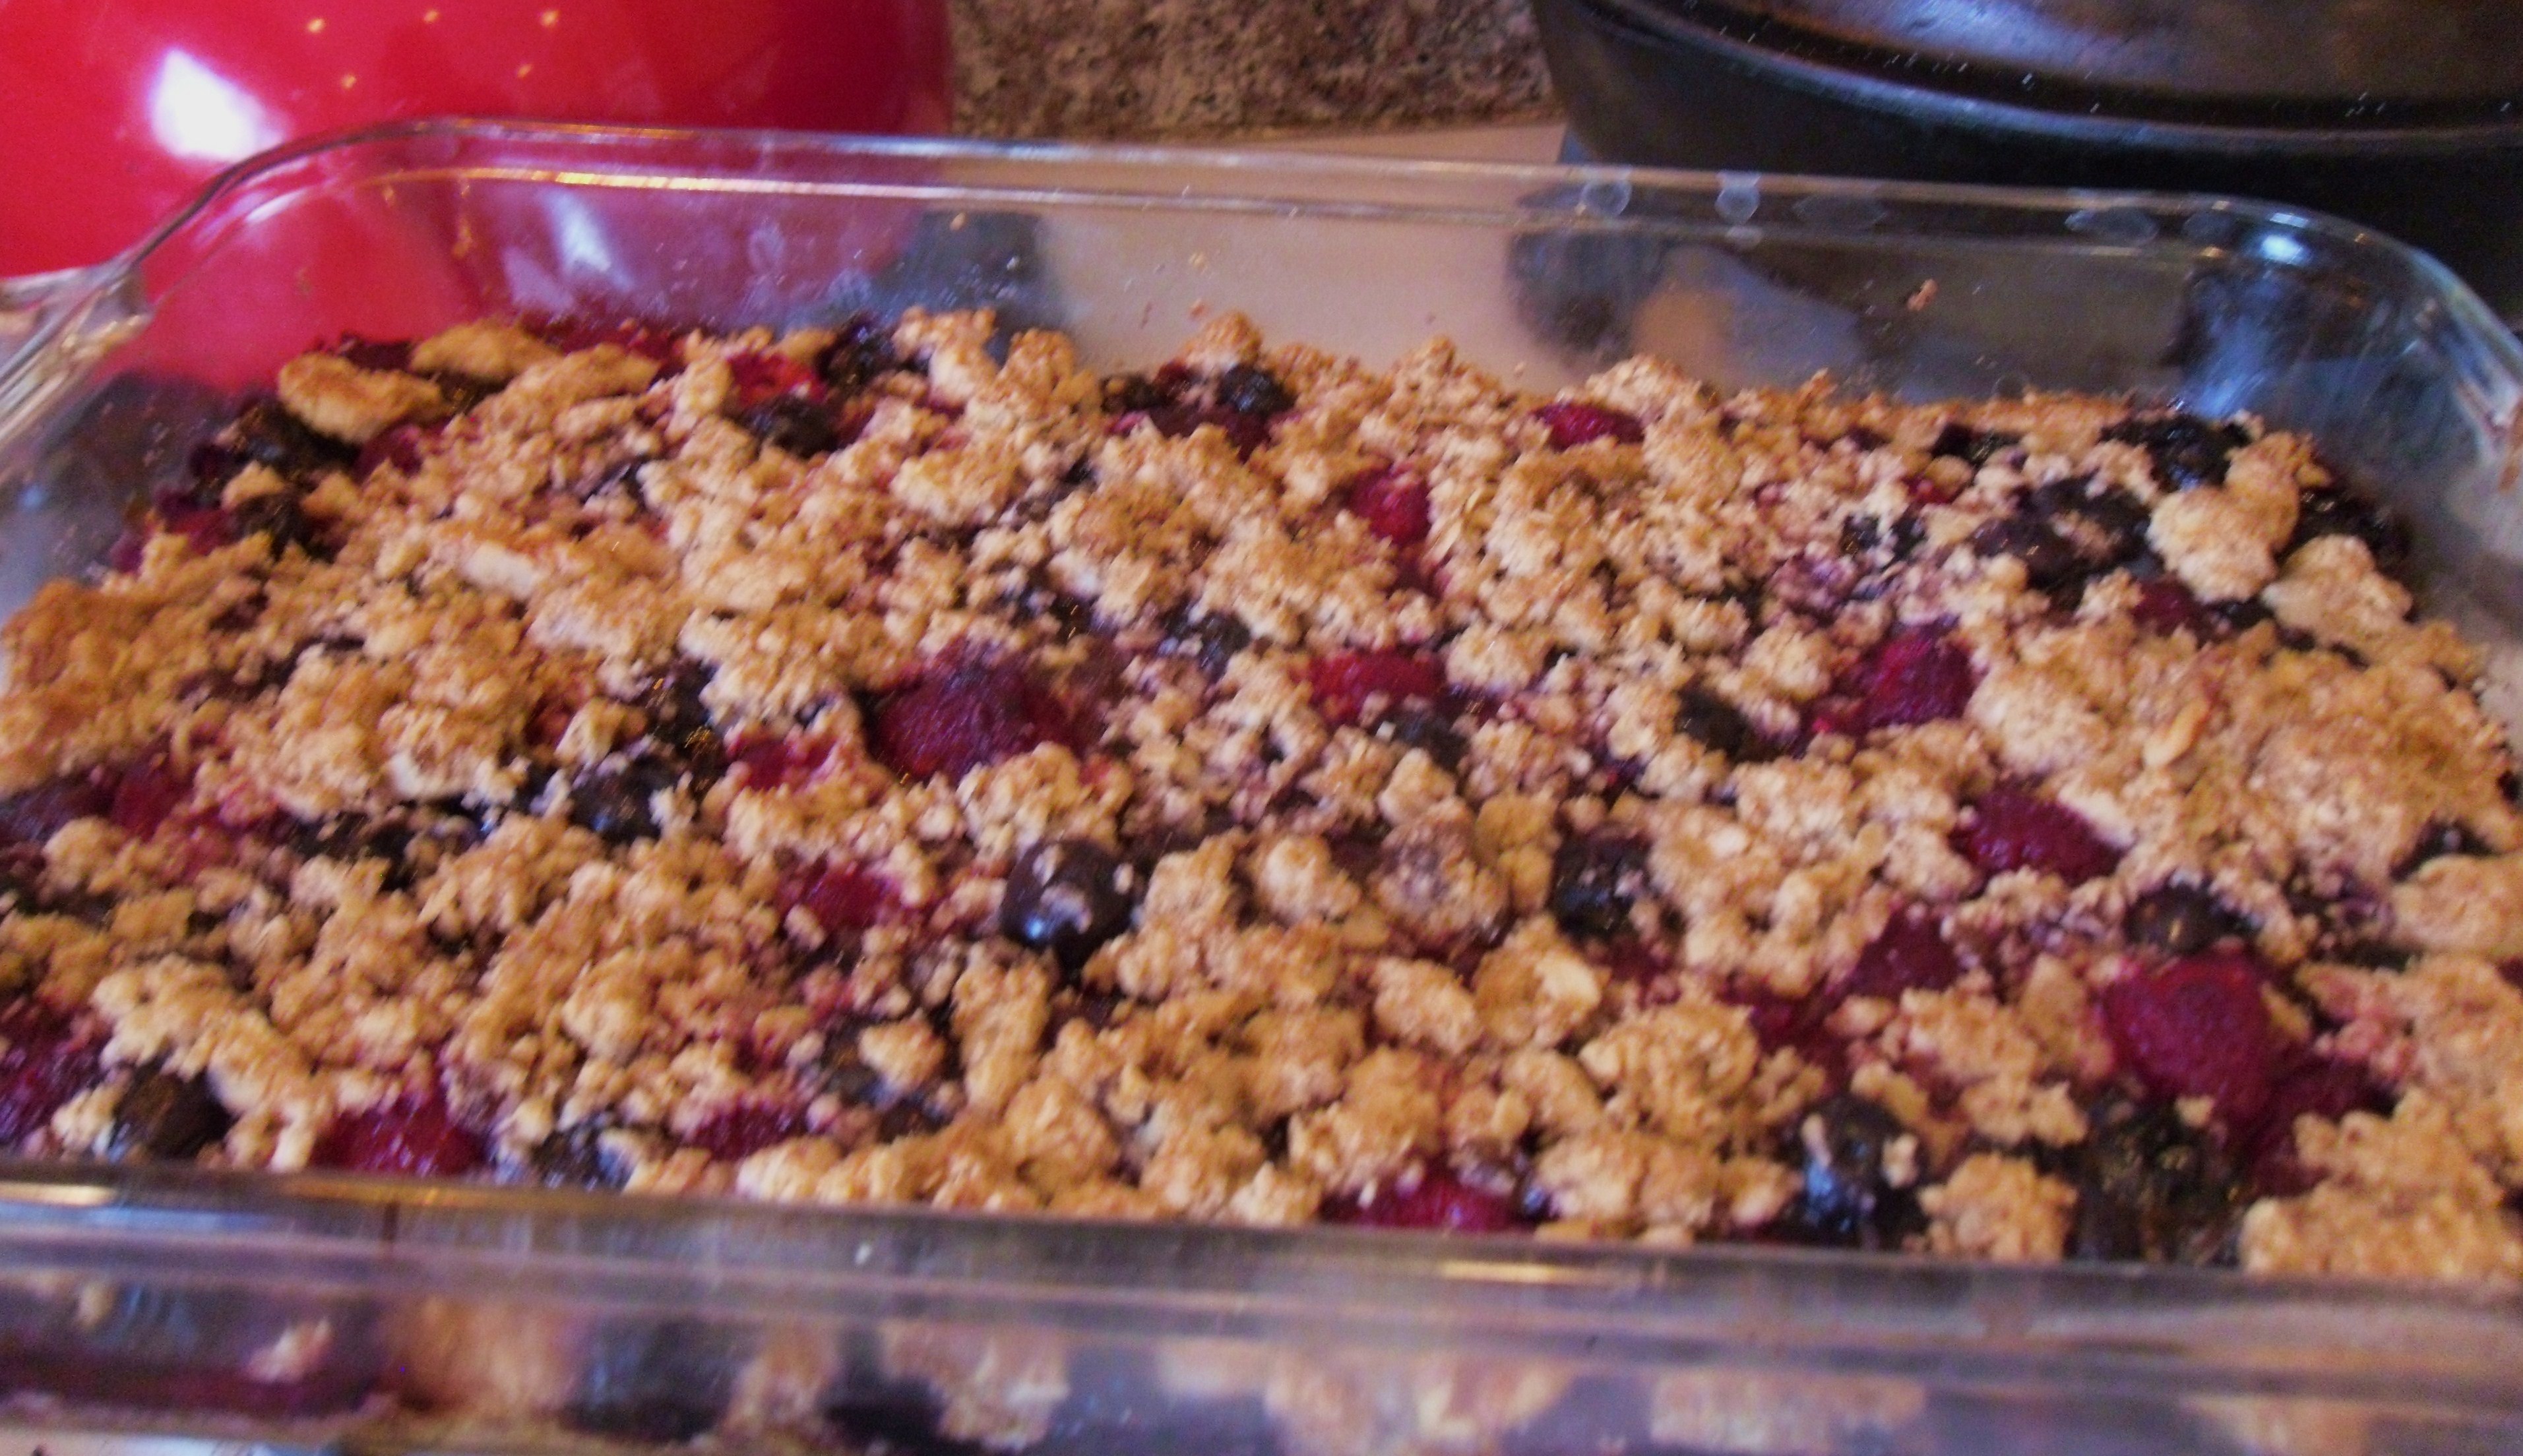 (Becky, the Mama.) This week I had a run of crazy mistakes that defy even my questionable logic. One day began by sending my husband’s business blog post, unedited, to hundreds of subscribers on the wrong day. From there it seemed every hour was punctuated by a wrong move, a major mess or spill in the kitchen, an embarrassing misspelling on social media, or a relational faux pas.
I was determined to make the next day mistake-free, and sailed through until about 3:00 pm, when I darted into a store and ran into a friend. Her face was full of compassion as she hugged me. “I read about all your latest mishaps on Facebook, bless your heart.”
I smiled and said, “Yes, but I’m having a much better day. No mistakes yet!”
She pointed to my abdomen and said, “So that big white sticker that says, ‘Citrus juicer, $5.00’ on your stomach, is that on purpose?”
Oh well, there’s “always tomorrow.”
This morning I woke feeling chipper, and posted a status on Facebook that described my excitement about going to my friend Sue’s house to celebrate her birthday with some of her good home cooking. I decided to whip up my favorite quick and easy berry bars to bring for dessert. They are a “just right” treat; not too sweet. Perfect under ice cream after dinner, but wonderful with a glass of milk for breakfast as well.
As we were enjoying our meal around their table (fabulous tenderloin steak, fresh corn on cob, and pesto pasta), Sue’s husband Jason grinned and asked, “Should we tell her now?”
“Tell me what?” I asked.
“Oh, Jason,” Sue said. “I wasn’t going to say anything. Becky had a hard week.”
“What?” I repeated.
Jason laughed. “Sue’s birthday is next week. We’d actually invited you to come for dinner next Sunday! But when Sue saw your status update, we thought, ‘Let’s just go with it. We’re free tonight, anyway.’”
I left half a pan of these blueberry raspberry bars with Jason and Sue, and hope it will remind them of how much I love them for being so patient and kind to their absentminded friend.
P.S. My daughter Rachel just wrote, “When my mom came to stay with me after Jackson was born, she made me these blueberry raspberry bars. I was a ravenous new nursing mom and let me just say, these did not last very long! They are especially delicious in the middle of the night with a glass of almond milk. Sigh…I miss those early nursing days when I could eat constantly and still lose weight!”

Blueberry Raspberry Bars
Becky’s Blueberry Raspberry Oat Nut Bars
Ingredients
Serves 12-15, depending on how big you cut the bars.
1 c. butter (vegans can substitute coconut oil or Earth Balance butter or a mixture of both)
1 c. brown sugar
1 3/4 c. flour
1 tsp. salt
1 1/2 c. oatmeal
1/2 c. chopped nuts (walnuts, pecans, almonds, whatever nut you like)
1 c. fresh or frozen blueberries
1 c. fresh or frozen raspberries
Directions
Preheat oven to 375 degrees. Dump the first four ingredients into the food processor and pulse until crumbly. Add the oatmeal and nuts, process just until blended. (You can also do this with a mixer or use clean hands for the job.) Press half of the mixture into a greased 9×13 inch pan: spread blueberries over the mixture and sprinkle with the remaining oatmeal mixture. (Like a crumb topping.) Bake about 25 minutes or until golden brown. Cool 10 minutes before cutting into bars.
If you have any leftover (and this is a big IF), I have found they stay freshest when wrapped well and refrigerated, then nuke the portion you want to eat for few seconds in microwave.
Try these with other fruits (raspberries, strawberries, cherries, pineapple, apples, rhubarb… or combos thereof).
Also works well with other flours (gluten free) and grains. Can sub wheat germ or other flakey grains for some of the oats to upsize or vary the nutritional value. You can use date sugar instead of brown sugar for sweetening, and keep it sugar free.
I love for people to find a basic recipe-method that works, then get creative with it, to make it their own. This is a great recipe to “play with,” because it is hard to mess up! (Even for me.)
This was printed from: We Laugh, We Cry, We Cook
The site URL: http://welaughwecrywecook.com
The Title: Blueberry Oat Nut Bars
The URL: https://welaughwecrywecook.com/2012/03/19/blueberry-oat-nut-bars/
© Copyright 2012 – All Rights Reserved
Refreshing “Lemon Drop” Berries, Walnut & Greens Salad
Posted: March 16, 2012 Filed under: Salads, Uncategorized | Tags: apples, berries, blueberries, easy salads, gluten-free, greens, lemon, light salads, olive oil, refreshing, salad, salads, spring salads, strawberries, summer salads, vegan, vegetarian, veggies, walnuts, winter salads 8 Comments
Not long ago, I enthusiastically wound up my Cuisinart salad spinner, a gift from my efficient salad-loving daughter. What I did not do was read the instructions, which I’m now guessing said something like, “Wait until the inner whirling colander comes to a complete halt before removing the lid.” If you remove the lid early in the spinning process, I can testify that you will immediately give your entire kitchen, including ceiling and floor, a certain lettuce-based Rain Forest look. However, if you use it correctly, a salad spinner is quite the nifty item to dry the lettuce mix for this recipe below, one of my favorite salads.
The “dressing” is mixed as you toss the salad, no need for a separate bowl.
 Becky’s
Refreshing “Lemon Drop” Berries, Walnut & Greens Salad

Serves 4
Ingredients
4 to 6 cups of early spring mix lettuce (rinsed, patted, or spun dry)
½ c. toasted walnuts or pecans
1/2 c. fresh blueberries
1/2 c. sliced fresh strawberries
Juice of one small lemon or ½ large lemon
Olive oil (about 2 T. or to taste)
Sea salt (to taste)
Organic sugar (to taste)
(Blue cheese , feta, goat cheese or Gorgonzola crumbles can also be added if you want a heartier salad.)
Directions
In a large salad bowl place the greens, berries and toasted nuts. Squeeze juice of one small lemon over all. Toss. Sprinkle the leaves with sea salt and sugar to taste. (Hint from professional chefs: salad always tastes better and you use less dressing if you lightly salt the greens just before serving.) Toss. Finally squiggle about 1-2 Tablespoons of olive oil. (My good friend Lucille gave me a bottle of Meyer Lemon Olive Oil featured in the picture- so good in this recipe!) Toss gently again. This is a taste-as-you-go salad. The dressing should taste sweet & sour — like lemonade or “lemon drops” — with just enough salt and olive oil to make it savory.
This salad is a light go-to side dish that goes especially well with heavier main dishes. Once you get the method down, it is also one of the fastest, easiest salads you can throw together – and everyone loves it! Try using sliced green or red apples or sliced peaches in place place of berries, for a salad that refreshes in all seasons.

I made a huge version of this salad on a big oval platter fothe holiday. Not a drop of salad left, and it was so beautiful. Looked like a Spring garden! Added some goat cheese to this version. Yum!
This was printed from: We Laugh, We Cry, We Cook
The site URL: http://welaughwecrywecook.com
The Title: Refreshing “Lemon Drop” Berries, Walnut & Greens Salad
The URL: https://welaughwecrywecook.wordpress.com/2012/03/16/refreshing-lemon-drop-apple-walnut-greens-salad/
© Copyright 2012 – All Rights Reserved
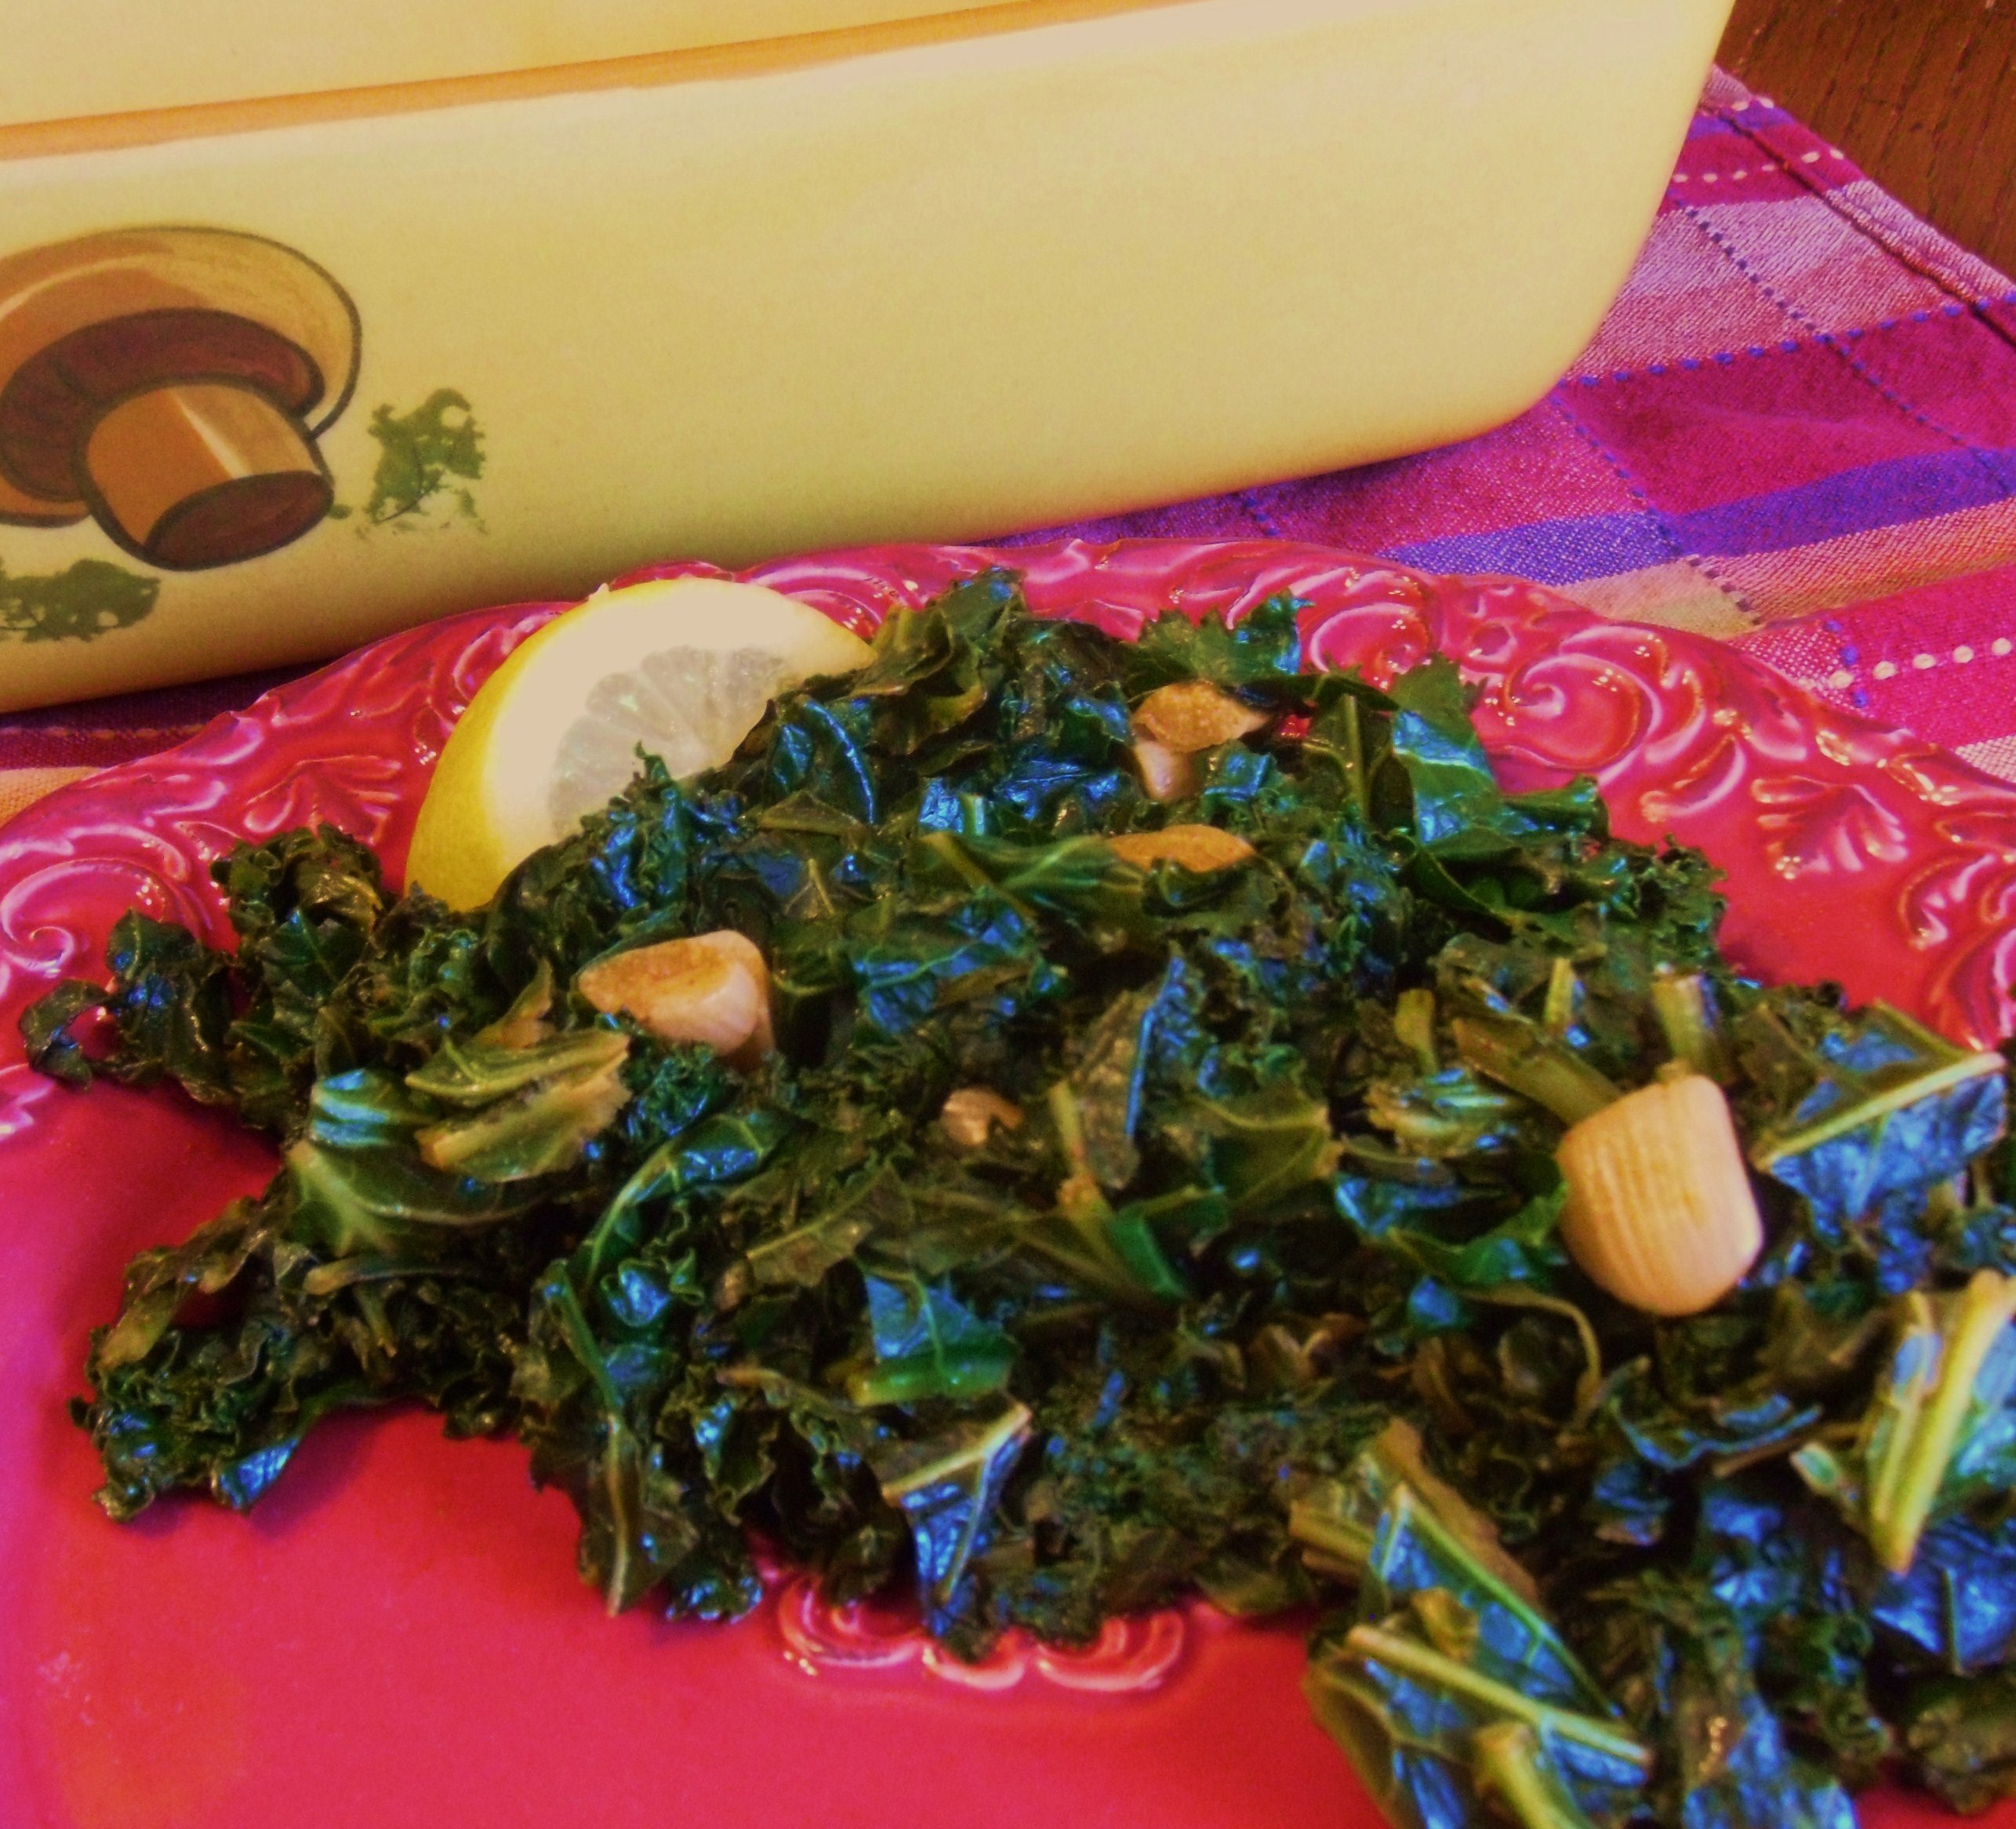
Smoky Garlic Lemon Kale
Posted: March 14, 2012 Filed under: Uncategorized, Veggies | Tags: garlic, gluten-free, greens, kale, lemon, side dishes, vegan, vegetarian, veggies 3 CommentsThe first time I tasted kale, I must admit, I spit it out and threw it away.
But my vegan daughter continued to wax eloquent about the virtues of kale: its texture, its taste, its nutrition! Then one day I tasted a bite of kale, cooked right. I was an instant Kale Convert. Now I also say, “All hail to kale!” It keeps a nice, un-mushy texture in soups and stews and I love the little bit of chewiness. Like spinach that never turns to slime.
Recently Rachel snapped this picture of her baby, Jackson, overjoyed with his fist full of kale. If this face doesn’t convince you to try it, I’m pretty sure nothing will.

Kale Baby! "Mmmmm...."
This recipe is a wonderful side dish that I like so much, I could honestly eat the whole bunch for lunch. (And in fact, I just did.) It reminds me of the southern-style greens from my childhood that were cooked all day with bacon. But this recipe adds smoky flavor without bacon, richness without added fat, and only takes about ten minutes to whip up.
Becky’s
Smokey Garlic Lemon Kale
Ingredients:
1/2 c. water
1 1/2 t. vinegar
1 bunch kale
2 cloves garlic
1/4 t. smoked paprika (see picture below)
1 t. olive oil
1/2 t. brown sugar
1/2 lemon
Salt and pepper to taste
Directions:
Tear stems from kale, then rinse and rough chop into about one inch pieces. “Massage” these pieces with your hands for about five seconds to tenderize them.
Into a skillet put: water, vinegar and 2 peeled cloves of garlic, chopped into about four to six slices each. Boil this mixture and then add the kale. Turn heat down to medium and simmer for about 7 minutes. Check it about 1/2 through cooking to make sure there is enough liquid in the pot to keep the kale from burning. The tricky part is to babysit the kale so that the kale itself absorbs as much liquid as possible, without going dry and burning.
When kale is tender, add olive oil, juice from one half a lemon, and brown sugar. Season with salt and pepper and serve. Serves about 4 people, unless you are me, and ravenous, then it only serves one.

Rachel introduced me to smoked paprika, essential for this dish. Adds a wonderful smoked flavor to veggies, beans or meats.
This was printed from: We Laugh, We Cry, We Cook
The site URL: http://welaughwecrywecook.com
The Title: Smokey Garlic Lemon Kale
The URL: https://welaughwecrywecook.wordpress.com/2012/03/14/smokey-garlic-lemon-kale/
© Copyright 2012 – All Rights Reserved
Tomato Basil Stackers
Posted: March 13, 2012 Filed under: Uncategorized | Tags: avocado, basil, English Muffins, Ezekiel Bread, lunch, tomato, vegan, vegetarian Leave a commentLast week I picked up some vine ripened tomatoes and my heart went pitter patter when I cut one open and saw that they were just as vibrantly red in the middle as they were on the outside. Better yet, they were sweet and flavorful and tasted like a tomato should taste. Blah tomatoes make the winter feel so long, don’t they? I can taste summer coming around the corner when I bite into my first juicy tomato.
To me, there is no better way to enjoy a nice ripe tomato than letting its flavors shine in between fresh basil leaves and sliced avocado on a garlicy toasted English muffin. Garlic toast brings any savory sandwich up a notch. It has amazing health benefits too. My mother swears that garlic cures everything from a head cold to a stumped toe. When she came to visit last week I had a sinus infection, and she made me swallow a garlic pill every time she caught my eye. Her parting gift to me was a bottle of odorless garlic tablets. I am now cured.
Mother knows best.
Anyway, I could eat this simple sandwich every day. I always buy the Ezekiel 4:9 Sprouted Grain English Muffins. You can find them in the freezer section of most stores that carry the Ezekiel line of breads. Not only does their nutty flavor taste delicious when toasted, but they bring 8 grams of protein, 6 grams of fiber, and a mere 160 calories to the plate.

Ezekiel English Muffin toasted to perfection with EVOO and garlic

Rachel’s
Tomato Basil Stackers
Serves 1
Ingredients
1 Ezekiel 4:9 Sprouted English Muffins, sliced through the middle
1 Garlic Clove, Minced
1 tbs EVOO
1 Vine Ripened Tomato
6 Fresh Basil Leaves
1/2 Avocado
Salt
Fresh Cracked Pepper
Drizzle of High Quality Olive Oil
Directions
Turn your oven on broil low, in a small bowl mix EVOO with minced garlic. Spread garlic and oil onto the inner side of the english muffin slices. Place on the top rack of your oven and broil until the edges just start to brown and crisp up. Stay close, it won’t take long. You don’t want this to happen.
Meanwhile, slice the tomato and avocado into slices, and gently tear the basil leaves a few times to release their flavors.
Layer the avocado, basil, and tomato onto one slice of the toasted english muffin. After each tomato layer, sprinkle with salt, fresh cracked pepper, and a small drizzle of high quality olive oil. When finished layering top with the other side of the English muffin.
I like to layer it like this: bread, avocado, tomato, basil, tomato, basil, tomato, basil, avocado, bread. I kind of spread the avocado onto the bread to keep it from sliding off. But layer to your hearts content or do two open faced ones if you don’t like a high stacker. I like to stack it high and then just lean over my plate and dive in. It will be messy, but oh so delicious!
This was printed from: We Laugh, We Cry, We Cook
The site URL: http://welaughwecrywecook.com
The Title: Tomato Basil Stackers
The URL: https://welaughwecrywecook.com/2012/03/13/tomato-basil-stackers/
© Copyright 2012 – All Rights Reserved
Hello Mother, Hello Daughter
Posted: March 12, 2012 Filed under: Introductory Blog, Main Dishes, Soups | Tags: burnt toast, butternut squash, cowboy caviar, ginger, mother daughter relationships, poblano peppers, soup, sweet potato, toast, vegan, vegetarian 11 Comments “My mother burns the toast as surely as the sun rises each morning. In fact, I doubt that she’s ever made a round of toast in her life that failed to fill the kitchen with plumes of throat-catching smoke. I am nine now, and have never seen butter without black bits in it.” Nigel Slator, Toast
Becky (“The Mother”)
Though I’m now a truly good cook, I’m still not always an alert cook, which means that I tend to burn food. The smoke alarm, for many years, was basically our dinner bell.
When my second born Zeke was about five years old I handed him a perfectly golden piece of toast. He took the toast and a dinner knife and walked over to the trash can and started scraping it. “Zeke, Honey,” I said. “You don’t have to scrape your toast today. Mommy didn’t burn it!” To which he looked at me, eyes wide and said, “Oh. I thought we always had to whittle our toast.”
******
We recently visited at Jared and Rachel’s home in Texas, having driven a couple of days from Denver to get there. With my adorable grandbaby flashing us a dimpled smile from his highchair, Rach and I couldn’t wait to roll up our sleeves, get into the kitchen, and cook!
Rachel made an amazing butternut squash soup for our lunch, and while it was simmering, she popped a pan of homemade croutons in the oven, giving me one job: to guard them. Then she disappeared to rock Jackson and put him down for his nap.
Rachel (“The Daughter”)
As I settled into the rocking chair with my sleepy baby, I was going over our lunch menu in our head. The soup was simmering, the side dish was all chopped and ready for consumption, the croutons were toasting.
Oh no. I left the croutons on 450 degrees!
Sure, a high temperature is a quick way to crisp up the chunks of bread lightly coated in olive oil and Italian seasoning, but they need to be watched closely with this quick cook method. The problem: my mom, notorious for burning the bread, was in charge of them. I considered texting her from the nursery to remind her to keep an eye on them, but I’d only asked her to do that one thing…surely she hadn’t already forgotten. I told myself, “Surely, Mom will smell them browning before they get too crisp. I can live with a little char.”
Before I’d finished the argument in my head (“Should I, or should I not, text her?”) I heard a loud “BEEP, BEEP, BEEP!!” coming from the kitchen, an all too familiar sound from my childhood. This was not a kitchen timer, not the microwave, not an annoying cell phone ring…this was none other than the smoke alarm.
Still holding Jackson, who had been on his way to dreamland but was alert and wide-eyed now, I rushed to the kitchen. Through a smoky cloud, I see Mom carrying a pan of black char to the back patio.

Like the “Saturday Night Live” skit, “Really!? with Seth and Amy,” all I could say was “Really, Mom? Really?!”
Shoulders scrunched, an innocent smile on her face, mom sheepishly replied, “Soooorrry. I think I may have slightly over-cooked the croutons.”
How can you not forgive a face like that? It’s a little bit childlike, mixed with a lot of ditzy blonde, sprinkled with a dash of Steve Urkel. Did I do thaaaat? I may not need this sweet innocent face as often as my mom has used it, but it’s a family skill I’m proud to have learned. It works wonders on my husband…especially after he looks at the credit card bill. Did I buy thaaat?
Becky
The soup was amazing even without the croutons, especially with a garnish of Rachel’s homemade Cowboy Caviar and tortilla chips.

Cowboy Caviar. This tangy black-eyed pea, avocado, corn relish is a staple at potlucks in the South.

Sweet & Spicy Butternut Soup garnished with vegan sour cream, cilantro, and tortilla chips
What occurred in the kitchen that day is a small window into the dynamics of our Mother-Daughter relationship. I have what a brain doctor called “Inattentive ADD.” Which means I’m not particularly hyper, but I’m ditzy, easily distracted and over-optimistic about things like time, limits, and reality.
Rach has always enjoyed rules and order and minimalist décor with the same enthusiasm that I enjoy flying-by-the-seat-of-my pants, ignoring messes, and filling every space with vintage clutter. My daughter owns a kitchen timer and actually knows where it is and how to use it. This astounds me.

Rachel’s
Sweet & Spicy Butternut Squash Soup
This rustic soup is just enough sweet and just enough spice to warm you up on a chilly winter day or to eat around the fire pit on a cool summer night. You could even simmer it over the fire in a dutch oven and serve it up in over-sized mugs if you want a really rustic presentation and experience.
Ingredients
Drizzle of Olive Oil
½ red onion, diced
1 poblano pepper, seeded and diced
2 jalapeno peppers, seeded and diced
4 cloves of garlic, diced or minced
½ cup baked sweet potato, mashed
2 cups of baked butternut squash, mashed
4 tbs white wine (divided)
2 cups veggie stock
1-3 cups water
Salt to taste
2 pieces of candied ginger (optional)
Garnish suggestions: croutons, tortilla chips, cilantro, sour cream (regular or non-dairy)
Directions
Heat olive oil on medium heat in a large pot (enough to lightly coat the bottom of the pan). Sweat the onion and peppers in olive oil with a sprinkle of salt until soft, add garlic and sweat for two more minutes. Add two tablespoons of the white wine and stir. Add the veggie stock, 1 cup of water, squash, sweet potato, and candied ginger (leave whole). Bring to a boil, then lower heat and simmer on med-low for 20 minutes. Remove ginger (unless you like the flavor a lot—I prefer small traces of it). Transfer to a food processor and blend until smooth. Transfer soup back to your pot and add more water if you would like a thinner consistency. Finish with remaining white wine and salt to taste. Garnish with your choice of toppings.
Notes: I happened to have leftover baked sweet potato and squash from making baby food when I first made this. As a quicker alternative, I’m sure you could chop up peeled sweet potato and squash and just simmer with the soup until they are soft all the way through. Though I think baking or roasting root vegetables brings out their best flavors.
This was printed from: We Laugh, We Cry, We Cook
The site URL: http://welaughwecrywecook.com
The Title: Hello Mother, Hello Daughter
The URL: https://welaughwecrywecook.wordpress.com/2012/03/12/hello-mother-hello-daughter/
© Copyright 2012 – All Rights Reserved


