
Seductive Puttanesca Sauce
Posted: April 25, 2012 Filed under: Beef, Gluten Free, Main Dishes, Pasta, Vegan, Vegan Options, Vegetarian | Tags: capers, chick peas, garbanzo beans, marinara, olives, Papperdelle, pasta, pepperocinis, Puttanesca, spaghetti squash, Vegan Pastas 1 Comment
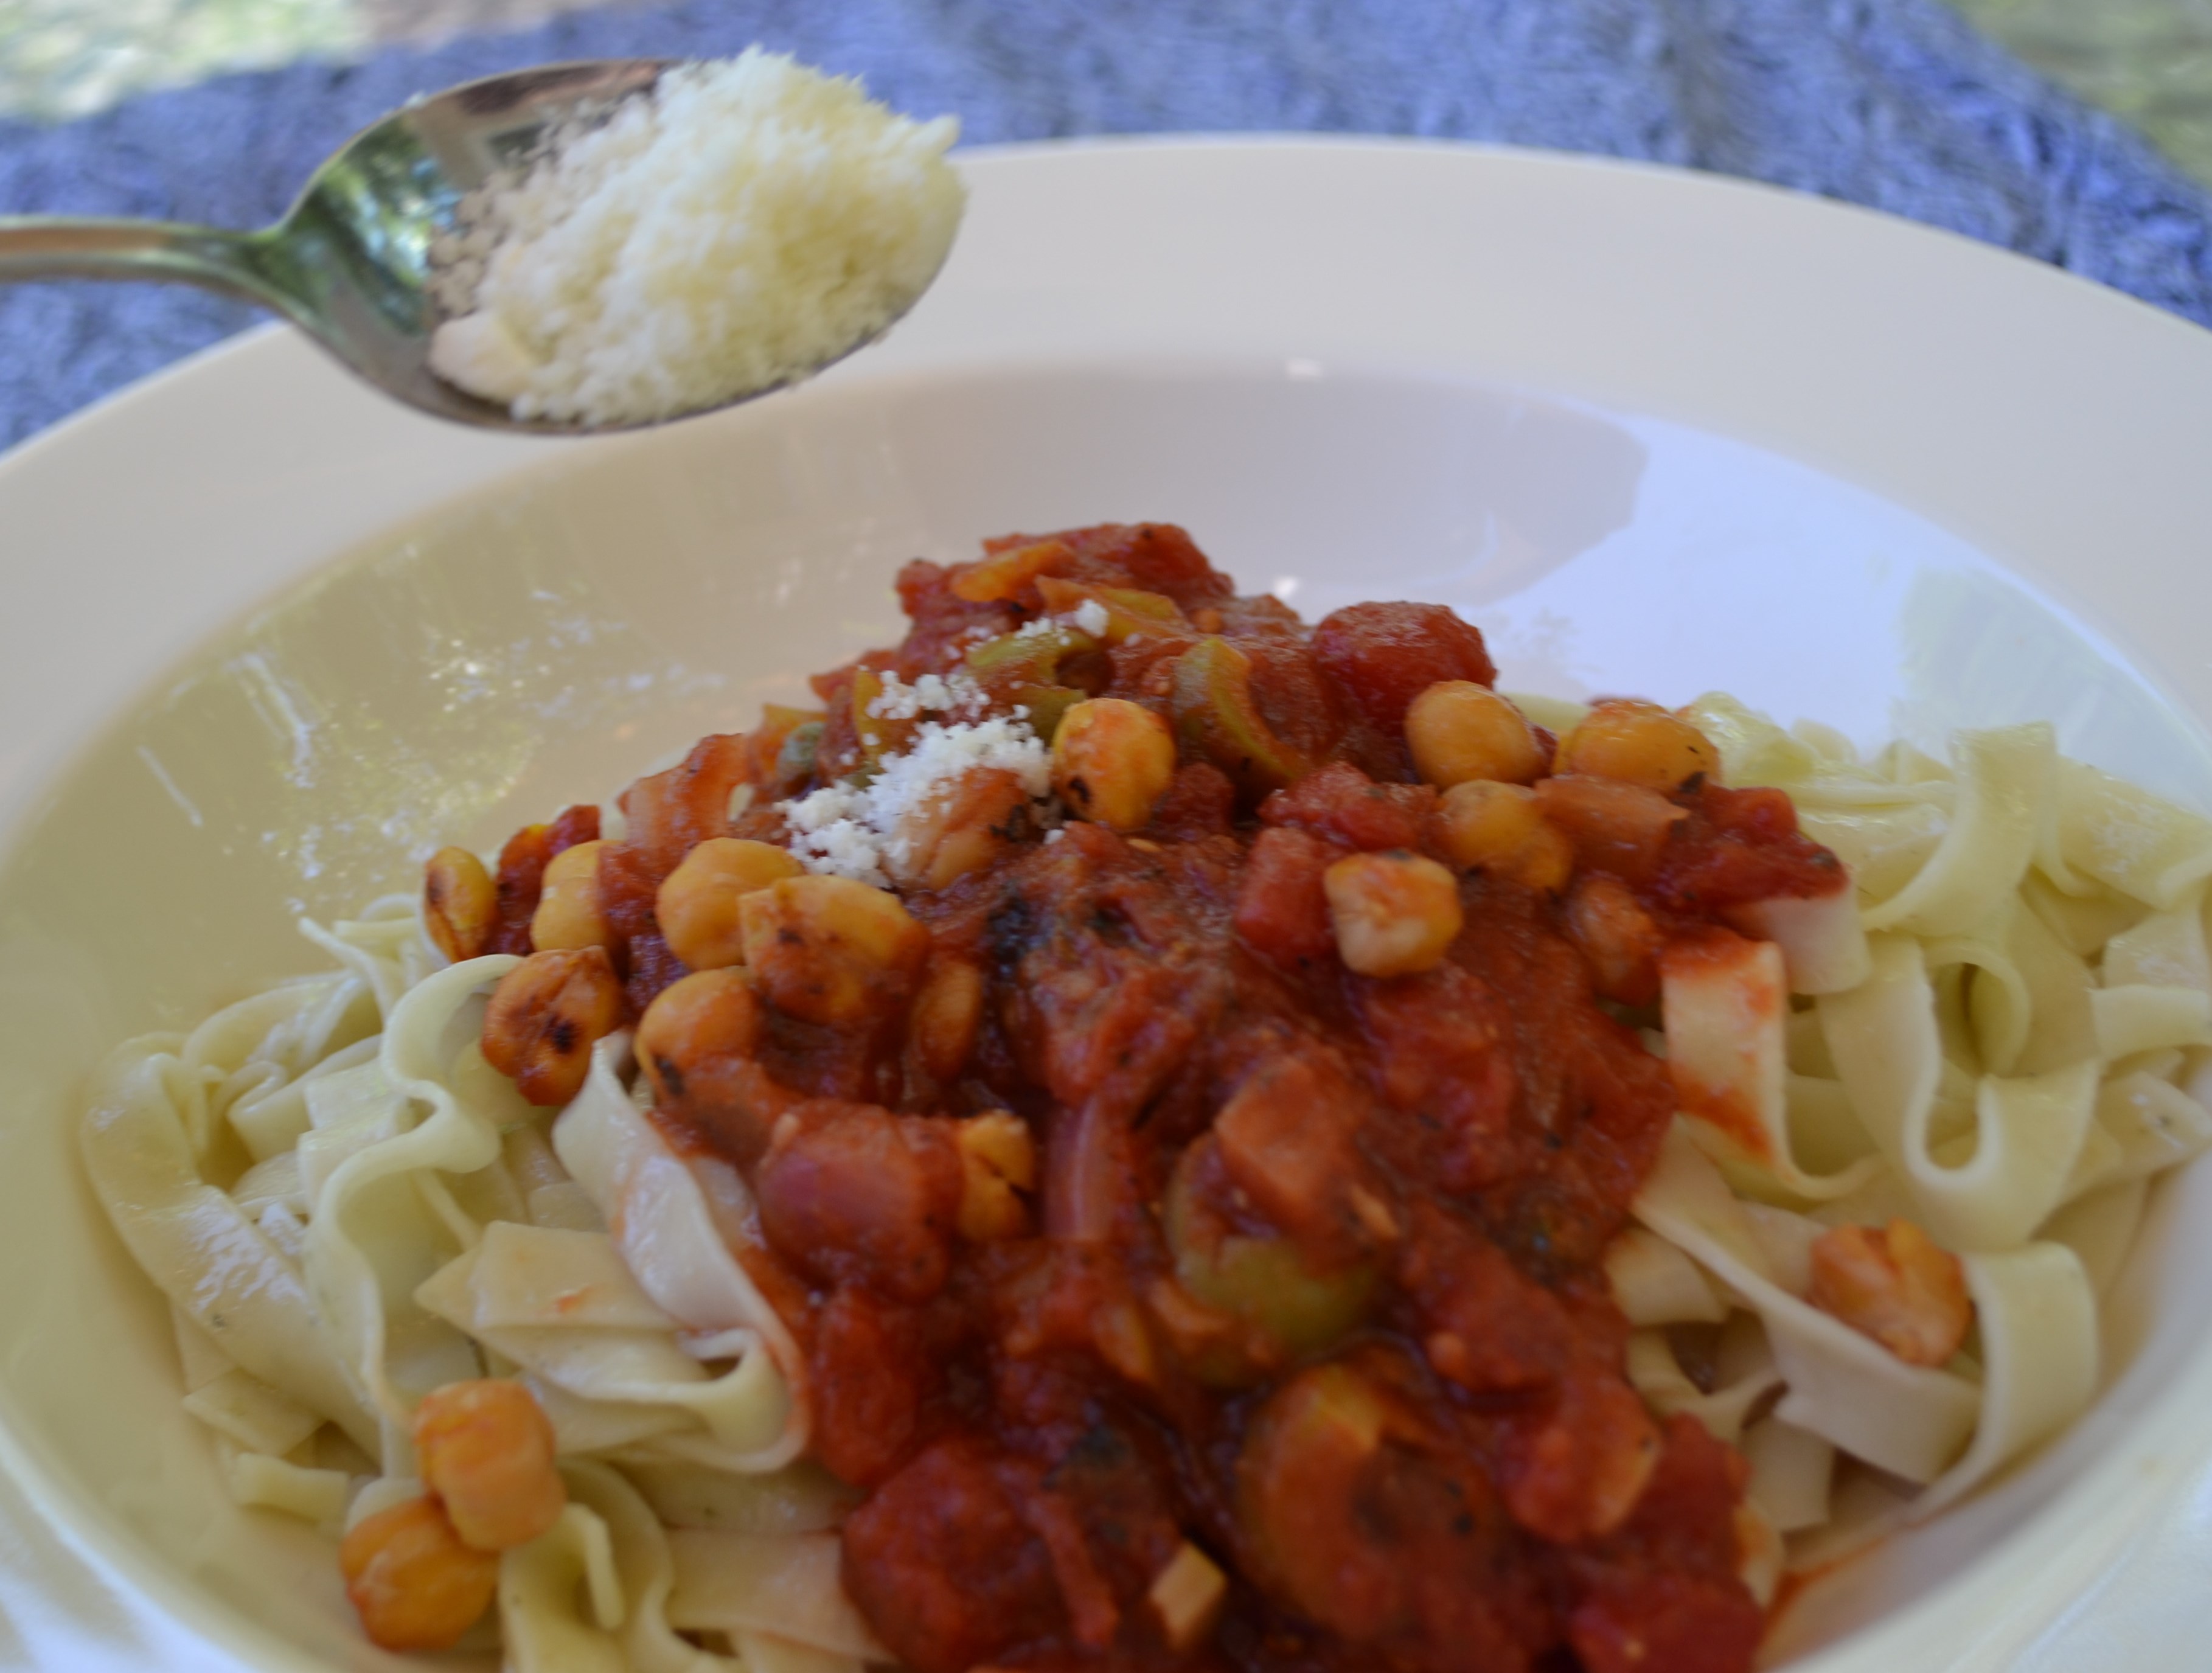
Becky’s Seductive Puttanesca Meat Sauce over Lemon-Pepper Pappardelle
Now and then I get a hankering for something that tempts all the senses: salty/briny, sweet, garlicky, rich and tomato-y. And when I do there there’s nothing like Puttanesca sauce to satisfy.
There are hundreds of variations on Puttanesca, but basically, it is a rich marinara sauce with a touch of something salty and briny (capers, olives, anchovies, artichoke hearts, and or pepperocinis) to give it an extra tangy zip. I also like to balance the zip with something sweet — chopped sun-dried tomatoes and/or brown sugar.
I recently served this dish, innocently, to a lovely group of female friends, many of them involved with some sort of Christian ministry. They loved it, scraped the skillet clean! In attendance that night was my good friend Lucille Zimmerman who is a writer and a therapist who loves to research little known facts with the passion of Curious George. She went right home and researched the meaning of the word, “Puttanesca.” She wrote to tell me that it means — oh, how shall I say this delicately? –“prostitute, whore, ladies of night, harlot,” just choose your favorite wanton woman term. Probably not a “word of the day” you’d choose to teach your kids over pasta.
Apparently the potent aroma of this dish from Italy was so powerful that the scent lured in potential customers off the street, serving as an appetizer for, well, the other “desserts” on the menu.
Oh, well. There’s nothing I can do about the origin of this dish, but I can tell you there is something powerfully seductive about it!
Below is how I make my Puttanesca, but don’t be intimidated by the ingredient list: it is what I had on hand in the fridge. Just pull out whatever you have in your fridge or pantry — and as long as you have something salty & briny, and something sweet, to balance the basic marinara, you’ll probably love the results.

Becky’s Seductive Puttanesca Sauce Over Pappardelle Lemon-Pepper Pasta

Becky’s Seductive Puttanesca Sauce
Into a medium high skillet (I love my cast iron for this) saute:
2 cloves minced garlic
1/2 chopped onion in 2 T. olive oil
Throw in any mixture of the following that you have on hand, stirring after each addition. (I do highly recommend that you use the chopped artichoke hearts, to me they are the most essential ingredient!)
1/3 – 1/2 c. chopped marinated artichoke heart
1/2 c. to 1 cup, any roasted or left over vegies, diced.
1 T. capers
2 T. olives, chopped, any kind
2 T. pesto sauce (if you have it on hand… no worries if not)
2 T. chopped pepperocini peppers
2 T. chopped sun-dried tomatoes (packed in oil, preferably)
1 – 2 T. brown sugar (this will depend on your taste and also how many “sour” ingredients that you put in your sauce that will need balanced by sweet)
1 28 oz can crushed tomatoes (I like the ones with basil and garlic)
1 t. Italian seasoning or oregano
Salt & Pepper to taste
Simmer until sauce is thick and chunky, then season with salt, pepper, and Italian spices to taste.
You can dress up the recipe from here and add some flavorful meat of your choice. It is delicious with ½ lb of ground beef sauteed with ½ pound Italian sausage (chicken or turkey sausage is great) tossed in. Or you can go vegan and roast garbanzo beans (see recipe below) and serve over your favorite pasta, or spaghetti squash (see instructions for this below as well). My daughter and I made this vegan version together (she suggested we try it with roasted garbanzos), and it was AWESOME.
I personally adore this sauce served over Trader Joe’s Lemon Pepper Pappardelle Pasta (which is a wide ribbon-like pasta). I looked up the root meaning of “pappardelle” and to my great relief, it simply means “to gobble up.” Whew. Much better “Italian word of the day” for little ones.
A light sprinkle of Parmesan (Vegan Parm if you are going dairy-free) and it is ready to serve. The aroma should draw hungry folks to your kitchen in no time.
Roasted Garbanzo Beans ( Chick Peas )
Drain, rinse and pat dry a can of garbanzo beans. Pour them evenly on a cookie sheet that has been sprinkled with olive oil, then roll them around. Sprinkle with salt or your favorite spiced salt. Roast at 350 for 10 to 15 minutes or until they are browned and crisped. (Shake them once or twice while baking so they can brown on two sides.)
Spaghetti Squash
Take a spaghetti squash and cut it in half length wise. Scoop out seeds. Put 1/2 cup water in the bottom of a big microwave proof bowl. Put one of the squash halves in the bowl, hole side up. (If it wobbles, trim a thin piece of the squash off the bottom so that it sits more level in the bowl.) Put the other squash half on top of the squash in the bowl. Don’t cover it. Just put in microwave for 10 minutes. Test done-ness by squeezing the top squash with a pot holder. If it squeezes easily, it is done. Take a fork and scrape “strings” of squash in spaghetti-like fashion.
Lightly salt, then top with sauce and roasted garbanzo beans. (You can also serve leftover spaghetti squash with butter and pepper and nutmeg for a side dish.)
This was printed from: We Laugh, We Cry, We Cook
The site URL: http://welaughwecrywecook.com
The Title: Seductive Puttanesca Sauce
The URL:http://wp.me/p1UwM9-ep
Balsamic Roasted Garlic Veggies
Posted: April 24, 2012 Filed under: Sides, Vegan, Vegetarian, Veggies | Tags: balsamic roasted veggies, balsamic vinegar, broccoli, carrots, cauliflower, garlic, onions, peppers, potatoes, roasted garlic, roasted vegetables, roasted veggies, squash, zucchini 3 Comments“I don’t like asparagus. I don’t like broccoli. I don’t like onions. I don’t like garlic. I don’t like vegetables. Well, I do like corn … and potatoes. I like potatoes.”
This was my husband when we first got married.
I don’t remember cooking much in our first year of marriage. In fact, I have no idea what we ate. I hardly have a single memory in that tiny galley kitchen. Between Jared’s aversion to all things that made food delicious to me and the hideous marbled yellow laminate counter tops with cracks on the corners, I must have felt less than inspired.
When we moved to a new town house with a bright white kitchen near Galveston, I suddenly found myself looking for excuses to be in the kitchen. I started shopping at Farmer’s Markets and reading food blogs and became determined to get Jared to love veggies. Little by little, I found ways to prepare certain vegetables in a way he would eat them. He’ll eat onions if they are caramelized or chopped fine and sauteed in a dish. He’ll eat his peas in a split pea soup. And I can get him to eat almost anything wrapped in a tortilla and dipped in salsa. Thank goodness, because in a crazy turn of events, before we moved out of that town home a year later, we had become full on vegans.
The preparation that finally got Jared raving and begging for veggies was roasting them. If it’s coated with a little evoo and seasoning and crisped up to perfection (to him that includes a few burnt bits on the pan), he’s a happy husband and a happy veggie eater!
This method works wonderfully with asparagus, any root vegetables, broccoli and cauliflower, onions, even chickpeas. Try it with a vegetable you think you don’t like and see if it changes your thoughts on it.

Roasted vegetables are easy enough to serve up on a weeknight and beautiful enough to serve to guests for a celebration dinner.
Rachel’s
Balsamic Roasted Garlic Veggies
Ingredients
(Note: The vegetable list is just a guideline. Use whatever you have in your refrigerator or is on sale at the market. The seasoning ingredients listed are for about 4 cups of vegetables.)
Potatoes, chopped (small, soft-skinned work great, but Idaho & sweet potatoes are wonderful too)
Carrots, chopped
Onions, quartered (leave one end in tact so they don’t get burnt)
Peppers (bell peppers, sweet tri colored peppers, poblanos) (seeded & quartered)
Broccoli (cut into “trees”)
Cauliflower (cut into “trees”)
Zucchini (chopped into large chunks or long ribbons)
Squash (chopped into large chunks or long ribbons)
2 T (maybe more) Extra Virgin Olive Oil
1 T. Balsamic Vinegar
2 t. Salt
2 t. Pepper
1 T. Italian Seasoning Blend
A full head of garlic
Directions
Preheat oven to 400. Spray large cookie sheet with nonstick spray.
Put all the veggies except the garlic in a large mixing bowl, and drizzle 2 tbs of olive oil over the veggies. Toss until all of the veggies are lightly coated, adding more olive oil if needed. Don’t drench them or you’re veggies won’t get crisp. (The amount of olive oil varies because some veggies soak up more, like cauliflower, and others hardly absorb any, like peppers.)
Add balsamic vinegar, salt, pepper, and Italian seasoning, and toss again. Pour veggies onto the cookie sheet and spread around. If they are piled on top of each other, use a second pan.
Take the garlic, remove the lose skin, and chop the top of the head off the garlic so the inside of each clove is exposed. Place the bulb on a piece of foil and drizzle the top of the bulb with olive oil. Wrap the foil around the clove. Add the foil wrapped garlic onto the pan of veggies (sitting upright). Check this tutorial out if you need a visual.
Bake the veggies and garlic for approximately 40 minutes. The potatoes and carrots take the longest to cook, so cook until they are soft in the middle and crispy on the outside.
Remove the garlic from the foil and allow to cool for a few minutes. Carefully either squeeze the garlic out (like toothpaste), or use a fork to remove each clove. Toss in with the roasted veggies. The garlic is delicious and really elevates roasted veggies! Your friends will most definitely track you down for the recipe. Trust me.
This was printed from: We Laugh, We Cry, We Cook
The site URL: http://welaughwecrywecook.com
The Title: Balsamic Roasted Garlic Veggies
The URL: https://welaughwecrywecook.com/2012/04/24/balsamic-roasted-garlic-veggies
Melty Parm Cheese, Walnut & Clementine Appetizer
Posted: April 23, 2012 Filed under: Appetizers, Uncategorized, Vegetarian | Tags: appetizers, clementines, Parmasan cheese, walnuts 4 Comments
Simple 3 Ingredient Delightful Bite: Parm Cheese (heated until pliable), walnuts and juicy clementines.

View from the condo porch. It is 75 degrees, which is why I need to be outside more than I want to be in the kitchen this week.
Though I generally love to cook, even when on vacation, I do not love to make complicated recipes that take time away from the pool and a book, and general self-imposed laziness. This week we are tucked into a timeshare in Orlando, Florida for seven days on business/vacation. (Greg is mostly taking care of the left side of the “business/vacation” slash, since he actually has to work. I’m taking care of the right side of the slash, since I –joy of joys! –mostly get to do whatever I please this week.)
A funny aside: Last night we were in bed and I heard what I thought was either the romantic roll of thunder or possibly the fireworks from Disney in the distance. I asked Greg if he heard the same sounds. He kindly responded, “Sweetie, that’s the toilet flushing in the condo above us.”
Needless to say, I’m totally in my Vacation Mind. So far today I’ve “cooked” a couple of bowls of cereal, a PBJ sandwich and peeled some string cheese and clementines. Not fancy fare worthy of food posting, really. But then, at Happy Hour time, I got inspired. I saw some Parmesan cheese and walnuts (I’d packed them in my carry-on from home), and a bowl of fresh Florida clementines (bought in haste from the local grocery last night.) Let me tell you, these Floridians really get premium citrus. These clementines are so juicy they nearly burst in your hands as you peel them. Naturally sweet and tangy. Oh my. When fruit is this good, you don’t want to do much to it. Just let Nature shine. So, on the fly I invented these Parm Cheese-Walnut and Clementine Appetizers. Salty, nutty, warm meets fresh, tangy, sweet and cold. So yummy.
Our cocktails in hand (see my recipe for Clementine Mojitos), I sliced a few “Parm shards,” sprinkled a few walnuts on top. Microwaved for 15 seconds. The Parmesan became just “melty” enough to be pliable. I rolled a piece of the warm Parm around a walnut and a slice or two of fresh clementine. It was Happy Hour in our mouths in less than a minute.
That’s it. That’s the whole 3 ingredient, 15 second recipe. The pictures below will show exactly how to throw this instant party food together.
Variations: Try with other cheeses, nuts and fresh fruits in season. For a larger crowd, use a baking sheet and put in a 250 degree oven for about 5 minutes or until cheese is just warm and pliable.

Parm "Shards," simply slice random thin pieces of Parmasan cheese and lay on a microwavable plate

Parm shards with broken pieces of walnuts, after being nuked for 15 seconds in the microwave

As parm cools, you can lift up little pieces and wrap around fresh clementine pieces, pop in your mouth and be very happy. Sometimes the best things in life really are the simplest!

This was printed from: We Laugh, We Cry, We Cook
The site URL: http://welaughwecrywecook.com
The Title: Melty Parm Cheese, Walnuts & Clementines Appetizer
The URL: https://welaughwecrywecook.com/2012/04/24/melty-parm-cheese-walnuts-clementines
Quicky Sticky Jasmine Rice & Mango
Posted: April 18, 2012 Filed under: Desserts, Fruit Dishes, Uncategorized, Vegan, Vegan Options, Vegetarian | Tags: anti-aging, coconut, coconut desserts, coconut milk, Dr. Amen, jasmine rice, mango, rice pudding, Thai desserts, Thai sticky rice and mango, Use Your Brain to Change Your Life 4 Comments
Becky's Quicky Sticky Jasmine Rice & Mango
Yesterday was my birthday, which means I’m only two years away from being able to answer the question, “Do you qualify for the senior discount?” in the affirmative.
The first time I say, “Yes, I’m officially old” to the kid behind the counter, you can be sure there will be salty tears stirred into my 20% Off Cup o’ Joe. (I know, the fact that I refer to coffee as “Joe” already dates me somewhere pre-WW2. But I thought I’d start practicing speaking Old People Talk. I want to get a leg up on fitting in with the AARP’s version of high school seniors as we gather in packs at the mall — before it opens, wearing sensible shoes and fanny packs, to walk around it ten times.)
But before I hit the ol’ double nickel birthday, I’d like to give anti-aging my very best shot. I am friends with and have worked with brain doc and Public Television guru, Dr. Daniel Amen. His latest book, Use Your Brain to Change Your Age, is packed full of research, stories and tips to stay young. If I were forced to sum up the entire book in two points, it would be:
1) Eat nutrition-packed, brain-healthy food. (Colorful fruits and veggies are our best friends in the anti-aging/anti-disease corner.)
2) Exercise. (Walking 30 minutes a day five times a week wards off dementia like a miracle drug.)
In August, I started a regular exercise routine, and though I am no where near svelte, I like the endorphin rush from moving in the morning, know I’m getting blood flow to my brain, and feel my endurance improving. Thanks to my Darling Daughter the Vegan, I’m discovering all sorts of yummy, creative ways to put more antioxidant-rich plant-based foods into my day. Yesterday, I decided to start my new birthday year off by becoming an EOD Vegan: Every Other Day Vegan. Periodically, I’ll report in and let you know if I’m aging backwards or losing any of my ample backside.
Thai food is one of my favorite vegan-friendly sources and last week I enjoyed a lunch of two amazing hot-spicy curries with my friend Lucille. When the waitress asked if we’d like to try Sticky Rice and Mango, since the mangoes are in season and “oh so sweet!” – we were game. And boy, am I glad we were. Fresh sliced mango with a side of almost translucent slightly sweet “sticky rice,” with a warm creamy coconut sauce over all, was delicious.
Making Thai sticky rice involves more time and contraptions than I’m willing to give or buy, but we adore Jasmine rice that I make in my $13.00 rice maker purchased at Wal-mart.

My cheap little beloved rice maker
(Commercial here: rice makers are awesome! You just pour in the rice and water, flip a switch and no burned rice, just perfect little fluffy grains, and all in about 15 minutes.) So I invented the following “Quicky Sticky Jasmine Rice & Mango” recipe – which I liked just as well as the original Thai dish. It makes a light, sweet ending to a Spring or Summertime meal.

Quicky Sticky Jasmine Rice & Mango
Serves 8
Ingredients
1 cup uncooked Jasmine rice (Jasmine rice imparts an amazing aroma and taste.)
1 ¼ cup water
1 can coconut milk, full fat (will be divided)
2 T. organic sugar
4 small mangos
Optional: 2 T. shredded coconut, sweetened or unsweetened, divided.
¾ t. salt, divided
About 8 mint leaves for garnish
Directions:
Into rice cooker (or pan, if you are cooking the rice on the stove top), put jasmine rice, ½ t. salt, water and ½ cup coconut milk and 1 T. coconut if you like. (Use mostly the liquid portion of the coconut milk to go into the rice, saving the majority of rich cream that rises to the top of the can, for the sauce.)
Into a small sauce pan, pour the rest of the coconut milk/cream from the can. Add 2 T. sugar, and if desired, 1 T. of shredded coconut, and ¼ t. salt. Stir and heat until creamy hot and sugar is dissolved. Set aside to let warm slightly.
Peel and slice mangoes, arranging them on pretty plates. You can cut them any way you like, but as you see in the picture, I cut them near to the seed, in two halves, then sliced the halves but keeping the shape intact. The dish in this pictures is enough to serve two, so I used one small mango for two people.
When the rice is done, ladle about ½ cup of the sweetened warm coconut milk over it, and stir. This will help make it “sticky.”
Pack the rice, about 1/3 cup or so, into a small cup (I used a Japanese tea cup that I first sprayed with vegetable oil), carefully turning upside down onto the plate next to the sliced mango.

Rice packed into small cup, ready to turn upside down on plate
Ladle some of the coconut milk over the rice and drizzle on mango as well. Serve any leftover coconut sauce on the table to let the guests serve themselves more if they like. Garnish with sprigs of mint.
Variations: Try with other tropical fruit like pineapple or banana. Berries would also be yummy. Makes a delicious light breakfast as well. Try with brown Jasmine rice.

Italian Veggie Layered Casserole
Posted: April 16, 2012 Filed under: Main Dishes, Uncategorized, Vegan Options, Vegetarian, Veggies | Tags: eggplant, Italian veggie casserole, layered veggie casserole, squash, squash casserole, vegan casseroles, vegetarian casseroles, veggie lasagne, zucchini, zucchini casserole 2 Comments

Becky's Italian Veggie Layered Casserole
When my kids were little, I remember going bathing suit shopping with three small children in tow. (The last child, number 4, had yet to be born.) Like most women, I’d rather pour lemon juice on a paper cut than shop for a bathing suit, especially after having incubated, grown and given birth to multiple children. The only thing that could make this task even more painful was to try to get it done with three bored and antsy preschoolers in tow.
After what must have seemed an eternity to my eldest son, he said, “Mom, just buy one of those zucchini bathing suits and let’s get out of this Lady Store!”
Little did this child know that due to his weighing in at 9 lb 2 oz, leaving stretch marks from my neck to the my knees, his mother’s days of wearing “zucchinis” (bikinis) were forever behind me.
However, I am quite fond of cooking with zucchini, and this casserole below is one of my favorite ways to use up the abundance of zucchini squash that seem to overflow everyone’s backyard garden all summer long.
I created and made this casserole last week, and it seemed to get even better the next couple of days, as I enjoyed for a vegetarian lunch or a side dish with dinner. It’s a little trouble to make, but it makes a bunch and keeps beautifully in the fridge for several days. Just cut a slice, nuke and enjoy! (Would be a great take-to-work lunch.) It also makes a gorgeous colorful side dish to go with a simple meat like baked chicken, fish, or hamburger patty for the omnivores in your family, while making a satisfying meal for any vegetarians among you. With a few tweaks, this can easily be made into a vegan-friendly dish as well.
Variations:
Vegan version below.
Add cooked seasoned ground hamburger, turkey, chicken, or Italian sausage for an all-in-one main dish casserole.
Using same technique experiment with a variety of veggies and cheeses. Try using Alfredo sauce in place of marinara.

Becky's Italian Veggie Layered Casserole
Becky’s Layered Italian Veggie Casserole
Serves 10 to
Olive oil to coat large skillet (1 to 3 Tablespoons)
1 eggplant, peeled, sliced about ¼ inch thin
2 smallish or 1 large potato, unpeeled, sliced about ¼ inch thin
1/3 c. water
3to 4 zucchini squash, sliced ¼ inch
3 to 4 yellow squash
6 slices Swiss cheese (or mozzarella or any white cheese that melts; almond or soy cheese for vegans)
4 cups marinara sauce, your favorite brand, your favorite homemade recipe or my quick blender marina sauce below * (Try to choose or cook a marinara that is a little on the thick side.)
½ c. to 2/3 c. grated Parmesan, Asiago or other firm Italian cheese (Vegans, click on this link for a recipe for fake vegan parm)
1 ½ c. crushed buttery whole wheat crackers like Ritz or Town House brands (vegans use vegan-friendly crackers of your choice)
2 T. olive oil
2 T. butter or Earth Balance for Vegans
1 t. oregano or Italian seasoning
Salt and pepper
Directions:
In large skillet, pour a couple of tablespoons of olive oil around skillet then sauté eggplant slices until partially cooked, Using tongs, place eggplant in a layer in bottom of big rectangle 11 by 13 inch baking dish. Next, partially cook potato in same skillet, adding 1/3 cup water. Then add this layer on top of the eggplant. Salt and pepper the eggplant-potato layer to taste. Pour two cups marinara sauce on top of potato and eggplant.

First layer of eggplant an potatoes with first layer of sauce being ladled on
Lay Swiss cheese or other white cheese on top of this layer. Next (using same skillet), lightly sauté zucchini and yellow squash together, adding more oil if needed. Put this layer on top of Swiss cheese. Lightly salt and pepper the squash. Pour two more cups of marina on top of squash.

Second layer of squash and marinara
Sprinkle with Parmesan cheese (or vegan substitute) Melt butter with olive oil in skillet, add crushed crackers, and stir until evenly coated. Pour buttered crackers atop casserole. Sprinkle with 1 t. oregano or Italian seasoning.

Topped with cheese and buttered crackers, ready for oven
Bake at 350 until cheese is hot and melted and crackers are golden brown about 20 to 30 minutes.


A slice of Italian veggie heaven...
* Becky’s Quick Blender Marinara
1 16 ounce can diced tomatoes with basil
1 small 4 oz. can tomato paste
1 c. water
1 t. salt
1 t. Italian seasoning
½ onion
2 garlic cloves, peeled
2 t. brown sugar
(optional: fresh basil leaves, ¼ cup red wine)
Put all ingredients in a blender, blend until smooth, or until as chunky as you like it. Makes about 4 cups marina, perfect for this recipe.
Rustic Iron Skillet Pot Pie
Posted: April 6, 2012 Filed under: Beef, Chicken, Main Dishes, Uncategorized, Vegan, Vegan Options, Vegetarian | Tags: beef pot pie, chicken pot pie, gravy, iron skillet pot pie, pie crust, pot pie, rustic pot pie, vegan pot pie, vegetarian pot pie, veggie pot pie 4 Comments
Homestyle Iron Skillet Pot Pie
My daughter is usually somewhat appalled at the disorganization in my refrigerator, along with the occasional discovery of leftovers-turned-science experiments lurking in its dark recesses.
On her last visit to Denver, her husband Jared was hungry and I told him, “Just look in the fridge and see what looks good to you. You never know what you might find.” To which Rachel immediately deadpanned, “Or what might jump out at you.”
So before I accidentally create new life forms from my leftovers, I really do try to use them up in more timely fashion these days. There are certain recipes I go-to when I need to use up the food I have on hand at the end of the week. This easy version of pot pie is one of the most successful and requested ones.
It is a little slice of flaky, creamy, hot home-style goodness. I don’t know why pot pie tastes so much better in an iron skillet than in a pie pan, but it does. And you’ll be amazed how easy it is, how fast it cooks up and comes together. (However, if you don’t have an iron skillet, it is still pretty darn amazing in a deep dish pie pan.)

Becky’s
Rustic Iron Skillet Pot Pie
Serves 4 to 5
Ingredients
1 pie crust, your favorite recipe, or refrigerated version or vegan version. (Click link for a great flaky vegan recipe!)
1/4 c. flour
2 T. olive oil
2 T. butter or Earth Balance (vegan)
1 1/2 c. chicken, veggie, or beef broth
2 potatoes, peeled and diced
4 medium carrots, peeled and diced
1/4 c. teriyaki sauce
1/2 t. grated garlic
1/2 c. frozen corn
1/2 c. frozen peas
Any other bits of leftover cooked veggies you have on hand. (I had about a 1/2 c cooked mushrooms to toss into the mix tonight, along with some leftover sauteed onions & peppers.)
Leftover diced cooked meat: chicken or beef, or any combination to make 1 1/2 to 2 cups, depending on how much you like and how much room is left in the skillet! (I diced a large cooked chicken breast and a cup of diced leftover roast. I often use leftover Rotisserie chicken meat for this dish.)
For Vegans: Use 1 can drained kidney beans and 1 can drained butter beans in place of meat. The kidney beans add a nice firmness and color and the butter beans are big and creamy and well, buttery. The combination makes a very tasty veggie pot pie. If you have a favorite vegan meat substitute, this could also be used.
Salt & Pepper to taste
Directions:
Preheat to 400 degrees.
Cook diced potatoes and carrots in about two cups water with dash of salt, turning burner to high to get a boil going, then down to medium heat to let them simmer.
While potatoes and carrots are cooking, mix 1/4 c. flour with 2 T. oil and 2 T. butter (Earth Balance for Vegans) in bottom of 10 inch iron skillet. Cook and stir constantly on medium heat until a paste forms (happens quickly), and while stirring with one hand (use a whisk), pour 2 1/2. cups veggie, beef or chicken broth slowly into skillet to make thickened gravy. (If you are new to gravy-making it helps to have a partner do the slow pouring of broth while you whisk.)
To the simmering gravy add:
2 T. teriyaki sauce
1/2 t. grated garlic
1/2 c. frozen corn
1/2 c. frozen peas
Any other leftover veggies you have on hand. (I had about a 1/2 c cooked mushrooms to toss in to the mix tonight, along with some leftover sauteed onions & peppers.)
To this add the drained, cooked carrots and potatoes. Gravy should be pretty thick and creamy (about consistency of heavy cream); adjust to desired thickness by simmering more to thicken, or adding a little more broth to thin. (You can add a splash of half-in-half or cream if you want a more creamy gravy.)
At this point, add salt and pepper to taste. Stir. Remove from burner.
Place uncooked pie crust over the top of the hot gravy-veggie mixture and carefully (that skillet is hot!) tuck the edges of the pie crust just inside the cast iron pan as pictured. Cut decorative slits in pie crust with a sharp knife to allow steam to escape.
Transfer skillet (using potholders) to 400 degree oven for 20 minutes or until crust is flaky and golden.
Serve pot pie at the table in the skillet, with big spoon to let each person dip out what they want. (Be sure to wrap a tea towel around handle of iron skillet so nobody burns themselves touching it.) Best served and eaten in bowls to catch every drop of goodness. Serve with a simple side of sliced fresh fruit and you’ve got dinner!
Variations: Some people prefer more “crust” with their pot pie. I love pie crust, too, but too often the bottom of pot pies can be soggy. So I will simply cook an extra round of pie dough, flat, on a cookie sheet, break it up in about 2 inch pieces, and serve in a bowl at the table, allowing “pie crust” lovers to add more crispy crusts to their bowl if desired. No soggy bottoms!
Refreshing Mandarin Orange & Pineapple Cake (Vegan Friendly)
Posted: April 4, 2012 Filed under: Desserts, Uncategorized, Vegan, Vegan Options, Vegetarian | Tags: birthday cakes, coconut milk, coconut oil, crushed pineapple, mandarin orange and pineapple cake, mandarin orange cake, Mandarin oranges, pineapple, pineapple cake, refreshing cake, refrigerator cakes, Spring cakes, Summer cakes, vegan birthday cakes, vegan cakes, whipped coconut cream, whipped cream 1 Comment
One warm day when my daughter Rachel was about fourteen, she bounced in the kitchen and said, “Mom, you have GOT to get the recipe for this cake called ‘Refreshing Cake’ that Cricket’s mom made today. It was cold and full of fruit and not too sweet, and creamy… and I want it for my birthday cake.”
Cricket was one of Rachel’s best friends, and luckily her mom was the sweet-natured recipe-sharing sort, so her recipe for “Refreshing Cake” (made with cake mix, eggs, pudding mix, a cup of oil, canned fruit and Cool Whip) showed up not only at birthdays, but was our go-to Spring and Summer dessert for family gatherings.
Then Rachel grew up, married, and became a vegan, bravely waving good-bye to many of her favorite desserts made with lots of dairy and eggs.
I, too, became more health conscious in my own way. I grew up in the 70’s when our collective moms (prompted by TV and the health advice de jour) stocked the kitchen with the latest new-fangled foods: Fresca, Tang (Why drink OJ from an actual orange when you can drink orange flavored sugar water?), margarine, IMO (A sour cream substitute. What those initials stood for is still a government secret.), saccharine, Mellorine (an artificial ice cream that melted into tile grout) and Cool Whip, that luscious tub full of hydrogenated oil and air!
We were a generation of kids raised on NASA and chemicals, basically eating astronaut food.
(I must hasten to add that my mother turned into something of a health nut in the decade of the 80’s, and has remained healthily and happily so ever since.)
But somewhere along the way to adulthood, I tasted real butter and ice cream (Blue Bell), promptly fell in love with the real McCoys, and began cooking with all things “natural.”
Now recipes with “artificial food” ingredients leave a slight chemical aftertaste in my mouth, not to mention an ache in my tummy.
But with the coming of Spring, visions of that moist pineapple and Mandarin orange cake, with its pineapple-whippy-pudding frosting started dancing in my head again. Along with the thought, “I wonder if I could create a ‘real food’ vegan-friendly version of this cake that doesn’t taste like fruit flavored mashed tofu and lentils?”
I’m pleased to say that with a quick trip for a couple of specialty items at Whole Foods, I produced a Refreshing Cake that is not only chemical free, organic and vegan… it tastes better than the original to me. No weird aftertaste, no achy tummy. Just a pure “real food” moist, yummy cake.
It would also make a great make-ahead cake for Easter lunch or dinner. A little preview tip: two cans of whole full fat coconut milk will need to go in your fridge overnight before making the recipe. This allows the “cream” to solidify and rise to the top so you can skim it off and whip it!

Becky’s Refreshing Mandarin Orange and Pineapple Cake
Serves 9 to 12, depending on size of pieces
Ingredients:

Some of the ingredients for “Better for You” Refreshing Cake
For Cake:
Dr. Oetker’s Organic Vanilla Cake Mix, (This mix has no dairy or eggs in the mix, so if you don’t add any, it can be vegan.)
4 eggs (Vegans use egg-replacer equal to 4 eggs. You can click on link for recipe or buy “egg-replacer” in a box at most health food stores.)
1/2 c. coconut oil
1/2 c. applesauce (you may also use another 1/2 c. of canola or coconut oil instead, but applesauce makes it lighter in calories)
1 11 ounce can Mandarin Oranges with juice
For Frosting:
2 16 oz. cans full-fat coconut milk, chilled overnight in fridge. (You will only use the coconut cream that rises to the top.) If you prefer dairy, you can use 1 c. whipping cream instead. Or 1 can of coconut cream and 1/2 c. whipping cream combined which is what I use most often as it seems to render the best of both!
1/2 c. vegan vanilla pudding mix (I used about half a package of Mori Nu vanilla pudding mix. If you aren’t vegan you can use any 3 1/2 oz. package of instant vanilla pudding mix.)
1 28 ounce can crushed pineapple, drained
1/4 c. raw organic sugar or agave nectar
2 t. good vanilla
Directions:
Preheat oven to 350 degrees.
To make the cake, mix the organic cake mix with eggs or egg-replacer of your choice, coconut oil and applesauce. When thoroughly blended, fold in mandarin oranges with juice, breaking gently as you stir. Pour batter into an 11 by 13 inch pan and bake for about 20 minutes or until golden brown and cake springs back to touch in the middle. Cool and refrigerate until cool to the touch before frosting.

Refreshing Cake before frosting
Using an electric mixer, whip the coconut cream as you would cream until it has the consistency of whipped cream. (Or if you prefer to use dairy, whip 1 c of heavy cream. I often use half coconut cream and have whipping cream.) Add 1/2 c. of vegan pudding mix (save rest for another cake, another day:) and continue to beat. Add vanilla and 1/4 c organic sugar or agave. Fold in the can of well-drained can of pineapple. ( Really squeeze the juice out, pushing pineapple against the colander holes.) Keep in fridge until you are ready to frost. If frosting feels too thick, add a little pineapple juice until it has the consistency of easy-to-spread, slightly stiff, whipped cream. If too thin, let it set in fridge for up to an hour and it should thicken.

Whipped Coconut Cream with Pineapple folded in
When the cake is chilled, frost with coconut-cream-pineapple frosting. You may want to garnish with a little flaked coconut. Cover with plastic wrap and keep in fridge until you are ready to serve. I think this cake tastes even better the next day or two as flavors have a chance to chill and mingle.
Refreshing Clementine Martini & Mojito
Posted: April 2, 2012 Filed under: Cocktails, Gluten Free, Uncategorized, Vegan, Vegetarian | Tags: clementine cocktail, clementine cocktails, clementine martini, clementines, cocktails, elderberry, elderberry cocktails, elderberry martini, mint, rum, St. Germain cocktails, St. Germains, vodka 6 Comments
Clementine Mojito
Oh my Darlin’ Clementines, how we’ve come to love you. Call them clementines, baby tangerines or Cuties, these sweet small oranges have won our hearts.

My firstborn grandson Nate, at age 3, once ate almost a whole bowl full of Clementines on a family beach vacation to San Clemente. We sat in awe, watching as he peeled and ate one after another, “all by himself,” and ate them with glee as we sat on the porch and watched the sea waves roll in.
I tuck Clementines into my purse on all my airplane trips now because they not only have Vitamin C, but a nice serving of fiber.
So, I figured, nutritious as they are, if one should add clementine juice to a martini, it would practically be a health drink…right?
In fact, the juice of 3 or 4 clementines and a shot or two of vodka, shaken with ice, yields a simple, lovely martini that needs no other sweetener. It is perfectly balanced as is.
But recently I tried a cocktail with St. Germains liqueur added, which is made from delicate elderberry flowers, but smells and tastes faintly of grapefruit. It was divine. Add this liqueur to the clementine and vodka, and you’ve got yourself an exotic, refreshing martini of citrus heaven.
The martini worked out so well, I took a glance at the mint already burgeoning in my herb garden this day in early April, and thought, “Hmm…. clementine mojitos! How could those not be good?”

Then my husband got our tax bill from the accountant and suddenly volunteered to taste any and all martinis and mojitos I made tonight, sacrificing for the good of this blog. Bless his heart.
Needless to say, we are now both happy campers. The martinis? Excellent. The mojitos? Amazing.
Just in time for tax season, I bequeath you both recipes.

Becky's Clementine Martini with Elderberry
Becky’s Clementine Martini
Serves One
Ingredients:
1/4 to 1/3 c. clementine juice (3 to 4 small clementines)
3 T. vodka
1 -2 T. St. Germain’s Elderberry Liqueur (depending on how strong you want it)
2 T. organic raw sugar mixed with 1/2 t. clementine zest (for rimming glass)
Put martini glass into freezer to chill. Put clementine juice, vodka and St. Germain’s into a shaker of ice. Shake-shake-shake. In a shallow bowl mix sugar and clementine zest. Take chilled glass out of freezer, run a slice of clementine around the rim to moisten the edge, then dip in sugar & clementine zest mixture.

Zest and organic raw sugar mixture to rim the glass
Strain martini and pour into cold sugar-zest rimmed martini glass.

Becky’s Clementine Mojito
Serves One
Ingredients
1 T. organic raw sugar
1/2 t. clementine zest
5 to 7 mint leaves
Juice of 3 clementines
1 T fresh lime juice
3 T. rum or vodka
club soda or sparkling water to top off glass
Directions:
Into a tall glass put mint leaves, sugar and clementine zest. Muddle with stick end of a wooden spoon to bruise the mint leaves and help the sugar to dissolve and melt. To this mixture add clementine and lime juice, rum or vodka. Stir. Add ice and top off drink with club soda or sparkling water. Stir once more and garnish, if you like, with slices of lime, clementine and a small sprig of mint.
Non-alcoholic Variation: These mojitos are perfect for your non-alcoholic guests or children if you leave out the liquor and just add a wee bit more sugar (or agave) and club soda or sparkling water. Nice alternative to lemonade for summertime sipping.
Baked Macaroni and Cashew Cheese
Posted: March 22, 2012 Filed under: Main Dishes, Uncategorized, Vegan, Vegetarian | Tags: cashew cheese, cashews, casserole, mac and cheese, macaroni and cheese, non-dairy cheese, vegan, vegan casserole, vegetarian 7 CommentsYesterday was our Vegan Anniversary! We celebrated by making this baked macaroni with cashew cheese, a version of one of our favorite go-to vegan dishes.

Baked Macaroni & Cashew Cheese
Two years ago Jared and I were on a Spring Break vacation at our favorite little island in Florida. Want to see how we celebrated back then? Jared is going to kill me for posting this.

Oh yes, that’s how we rolled! I believe that is a plate of barbeque pork nachos bigger than Jared’s head, a grouper sandwich hanging from his mouth, some grilled shrimp, a side of onion rings, and I don’t think that green St. Patty’s Day beverage is a tall glass of wheatgrass. Though we don’t have a photo to prove it (thank goodness!), I too helped devour this heart attack waiting to happen. Little did we know, this was one of our last meaty meals. We certainly went out with a bang didn’t we!?
On our drive back from Florida to Texas, we listened to some books on CD that I had randomly grabbed from our local library’s limited selection. One of them shared some pretty compelling information from The China Study that had us thinking twice about the dairy and meat in those nachos we’d devoured the week before. As we finished up the book, Jared proposed a challenge.
“Let’s try it. Let’s go vegan for a month and see how we feel,” he said.
A challenge I’d wanted to make myself, but would never have dreamed of proposing to my meat, cheese, and potatoes eating manly man of a man.
“Let’s do it,” I agreed!
And 24 months later, here we are with no plans of turning back.
Jared has even become quite the little vegan chef. He found the original recipe for the macaroni and cashew cheese and made it for us the first time. It was so good I asked him to make it again for both of our family’s Christmas dinners. To our surprise, even his teenage brother, the guy who has to have Kraft shells & cheese at every family gathering, liked it. We made it for my mom and Greg when they visited a few weeks ago and Greg announced “This is better than real mac and cheese.” I like the original a lot, but decided to make some tweaks to it to shake things up a bit.

Who knew you didn't need cheese to make a creamy and delicious macaroni casserole!?
Rachel’s
Baked Macaroni and Cashew Cheese
Inspired by Epicurean Vegan
Serves: 6-8 people
Ingredients
16oz small whole wheat pasta, cooked al dente (shells, rotini, elbow macaroni, or penne are all great)
1-1/4 C raw cashews
1/2 C nutritional yeast
1 tsp onion powder
1 tsp salt
1/2 tsp garlic powder
1/2 tsp white pepper
2 cloves garlic, minced
1 small white onion, chopped
2 Tbs EVOO
4 C unsweetened nondairy milk (I used almond)
3 Tbs cornstarch
1/2 C canola oil
3 Tbs Earth Balance (vegan butter)
1/8 C barley miso (any miso would probably work fine, the original recipe called for light miso)
1 cup dairy free sour cream
2 Tbs lemon juice
1 tsp Tabasco (optional)
Panko break crumbs
Smoked Paprika (optional)
Italian Seasoning (optional)
Directions
Start by boiling your pasta water and preheating the oven to 400 degrees.
In a large saucepan saute garlic & onions in olive oil with a sprinkle of salt over medium heat for five minutes.
Meanwhile, in a large food processor bowl finely grind the cashews, but don’t let them turn to a paste (or you’ll end up with cashew butter–not a bad result, but not what you’re looking for here.) Add the nutritional yeast, onion powder, salt, garlic powder, and white pepper. Pulse a few more times until it looks like a fine powder.

Process until it is a fine powder, but before it turns into cashew butter
Add the onions and garlic to the food processor bowl and pulse a few times.
If the pasta water is boiling, go ahead and drop the pasta and set your timer for 2-3 minutes less than the package recommends. You want to pull out your pasta when it is al dente because it will continue cooking in the oven.
In the same large saucepan as you used for the onions and garlic combine one cup of milk and the cornstarch on high heat. Stir constantly with a whisk until the cornstarch dissolves. Gradually add the rest of the milk, stirring as you go. Finally add canola oil and Earth Balance. Bring the mixture to a simmer then decrease heat to low-medium, cover and simmer, stirring occasionally for 5 minutes. Turn off the burner, add miso and sour cream and stir until incorporated.
With the food processor running, gradually add the wet ingredients to the work bowl. Blend for about 2 minutes or until smooth and creamy. Next blend in the lemon juice and tabasco (optional).
In a large casserole dish, pour the cashew sauce over the pasta. You want to have a lot of liquid because it will reduce as it bakes.

To avoid dry casseroles, always make sure they have have plenty of liquid before they go in the oven to bake. For best results, add a smiling bouncing baby in the background as you cook. 🙂
Cover the top of the dish with a thin layer of panko bread crumbs. I like to add a sprinkle of smoked paprika and Italian seasoning, but it would be just fine without it if you don’t have it. Bake for 30 minutes at 400 degrees or until the bread crumbs are golden. Serve immediately.

Baked Macaroni and Cashew "Cheese"
Notes: If you have leftover cheese sauce, save it and use it on the leftovers since the sauce tends to thicken over time. Add a pat of Earth Balance and a drizzle of nondairy milk to your leftovers before reheating to keep it nice and creamy. I’ve also added chickpeas and veggies to this dish before baking to up the nutritional profile and it was really tasty. It’s a very versatile casserole and hard to mess up. Though I’ve never used dairy milk, butter, and sour cream, I imagine it would work great in this too if that’s what you have on hand.
This was printed from: We Laugh, We Cry, We Cook
The site URL: http://welaughwecrywecook.com
The Title: Baked Macaroni and Cashew Cheese
The URL: https://welaughwecrywecook.com/2012/03/22/baked-macaroni-and-cashew-cheese
© Copyright 2012 – All Rights Reserved


