
No Bake Apricot Bars
Posted: May 2, 2012 Filed under: Breakfast Foods, Desserts, Vegan | Tags: apricots, breakfast, cashew apricot bars, cashews, dessert, freezer-friendly desserts, healthy desserts, no bake apricot bars, no bake date bars, vegan, vegan desserts, vegetarian 9 Comments
Some women nest when they are pregnant by obsessively organizing the nursery until every onesie is folded just so and all the outfits are color coordinated and sorted by size, some scrub the house obsessively. I did a little of those, but mostly I cooked. And when I say I cooked, I mean I cooked!
In the two weeks before Jackson arrived, I completely filled my freezer with everything from chili and cornbread, to pot pie, to muffins, to waffles, to cookies and hummus. I started with an empty freezer and when my nesting was over, I literally had to remove the ice basket to fit everything in.
One of the recipes I made, 5 Ingredient No Bake Date Bars, from the blog “Oh She Glows,” barely made it to my due date. My family and I could not keep out of them. They are like crack, but healthy crack. In fact, they could probably cure drug addiction.
Angela at Oh She Glows is a genius when it comes to making healthy vegan treats. I can’t wait for her cookbook to come out. These bars have no added sugar, only five ingredients and don’t even require turning on the oven. My favorite thing about them is that they are best eaten straight out of the freezer. When Jackson arrived and I was a new nursing mother, I would suddenly be ravenous, and could hardly think straight until I had food in me again. These were the perfect fuel for my sudden hunger attacks, high in protein and fiber, they were filling and healthy, but felt indulgent.
I’ve made different versions of the bars countless times now, but yesterday I tried a new combination that really rivaled it’s original counterpart. Instead of dates and almonds, I used dried apricots and toasted cashews. Wow! I don’t know which one I like more. I took them to the leader meeting for my MOPS (Mother’s of Preschoolers) group last night and several requested the recipe. So as promised, here you go ladies!
The sweet tangy pureed apricots sandwiched between layers of rich salty cashews hits three of the five taste bud senses and also combines creamy, chewy, and crunchy textures. It’s satisfying on every level.

5 Ingredient No-Bake Apricot Cashew Bars
Inspired by OhSheGlow’s 5 Ingredient No Bake Vegan Date Squares
Ingredients
Crust:
- 1.5 cups whole cashews (toasted, roasted, honey roasted – whatever you have)
- 1.5 cups regular oats (for Gluten-free, use GF oats)
- 1/2 tsp kosher salt (omit if cashews are salted)
- 10-15 dried apricots (~ 1/2 a cup), roughly chopped
- 1/4 cup coconut oil, melted
Filling:
- 25-35 dried apricots roughly chopped (~2 cups)
- 1/2 – 1 cup water
Directions:
1. Spray a muffin tin (my preference) or 8×8 pan with non-stick cooking spray. In a food processor, process cashews, salt, and oats until a fine crumble forms. Add apricots and process until crumbly again. Add coconut oil and process until sticky. Remove from processor, set aside 3/4 cup of the mixture for later, press remaining into cupcake molds or pan to form a crust. For muffin tins I use a tablespoon and put a heaping tablespoons into each mold, then use the back of the tablespoon to press down and smooth out the layer.
2. Process the apricots and 1/2 cup water in the food processor (I’ve found a smaller work bowl works better than a large one if you have a full sized food processor–in fact I just used my mini one for this step) until a paste forms, stopping to scrape down the sides and adding a little more water as needed (don’t exceed 1 cup). Scoop out the apricot mixture into the pan or evenly into the muffin tins and gently spread out to cover the crust.
3. Sprinkle on the reserved crust and gently press down into the apricot mixture, just so it sticks. Freeze for at least an hour or until firm. Cut squares or pop out of muffin molds and wrap individually with saran wrap. Store in freezer. Enjoy straight from the freezer or slightly thawed as a delicious, guilt-free treat!
This was printed from: We Laugh, We Cry, We Cook
The site URL: http://welaughwecrywecook.com
The Title: No Bake Apricot Bars
The URL: https://welaughwecrywecook.com/2012/05/02/no-bake-apricot-bars
Creamy Yellow Pepper Soup
Posted: May 1, 2012 Filed under: Soups, Uncategorized, Vegan, Vegan Options, Vegetarian, Veggies | Tags: cream, sweet potato, yellow pepper, yellow pepper soup 7 Comments
Becky's Creamy Yellow Pepper Soup
Last week I spent the waning hours of sunshine lingering at the condo pool where we spent our vacation in Orlando. As I read my book, luxuriating in the peaceful surroundings, I suddenly heard a child’s terrified scream from the shallow end of the pool. En masse, all the adults stood to see what happened, ready to spring into action.
What we saw was a pink swimsuit, a flurry of dark braids, and what appeared to be a flock of feathers, going at each other. A pair of ducks had apparently chosen this pool for their evening dip, nearly landing on the little girl’s head. Before long, the wide-eyed child went from screams of fright to peals of laughter as the two ducks (I’m assuming Donald and Daffy?) quacked and paddled around their new friend.
Life is like that, full of surprises.
This recipe for yellow pepper soup was one of life’s small surprises for me. My friend of many years, Maxine Bland, served it for lunch on her pretty back porch on a beautiful day in Merritt Island, Florida. I can’t say I was thrilled when she announced we were having Yellow Pepper Soup, as this was years ago, and I’d never tasted or seen a yellow pepper! However, I took one sip, and was transported. The delightful, soothing combination of subtle flavors left me craving more, and Maxine was gracious enough to share her recipe. I modified it just slightly.
(As an aside, I wrote a chapter about Maxine and her mother-in-law, Bernie Bland, who is co-founder of Teen Missions, in my book, Real Magnolias. Two women whose faith and perseverance I deeply admire.)
It is fun to serve this soup and watch the expressions from guests. They always ask for seconds, and then, for the recipe. Even people who don’t like peppers (like my husband) love it. It is smooth and slightly sweet (thanks to the addition of a sweet potato and bit of maple syrup), mingled with the crisp fresh taste of yellow peppers. When you swirl in a tablespoon of rich heavy cream, it adds a buttery richness and makes a beautiful presentation.

Becky's Creamy Yellow Pepper Soup
Becky’s Creamy Yellow Pepper Soup
Serves 6 to 8
Ingredients
4 Yellow Peppers, medium sized, seeded, rough chopped and sautéed until just tender. (You can also roast them for a bit more flavor, peeling off the charred skin before seeding and chopping.)
1 cooked (baked, boiled or nuked) sweet potato, peeled and rough-chopped
3 c. organic vegetable broth (you can use chicken broth as well, but in this recipe, I really prefer vegie broth)
1/2 onion, rough chopped
1 clove garlic, peeled
1 T. maple syrup (or brown sugar)
1/4 t. fresh grated nutmeg
3/4 t. salt
1/4 t. pepper
Cream, 6 Tablespoons (1 T for each of 6 bowls) (Non-dairy, unsweetened creamer for vegans)
Directions
Into a blender, toss all the ingredients except salt & pepper, nutmeg and cream. Blend until as smooth as you can get it and cook over medium heat, stirring often, about 10 to 15 minutes until any raw onion and garlic taste is gone, and it is heated through. Add salt and pepper and nutmeg checking for seasonings, adjusting to your liking. Serve in bowls, swirling 1 T. heavy cream into each bowl, gently, using the tip of a spoon just before serving.

Becky's Creamy Yellow Pepper Soup
This was printed from: We Laugh, We Cry, We Cook
The site URL: http://welaughwecrywecook.com
The Title: Creamy Yellow Pepper Soup
The URL: https://welaughwecrywecook.com/2012/05/01/947/
Not-Too-Sweet Banana Butternut Squash Smoothie
Posted: April 30, 2012 Filed under: Beverages and Smoothies, Breakfast Foods, Vegan | Tags: banana butternut squash smoothie, bananas, breakfast, butternut squash, not-too-sweet smoothie, savory smoothie, smoothies, walnuts Leave a comment
For those of us who don't like sweets before noon, this smoothie with butternut squash, walnuts and just a 1/2 teaspoon of maple syrup is the perfect not-too-sweet morning treat.
Though most days, Jared and I adore and respect each other, not every day is marital bliss. Just like any other couple, we have our “moments.” Recently we had one of those “moments” on a lunch date. I was hungry and had hardly eaten breakfast. If you know me well, I am unpleasant to be around when I’m hungry. I try to never let myself reach hunger for this reason. The tiff was over something little and unfortunately left unresolved for the night as Jared had to head straight from lunch to scout a ballgame out of town. There is a good reason that we mostly aim to resolve arguments quickly. I’m not one of those people that “just needs time.” Jared is.
So a few hours after Jared left, the argument to him magically resolved itself. That magical dust must have passed over me though. While waiting on the ballgame to start, he sent me a Words With Friends (basically a Scrabble app for iPhones) game request. My first thought was “Yeah, I’ve got some words for you, buddy.” But then I realized I might be dealt letters for words like “love” or “apology.” It wasn’t a risk I was willing to take. So I instead rejected his game request. That will get him. We are not friends right now and I don’t want to play with you. So there!
This may be a new low for me.
The next morning before getting out of bed, Jared graciously apologized. I’m pretty sure that all of my maturity shifts to him during our arguments.
In an effort to keep from turning into a 4-year old again, I made myself sit down that morning with a healthy breakfast and a little quiet time.
I had cooked up some butternut squash for Jackson the previous day and used a cup of it to throw into a smoothie. I still wasn’t quite in the mood for being overly sweet or for an overly sweet breakfast. This smoothie paired with a little peanut butter and honey toast was the perfect not-too-sweet breakfast to start my day. Filled up in mind, spirit, and body, I was finally ready to be friends and play nice.

Rachel’s
Banana Butternut Squash Smoothie
Ingredients
1 c. Butternut Squash (I’ve used acorn squash too), cooked and cooled*
1 c. milk of your choice
1/4 c. walnuts or pecans
1 banana
1 t. cinnamon
A few grates of fresh nutmeg (optional)
1/2 t. maple syrup
A handful of ice
Directions
Put all the ingredients except for the ice in the blender, blend until smooth. Add a little more milk if needed. Add ice and blend again until it is finely crushed throughout. If you like a sweeter smoothie, you can add a little more maple syrup.
*The easiest way for me to cook squash is to cut it in half lengthwise and put both halves in a baking dish face down with about an inch of water in the bottom of the pan. Cook at 400 for about 30 – 40 minutes or until the flesh of the squash can easily be scooped out with a fork or spoon. For the smoothie, just scoop out the flesh when it cools down and store in tupperware in the refrigerator until ready to use (will keep for a few days). You can also freeze it in ice trays and then store the frozen cubes in a ziplock bag for at least a month. Just thaw a few whenever you need them. Steaming, roasting, or boiling the squash would work fine too if that’s your preferred method.
This was printed from: We Laugh, We Cry, We Cook
The site URL: http://welaughwecrywecook.com
The Title: Not-Too-Sweet Banana Butternut Squash Smoothie
The URL: https://welaughwecrywecook.com/2012/04/30/not-too-sweet-banana-butternut-squash-smoothie
Roasted Red Pepper Quinoa
Posted: April 26, 2012 Filed under: Gluten Free, Sides, Vegan | Tags: easy quinoa, gluten-free, quinoa, rice maker quinoa, roasted red pepper quinoa, side dish, vegan 5 Comments
Roasted Red Pepper Quinoa brings a nice touch of color, a punch of flavor, and a boost of nutrition to any meal.
This week I made a plan, a very purposeful plan. I decided that if I really wanted to make room in my life for God, fitness, writing, cooking, my husband, and my son, then I needed to live every day intentionally. Sunday morning I made charts and printed off calendars and posted them on the refrigerator door. I was even planning on attempting to skip my beloved morning coffee. I’d just take Jackson for a brisk walk instead.
As life goes, after church Sunday evening Jackson started running his first ever fever and was up most of the night. Then Monday morning at 7:50 am, my door bell rang. I hurried out of my pjs and into a t-shirt and sweats and threw my wild morning curls into a bun. I carried Jackson, still in his pjs, with me to the door, and we were greeted by a girl in her young 20s who looked like her morning routine had closely resembled mine, except she’d thrown on some scrubs instead of sweats.
“I’m here to give you your physical for the life insurance policy,” she said.
My husband had attempted to postpone this appointment, since he realized last minute he couldn’t be there. Apparently they didn’t get the memo. So there I was left alone to answer 4,000 questions about what disease I may or may not have contracted, pee in a cup (I wonder how many times can I talk about peeing on our food blog!), and have my blood drawn as I tried to keep Jackson entertained and contained.
The visit couldn’t have been less pleasant or less awkward. Taking my blood took two tries, leaving one arm bruised and still sore three days later. Apparently, you don’t need any social skills, hygiene, or experience with needles to be an in-home nurse for this company.
My actual plan for the day had included creating a menu for the week and going grocery shopping. With a feverish baby and one immobile arm, I decided productivity was going to have to wait. Which meant whipping up something for dinner out of a few staples in the kitchen. I usually have a block of tofu (I’m not crazy for tofu, so it’s always waiting for me as I get down to the last of my groceries), some sort of veggies left in the crisper, a jar of roasted red peppers, and a box of pre-rinsed quinoa (pronounced keen-wah).
So I made Everything Tofu (tofu coated in sesame seeds, poppy seeds, onion flakes, and garlic powder) topped with a chive Tofutti cream cheese sauce, a simple side of steamed broccoli, and my latest go-to side dish, roasted red pepper quinoa. It’s so easy and with my rice maker it basically cooks itself while I get the rest of dinner made.
The tofu was actually pretty good, but a lot of work. I would have been just as happy with a whole plate of this quinoa and a little broccoli. I immediately regretted not making more (so I’ve doubled the recipe for you guys!)
Tuesday, after another rough night with Jackson, I woke to a clogged milk duct along with a side of fever. Thankfully, we were back to our healthy selves by Wednesday. There is nothing like feeling sick and sleep deprived to make me thankful for a decent night’s rest and my good health. Maybe I’ll even get back to my plan tomorrow, but I may have lost my willpower to forgo coffee. Have any of you successfully quit coffee? Was it really hard? Did you feel better without it?

Rachel’s
Roasted Red Pepper Quinoa
Serves 4
Ingredients
1 cup onion, diced
4 cloves of garlic, minced
2 T. olive oil
2 cups quinoa (rinsed if the package doesn’t say it’s already pre-rinsed)
3 1/2 cups of water
1/2 cup of juice from a jar of roasted red peppers
1 t. salt
1/2 cup roasted red peppers, chopped
Directions
With a Rice Maker:
In a skillet, saute onions in the olive oil until soft, add the garlic and saute a few minutes longer. Transfer the onions and garlic and any remaining oil into the rice maker, add the quinoa, water, salt, and red pepper juice and cover and start the rice cooker. When the rice maker goes off, add in the chopped roasted red peppers.
Note: If your rice maker has a tendency to stick, add about a teaspoon of extra oil & stir the ingredients before cooking.
Without a Rice Maker:
In a medium sauce pan, saute onions in the olive oil until soft, add the garlic and saute a few minutes longer. Add the quinoa, water, red pepper juice, & salt to the pot. Cover, bring to a boil, then reduce to simmer and cook until all the liquid is absorbed (about 15-20 minutes). When the rice maker goes off, add in the chopped roasted red pepper
This was printed from: We Laugh, We Cry, We Cook
The site URL: http://welaughwecrywecook.com
The Title: Roasted Red Pepper Quinoa
The URL: https://welaughwecrywecook.com/2012/04/26/roasted-red-pepper-quinoa
Seductive Puttanesca Sauce
Posted: April 25, 2012 Filed under: Beef, Gluten Free, Main Dishes, Pasta, Vegan, Vegan Options, Vegetarian | Tags: capers, chick peas, garbanzo beans, marinara, olives, Papperdelle, pasta, pepperocinis, Puttanesca, spaghetti squash, Vegan Pastas 1 Comment
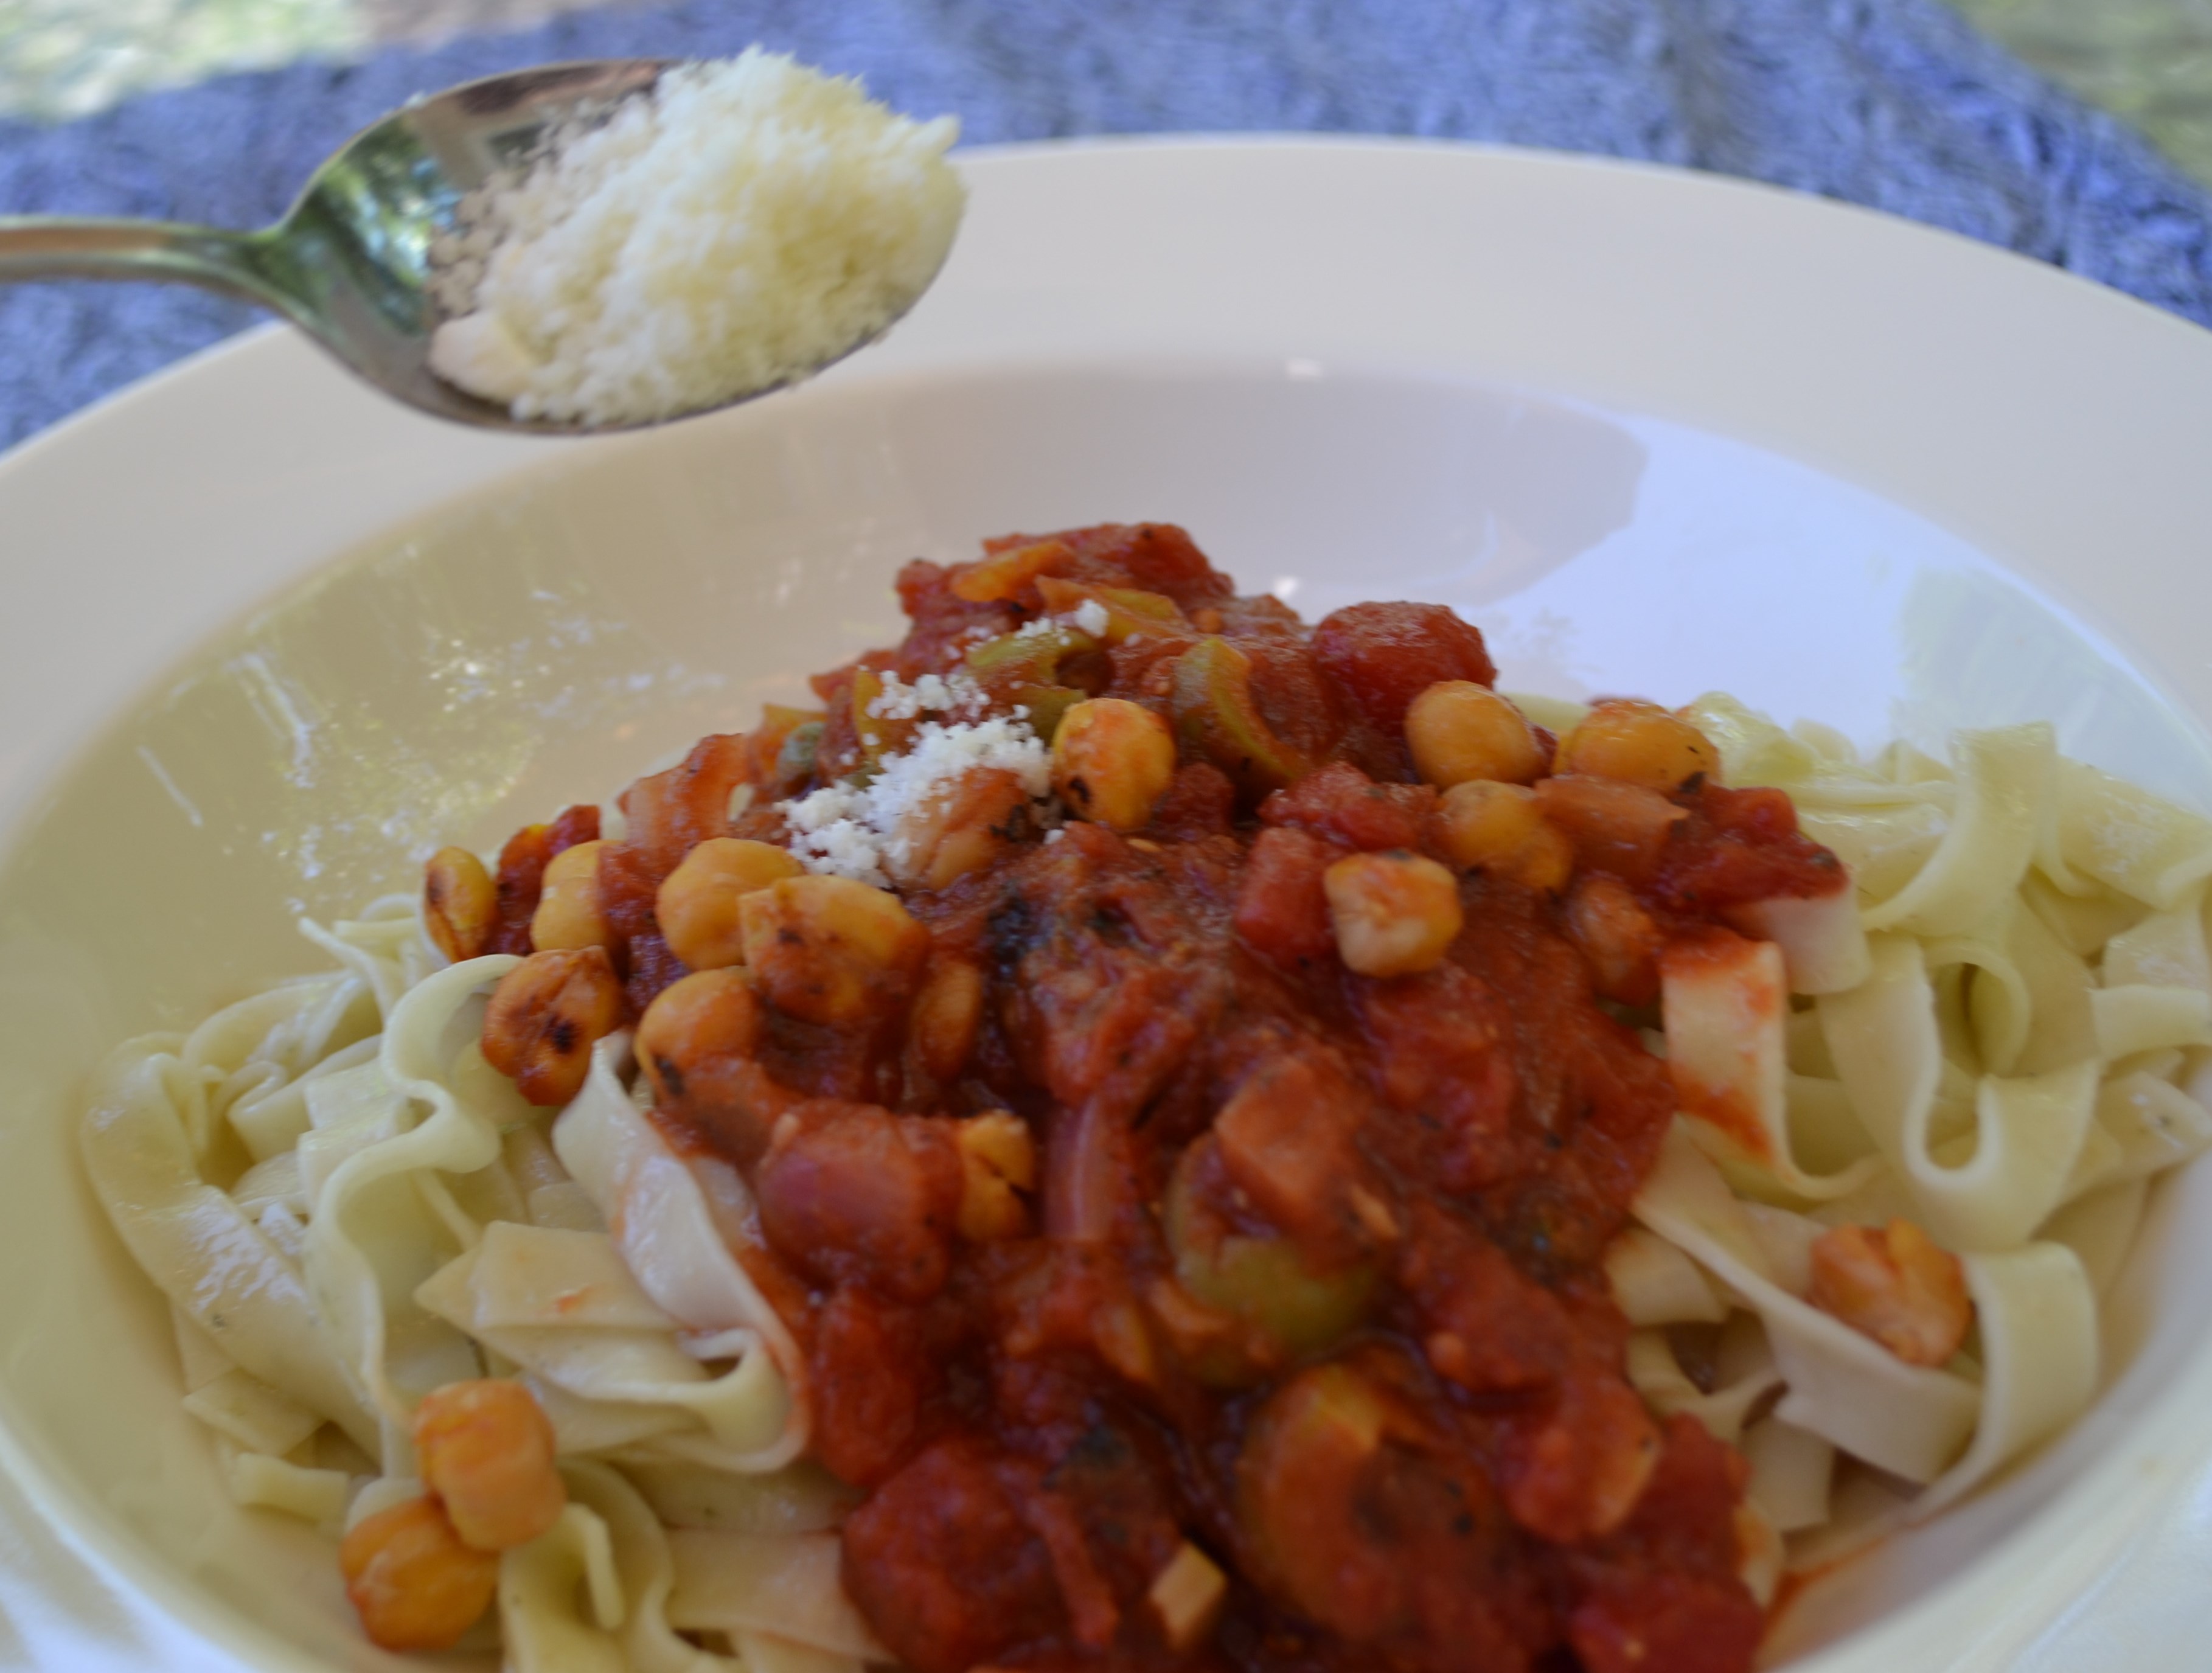
Becky’s Seductive Puttanesca Meat Sauce over Lemon-Pepper Pappardelle
Now and then I get a hankering for something that tempts all the senses: salty/briny, sweet, garlicky, rich and tomato-y. And when I do there there’s nothing like Puttanesca sauce to satisfy.
There are hundreds of variations on Puttanesca, but basically, it is a rich marinara sauce with a touch of something salty and briny (capers, olives, anchovies, artichoke hearts, and or pepperocinis) to give it an extra tangy zip. I also like to balance the zip with something sweet — chopped sun-dried tomatoes and/or brown sugar.
I recently served this dish, innocently, to a lovely group of female friends, many of them involved with some sort of Christian ministry. They loved it, scraped the skillet clean! In attendance that night was my good friend Lucille Zimmerman who is a writer and a therapist who loves to research little known facts with the passion of Curious George. She went right home and researched the meaning of the word, “Puttanesca.” She wrote to tell me that it means — oh, how shall I say this delicately? –“prostitute, whore, ladies of night, harlot,” just choose your favorite wanton woman term. Probably not a “word of the day” you’d choose to teach your kids over pasta.
Apparently the potent aroma of this dish from Italy was so powerful that the scent lured in potential customers off the street, serving as an appetizer for, well, the other “desserts” on the menu.
Oh, well. There’s nothing I can do about the origin of this dish, but I can tell you there is something powerfully seductive about it!
Below is how I make my Puttanesca, but don’t be intimidated by the ingredient list: it is what I had on hand in the fridge. Just pull out whatever you have in your fridge or pantry — and as long as you have something salty & briny, and something sweet, to balance the basic marinara, you’ll probably love the results.

Becky’s Seductive Puttanesca Sauce Over Pappardelle Lemon-Pepper Pasta

Becky’s Seductive Puttanesca Sauce
Into a medium high skillet (I love my cast iron for this) saute:
2 cloves minced garlic
1/2 chopped onion in 2 T. olive oil
Throw in any mixture of the following that you have on hand, stirring after each addition. (I do highly recommend that you use the chopped artichoke hearts, to me they are the most essential ingredient!)
1/3 – 1/2 c. chopped marinated artichoke heart
1/2 c. to 1 cup, any roasted or left over vegies, diced.
1 T. capers
2 T. olives, chopped, any kind
2 T. pesto sauce (if you have it on hand… no worries if not)
2 T. chopped pepperocini peppers
2 T. chopped sun-dried tomatoes (packed in oil, preferably)
1 – 2 T. brown sugar (this will depend on your taste and also how many “sour” ingredients that you put in your sauce that will need balanced by sweet)
1 28 oz can crushed tomatoes (I like the ones with basil and garlic)
1 t. Italian seasoning or oregano
Salt & Pepper to taste
Simmer until sauce is thick and chunky, then season with salt, pepper, and Italian spices to taste.
You can dress up the recipe from here and add some flavorful meat of your choice. It is delicious with ½ lb of ground beef sauteed with ½ pound Italian sausage (chicken or turkey sausage is great) tossed in. Or you can go vegan and roast garbanzo beans (see recipe below) and serve over your favorite pasta, or spaghetti squash (see instructions for this below as well). My daughter and I made this vegan version together (she suggested we try it with roasted garbanzos), and it was AWESOME.
I personally adore this sauce served over Trader Joe’s Lemon Pepper Pappardelle Pasta (which is a wide ribbon-like pasta). I looked up the root meaning of “pappardelle” and to my great relief, it simply means “to gobble up.” Whew. Much better “Italian word of the day” for little ones.
A light sprinkle of Parmesan (Vegan Parm if you are going dairy-free) and it is ready to serve. The aroma should draw hungry folks to your kitchen in no time.
Roasted Garbanzo Beans ( Chick Peas )
Drain, rinse and pat dry a can of garbanzo beans. Pour them evenly on a cookie sheet that has been sprinkled with olive oil, then roll them around. Sprinkle with salt or your favorite spiced salt. Roast at 350 for 10 to 15 minutes or until they are browned and crisped. (Shake them once or twice while baking so they can brown on two sides.)
Spaghetti Squash
Take a spaghetti squash and cut it in half length wise. Scoop out seeds. Put 1/2 cup water in the bottom of a big microwave proof bowl. Put one of the squash halves in the bowl, hole side up. (If it wobbles, trim a thin piece of the squash off the bottom so that it sits more level in the bowl.) Put the other squash half on top of the squash in the bowl. Don’t cover it. Just put in microwave for 10 minutes. Test done-ness by squeezing the top squash with a pot holder. If it squeezes easily, it is done. Take a fork and scrape “strings” of squash in spaghetti-like fashion.
Lightly salt, then top with sauce and roasted garbanzo beans. (You can also serve leftover spaghetti squash with butter and pepper and nutmeg for a side dish.)
This was printed from: We Laugh, We Cry, We Cook
The site URL: http://welaughwecrywecook.com
The Title: Seductive Puttanesca Sauce
The URL:http://wp.me/p1UwM9-ep
Balsamic Roasted Garlic Veggies
Posted: April 24, 2012 Filed under: Sides, Vegan, Vegetarian, Veggies | Tags: balsamic roasted veggies, balsamic vinegar, broccoli, carrots, cauliflower, garlic, onions, peppers, potatoes, roasted garlic, roasted vegetables, roasted veggies, squash, zucchini 3 Comments“I don’t like asparagus. I don’t like broccoli. I don’t like onions. I don’t like garlic. I don’t like vegetables. Well, I do like corn … and potatoes. I like potatoes.”
This was my husband when we first got married.
I don’t remember cooking much in our first year of marriage. In fact, I have no idea what we ate. I hardly have a single memory in that tiny galley kitchen. Between Jared’s aversion to all things that made food delicious to me and the hideous marbled yellow laminate counter tops with cracks on the corners, I must have felt less than inspired.
When we moved to a new town house with a bright white kitchen near Galveston, I suddenly found myself looking for excuses to be in the kitchen. I started shopping at Farmer’s Markets and reading food blogs and became determined to get Jared to love veggies. Little by little, I found ways to prepare certain vegetables in a way he would eat them. He’ll eat onions if they are caramelized or chopped fine and sauteed in a dish. He’ll eat his peas in a split pea soup. And I can get him to eat almost anything wrapped in a tortilla and dipped in salsa. Thank goodness, because in a crazy turn of events, before we moved out of that town home a year later, we had become full on vegans.
The preparation that finally got Jared raving and begging for veggies was roasting them. If it’s coated with a little evoo and seasoning and crisped up to perfection (to him that includes a few burnt bits on the pan), he’s a happy husband and a happy veggie eater!
This method works wonderfully with asparagus, any root vegetables, broccoli and cauliflower, onions, even chickpeas. Try it with a vegetable you think you don’t like and see if it changes your thoughts on it.

Roasted vegetables are easy enough to serve up on a weeknight and beautiful enough to serve to guests for a celebration dinner.
Rachel’s
Balsamic Roasted Garlic Veggies
Ingredients
(Note: The vegetable list is just a guideline. Use whatever you have in your refrigerator or is on sale at the market. The seasoning ingredients listed are for about 4 cups of vegetables.)
Potatoes, chopped (small, soft-skinned work great, but Idaho & sweet potatoes are wonderful too)
Carrots, chopped
Onions, quartered (leave one end in tact so they don’t get burnt)
Peppers (bell peppers, sweet tri colored peppers, poblanos) (seeded & quartered)
Broccoli (cut into “trees”)
Cauliflower (cut into “trees”)
Zucchini (chopped into large chunks or long ribbons)
Squash (chopped into large chunks or long ribbons)
2 T (maybe more) Extra Virgin Olive Oil
1 T. Balsamic Vinegar
2 t. Salt
2 t. Pepper
1 T. Italian Seasoning Blend
A full head of garlic
Directions
Preheat oven to 400. Spray large cookie sheet with nonstick spray.
Put all the veggies except the garlic in a large mixing bowl, and drizzle 2 tbs of olive oil over the veggies. Toss until all of the veggies are lightly coated, adding more olive oil if needed. Don’t drench them or you’re veggies won’t get crisp. (The amount of olive oil varies because some veggies soak up more, like cauliflower, and others hardly absorb any, like peppers.)
Add balsamic vinegar, salt, pepper, and Italian seasoning, and toss again. Pour veggies onto the cookie sheet and spread around. If they are piled on top of each other, use a second pan.
Take the garlic, remove the lose skin, and chop the top of the head off the garlic so the inside of each clove is exposed. Place the bulb on a piece of foil and drizzle the top of the bulb with olive oil. Wrap the foil around the clove. Add the foil wrapped garlic onto the pan of veggies (sitting upright). Check this tutorial out if you need a visual.
Bake the veggies and garlic for approximately 40 minutes. The potatoes and carrots take the longest to cook, so cook until they are soft in the middle and crispy on the outside.
Remove the garlic from the foil and allow to cool for a few minutes. Carefully either squeeze the garlic out (like toothpaste), or use a fork to remove each clove. Toss in with the roasted veggies. The garlic is delicious and really elevates roasted veggies! Your friends will most definitely track you down for the recipe. Trust me.
This was printed from: We Laugh, We Cry, We Cook
The site URL: http://welaughwecrywecook.com
The Title: Balsamic Roasted Garlic Veggies
The URL: https://welaughwecrywecook.com/2012/04/24/balsamic-roasted-garlic-veggies
Vegan Zucchini Risotto
Posted: April 19, 2012 Filed under: Sides, Vegan | Tags: basil, rice, risotto, sides, sundried tomatoes, vegan risotto, zucchini risotto 2 Comments
Vegan Zucchini Risotto with Sun-dried tomatoes and fresh basil
Jackson has recently started whimpering every time I eat until I give him a bite. It all started with this vegan zucchini risotto. I offered him one little nibble and he probably ate a fourth of my bowl. It was pretty exciting that my little boy had such a sophisticated palate and was asking for solids already. (You score bonus points with the earth mamas for baby led weaning, ya know.) Since then, he has scarfed down roasted pepper quinoa, blackened tofu, pasta with creamy artichoke basil sauce, edamame, split pea soup, among other delicious and nutritious meals I’ve shared with him. I’ve been so proud of my little baby’s love of my favorite plant-based foods…
….until today.
We were outside enjoying the beautiful Spring day, me sittin’ & sippin’ my ice water, Jackson “vrooming” his truck around the patio, when he stopped in his tracks and turned to chase a rollie pollie crawling by. He’s so adorably curious, I thought to myself, just before he picked up the rollie pollie and stuck it in his mouth. I jumped out of my lounge chair and cringed as I saw that little black bug all rolled up tight on his tongue. I reached my finger into Jackson’s mouth, but his jaws clamped.
Crunch. Crunch. Gulp.
My sophisticated little veggie baby had just crushed a live bug in between his six little teeth as if it were one of his baby cheerios. And he immediately reached for another one cruising by.
We spent the rest of the day inside.
If that story doesn’t make you crave the delicious vegan risotto that led my child on his culinary adventure all the way to a diet of raw bugs in the back yard, I don’t know what will.
Honestly, this is so delicious. It is tedious (not one of those meals I can make while Jackson hangs off the back of my legs), but it makes a lot and reheats well, so it’s worth the trouble for a special occasion. I know traditional risotto has cheese in it, but I think this tasted amazing without it. I even lowered the amount of nutritional yeast the second time I made it because I really liked the flavors and the creaminess before I added it.

Rachel’s
Vegan Zucchini Risotto
Serves ~ 6
Ingredients
1 T. olive oil
1 T. Earth Balance or other margarine
1/4 white onion, diced
2 cloves garlic, minced
2 c. arborio rice
1/2 t. salt
freshly ground pepper
1 c. white wine, warm
6 c. veggie broth, warm (you can use some water if you don’t have enough broth)
2 small zucchini, grated
1 T. nutritional yeast (non-vegans could use a little Parmesan instead)
2 T. Earth Balance or other margarine
1/2 c. sun-dried tomatoes, chopped
2 T. basil, chopped (optional but does add a lot of flavor)
Directions
Heat a large saucepan over med-hi heat with oil and margarine. Saute the onion and garlic until soft but not brown. Add rice and cook, stirring constantly until the rice is translucent. Season with salt and pepper, then add about 1/2 cup of broth. Stir constantly until the liquid is reduced. Add the wine and repeat. Then continue adding about 1/2 – 1 cup of liquid at a time, stirring, and letting the liquid reduce each time. When you only have a cup or so of broth left, add the zucchini. Continue adding the remaining liquid and stir until it is absorbed and the rice is cooked through. You may not need all of the broth, or you may need a little extra broth, water, or wine. Remove from heat and stir in nutritional yeast, margarine, sun dried tomatoes, and basil. Adjust salt and pepper to taste. Let sit for a couple of minutes before serving.
Quicky Sticky Jasmine Rice & Mango
Posted: April 18, 2012 Filed under: Desserts, Fruit Dishes, Uncategorized, Vegan, Vegan Options, Vegetarian | Tags: anti-aging, coconut, coconut desserts, coconut milk, Dr. Amen, jasmine rice, mango, rice pudding, Thai desserts, Thai sticky rice and mango, Use Your Brain to Change Your Life 4 Comments
Becky's Quicky Sticky Jasmine Rice & Mango
Yesterday was my birthday, which means I’m only two years away from being able to answer the question, “Do you qualify for the senior discount?” in the affirmative.
The first time I say, “Yes, I’m officially old” to the kid behind the counter, you can be sure there will be salty tears stirred into my 20% Off Cup o’ Joe. (I know, the fact that I refer to coffee as “Joe” already dates me somewhere pre-WW2. But I thought I’d start practicing speaking Old People Talk. I want to get a leg up on fitting in with the AARP’s version of high school seniors as we gather in packs at the mall — before it opens, wearing sensible shoes and fanny packs, to walk around it ten times.)
But before I hit the ol’ double nickel birthday, I’d like to give anti-aging my very best shot. I am friends with and have worked with brain doc and Public Television guru, Dr. Daniel Amen. His latest book, Use Your Brain to Change Your Age, is packed full of research, stories and tips to stay young. If I were forced to sum up the entire book in two points, it would be:
1) Eat nutrition-packed, brain-healthy food. (Colorful fruits and veggies are our best friends in the anti-aging/anti-disease corner.)
2) Exercise. (Walking 30 minutes a day five times a week wards off dementia like a miracle drug.)
In August, I started a regular exercise routine, and though I am no where near svelte, I like the endorphin rush from moving in the morning, know I’m getting blood flow to my brain, and feel my endurance improving. Thanks to my Darling Daughter the Vegan, I’m discovering all sorts of yummy, creative ways to put more antioxidant-rich plant-based foods into my day. Yesterday, I decided to start my new birthday year off by becoming an EOD Vegan: Every Other Day Vegan. Periodically, I’ll report in and let you know if I’m aging backwards or losing any of my ample backside.
Thai food is one of my favorite vegan-friendly sources and last week I enjoyed a lunch of two amazing hot-spicy curries with my friend Lucille. When the waitress asked if we’d like to try Sticky Rice and Mango, since the mangoes are in season and “oh so sweet!” – we were game. And boy, am I glad we were. Fresh sliced mango with a side of almost translucent slightly sweet “sticky rice,” with a warm creamy coconut sauce over all, was delicious.
Making Thai sticky rice involves more time and contraptions than I’m willing to give or buy, but we adore Jasmine rice that I make in my $13.00 rice maker purchased at Wal-mart.

My cheap little beloved rice maker
(Commercial here: rice makers are awesome! You just pour in the rice and water, flip a switch and no burned rice, just perfect little fluffy grains, and all in about 15 minutes.) So I invented the following “Quicky Sticky Jasmine Rice & Mango” recipe – which I liked just as well as the original Thai dish. It makes a light, sweet ending to a Spring or Summertime meal.

Quicky Sticky Jasmine Rice & Mango
Serves 8
Ingredients
1 cup uncooked Jasmine rice (Jasmine rice imparts an amazing aroma and taste.)
1 ¼ cup water
1 can coconut milk, full fat (will be divided)
2 T. organic sugar
4 small mangos
Optional: 2 T. shredded coconut, sweetened or unsweetened, divided.
¾ t. salt, divided
About 8 mint leaves for garnish
Directions:
Into rice cooker (or pan, if you are cooking the rice on the stove top), put jasmine rice, ½ t. salt, water and ½ cup coconut milk and 1 T. coconut if you like. (Use mostly the liquid portion of the coconut milk to go into the rice, saving the majority of rich cream that rises to the top of the can, for the sauce.)
Into a small sauce pan, pour the rest of the coconut milk/cream from the can. Add 2 T. sugar, and if desired, 1 T. of shredded coconut, and ¼ t. salt. Stir and heat until creamy hot and sugar is dissolved. Set aside to let warm slightly.
Peel and slice mangoes, arranging them on pretty plates. You can cut them any way you like, but as you see in the picture, I cut them near to the seed, in two halves, then sliced the halves but keeping the shape intact. The dish in this pictures is enough to serve two, so I used one small mango for two people.
When the rice is done, ladle about ½ cup of the sweetened warm coconut milk over it, and stir. This will help make it “sticky.”
Pack the rice, about 1/3 cup or so, into a small cup (I used a Japanese tea cup that I first sprayed with vegetable oil), carefully turning upside down onto the plate next to the sliced mango.

Rice packed into small cup, ready to turn upside down on plate
Ladle some of the coconut milk over the rice and drizzle on mango as well. Serve any leftover coconut sauce on the table to let the guests serve themselves more if they like. Garnish with sprigs of mint.
Variations: Try with other tropical fruit like pineapple or banana. Berries would also be yummy. Makes a delicious light breakfast as well. Try with brown Jasmine rice.

Creamy Artichoke Basil Sauce
Posted: April 17, 2012 Filed under: Main Dishes, Vegan | Tags: artichokes, basil, easy dinner, garlic, healthy, low fat, main dish, pasta, quick dinner, roasted bell peppers, side dish, vegan, vegetarian 5 Comments
Artichokes give this sauce its creamy factor without adding any fat.
Motherhood has changed me. We just spent an evening discussing life insurance and wills. I wake up before eight a.m. without an alarm. I no longer pee alone. I don’t shower until noon most days (if I shower at all). And I cook every meal while simultaneously pulling my child out of cabinets, trash cans, and the wash machine … or out from between my legs.
My mom snapped this picture of Jackson last time she was here. He pulls up on my pant legs right behind me and completely immobilizes me. I can’t turn around or squat down to get him or he’ll fall over. Cooking like this is challenging to say the least.

So I love a meal that is quick and easy, but tastes deliciously gourmet. This pasta sauce is exactly that. It takes about five minutes to make and if you pour it over hot pasta, you don’t even have to simmer it. As a bonus, Jackson likes it too, so I can give him little bites of my dinner without making a different meal for him. Mommy and baby approved!
Did I mention there is no cream in this creamy pasta? It’s almost guilt-free, minus the two tablespoons of olive oil. Another bonus for this post baby body!

Rachel’s
Creamy Artichoke Basil Sauce
Serves 2
Ingredients
2 garlic cloves, diced
2 T. olive oil
1 14 oz can of artichoke hearts, reserve liquid
1 1/2 roasted red bell peppers (jarred or make your own*)
A palm full of basil, roughly chopped
Juice of 1/2 a lemon
1/4 t. salt
1/4 t. pepper
1/2 t. Italian seasoning
8 oz pasta (I used whole wheat spiral pasta, but any kind you like would be fine)
Directions
In a small skillet, heat garlic and olive oil until garlic is just starting to brown. In a blender or food processor, blend all the ingredients including the sauteed garlic and olive oil. Add reserved liquid** from the artichokes (I think I used about a half a cup) to thin out sauce to desired consistency. Taste for seasoning and adjust if needed.
Toss with pasta immediately out of the boiling water. Garnish with a little chopped basil if desired.
*Making your own roasted peppers is easy. Just placing them directly on on a gas burner flame rotating it a few times (like this) or on a pan under the broiler until charred. Then put it in a bowl tightly covered with plastic wrap for a about five minutes. Rub off most of the skin with a damp paper towel. Voila, roasted peppers!
**Pasta water would work great too if you accidentally forget to reserve the liquid from the artichokes. Yes, I speak from experience.
Variations
Stir in chickpeas, sauteed veggies, chicken or Italian sausage (or the vegan versions of these)
Three Pea Salad
Posted: April 10, 2012 Filed under: Salads, Vegan | Tags: black-eyed peas, chickpeas, peas, salad, side dish, spring side dish, tabasco, vegan, vegan protein Leave a commentWe had the most wonderful, relaxing Easter this year. Jared’s parents and brother came over to our house and we enjoyed a beautiful spread of food for vegans and omnivores alike.

Easter Lunch
Rhonda, my wonderful mother-in-law, brought ham, and homemade macaroni and cheese, delicious roasted corn, and an apple pie. Jared and I weren’t short on choices though! I made zucchini basil risotto, balsamic roasted veggies, cranberry orange kale salad, cashew queso in a bread bowl, and three pea salad. We washed it all down with peach iced tea and Bogle Chardonnay. It was quite a feast for the five of us.
We meandered through lunch, then headed out for Jackson’s first Easter egg hunt before heading to the evening church service.
I could have just eaten him up in his little Easter duds. Lucky for him, I was pretty full from lunch.
(Jared and I just got Iphones so I can now do fun things like this with my phone pictures. I’ll try not to share a nostalgic shaded picture of my baby in every post. But know, each time I don’t, it took major restraint. Jared, on the other hand promptly dropped his phone in the toilet and ruined the camera. Thanks to Apple Care, a new one is on the way.)
I’ll share most of the recipes I made on upcoming posts, but I’m starting off with the one I finished off first, the Three Pea Salad. I was trying to come up with a vegan version of the old classic Spring Pea Salad with mayonaise and cubes of cheese, but I was afraid Jared wouldn’t go for just peas in a salad, so I veered off of that path pretty far. What I ended up with was a filling, tangy, spicy side dish. It’s one of those salads that gets better the longer it sits. I ate a bowl for dinner last night and then finished it off for lunch today.

Sweet Peas, Chick"peas," and Black Eyed Peas in a creamy tangy dressing.
Rachel’s
Three “Pea” Salad
Ingredients
1 16 oz can of Chickpeas, drained & rinsed
1 16 oz can of Black Eyed Peas, drained & rinsed
1 1/2 cups of Frozen Peas, cooked & cooled (put in ice water to quickly cool off)
3 T. Sweet Onion, minced
1/4 c. Vegenaise (or mayo of choice)
1 T. Rice Vinegar (any vinegar would be fine)
2 t. Frank’s hot sauce
A few splashes of Tabasco (optional for extra heat)
1 t. Salt
1/2 t. Pepper
1 t. Garlic Powder (or one minced garlic clove)
1/4 c. Parsley, chopped
Directions
In a medium sized bowl, mix all the ingredients together. Cover and refrigerate for at least 2 hours (overnight is best). Check for seasoning. Serve cold.
Although this dressing uses mayo, it doesn’t call for very much and results in a nice light coating of dressing (the way I prefer). If you want a thick creamy dressing, you may want to add more mayo and seasonings.


