
Salted Caramel Banana Nut Shake (Healthy)
Posted: May 28, 2012 Filed under: Beverages and Smoothies, Breakfast Foods, Cocktails, Desserts, Gluten Free, Uncategorized, Vegan, Vegetarian | Tags: almond milk, almonds, banana, banana nut, banana nut smoothie, caramel, healthy shake, milkshake, salted caramel, salted caramel banana nut, salted caramel smoothie, smoothies 1 Comment
Salted Caramel Banana Nut Shake
I’ve always loved a perfectly ripe banana for a quick snack. On hectic mornings, I’d often grab a banana, a spoonful of peanut butter, a swig of milk and call it breakfast. Once, when my four kids were young, we all headed in a crazed mass exit toward the car where I would drive them to school. Realizing I’d forgotten to eat, I instructed my then-thirteen year old son, Zach, to “run back in the house and grab me a banana.”
I watched, perplexed. as he ran to the front door of the house then took an odd pose, his head slightly to the right, his arms to his side, and then ran back to the car in this weird position. “What are you doing?” I asked. He answered in all seriousness, “I thought you told me to go to the house and then run like a banana.”
I swear, when puberty hits our children their hormones start eating their brain cells. But I digress.
Back to bananas for breakfast. As some of you know, I’m determined to eat my way to lower blood pressure. One of the ways to do this is to eat more potassium rich foods. And a banana is loaded with potassium. In fact, I read that a bite of a banana has more potassium than most potassium tablets. Almonds, too, are praised for all sorts of health benefits, including lowering blood pressure.
Another new food craze I love is salted caramel anything. So I combined a simple banana smoothie with almonds and unsweetened almond milk (only 35 calories a cup!) then added a touch of caramel and sea salt. (Sea salt does not raise blood pressure the way iodized chemically produced salt does, and you need less of it to flavor your food since it so rich in minerals.) There is only 2 teaspoons of caramel syrup (about 40 calories) in each shake, but because you use one of the teaspoons to rim the glass and as a decoration on top, you get the feeling that it is much sweeter as you get a tiny taste of the pure caramel with each sip.
This new smoothie/shake is the breakfast of my dreams. I’m hooked. It also makes a wonderful mid-afternoon snack or a bedtime treat, since the ingredients also relax you for a good night sleep. It could be a fluke, but I have noticed my blood pressure has lowered since having one of these banana and almond treats per day.
Served in a martini or margarita glass not only adds more elegance but allows you to rim the glass in a bit more caramel and sea salt, and gives you more surface area to garnish the top with the same.

Salted Caramel Banana Nut Shake
Becky’s Salted Caramel Banana Nut Shake (Healthy)
Serves Two
Ingredients
1 rounded T. roasted almonds (salted or unsalted both work)
1 banana, peeled and chopped into 2 inch slices (preferably frozen)
1 ½ c. unsweetened almond milk
4 t. caramel syrup, divided (There are several non-dairy alternatives for vegans, including caramel agave nectar, or google recipes for vegan caramel. )
½ c. ice
Sea salt – couple of tiny pinches

almond milk, roasted almonds, a frozen banana, caramel syrup and sea salt makes an amazing and potassium rich treat
Directions:
Into a blender put almonds, banana, and almond milk, 2 t. caramel syrup, ice and small pinch sea salt. Blend until smooth and almonds are just specks.
Pour about a teaspoon of caramel syrup around a plate, approximately the size of the rim of a martini glass. Sprinkle this circle with a tiny pinch of sea salt, lightly. Dip the rim of the glass into the syrup and salt, twisting and turning to coat evenly. Do this twice to prepare two martini glasses.

Create a circle of caramel syrup, lightly sprinkled with sea salt, on a plate, to rim the glasses
Pour half the smoothie/shake into each glass. Squiggle a bit more of the syrup (about 1/2 t.) to garnish the top of the drink, and sprinkle with one more tiny pinch of sea salt. Prepare to fall in love.
Variations: Add protein powder to buff up the protein and drink the whole recipe to make a complete breakfast smoothie.
Add liquor (rum, coconut or vanilla vodka) to turn this into a yummy frozen cocktail.
Try it with coconut milk instead of almond milk.
In a hurry? Skip rimming the glass.
Kiwi-Strawberry Key Lime “Flower” Tarts (Vegan)
Posted: May 16, 2012 Filed under: Desserts, Fruit Dishes, Uncategorized, Vegan, Vegan Options | Tags: fruit tart, Key Lime Fruit Tarts, Key Lime Pie, Key Lime Tarts, kiwi, strawberries, strawberry kiwi key lime tart, vegan desserts, vegan key lime pie, vegan key lime tart Leave a comment
Becky’s Kiwi-Strawberry Key Lime “Flower” Tarts
Those of you who know me, or have been reading this blog, have probably discovered that although Rachel and I share a love of cooking and laughter, she’s definitely “Felix” and I am “Oscar” in this Mother-Daughter Odd Couple.
When she and her husband Jared were visiting us this year,Jared was hungry and so I told him,”Jared, just scrounge in the fridge! You never know what you’ll find in there.” To which Rachel instantly deadpanned,”Or what might jump out at you.” It wasn’t long before she offered to give me a hand cleaning out my fridge. At one point she held up a lime that was, okay, a little brownish-black, but I figured the juice might be salvageable.
“What’s this?” she asked, dubiously eying the shriveled citrus.
“It’s a lime,” I offered, hopefully.
She shook her head. “Not a lime.”
“Not a lime?” I echoed.
“Not a lime. Mom, face it. This thing died weeks ago, you just couldn’t bring yourself to bury it. Grieve the lime and Let. It. Go.”
I sighed and let her toss it in the trashcan.
This week I sent Rachel the following picture of a lime that I found in the recesses of my kitchen.

“Not a lime.” Sigh.
To which she offered this advice. “Mom, when limes start looking like kiwis, they are no longer limes. Toss it out.”
But (and this is the way my ADD mind works), when she said “kiwi” and “lime” together in the same sentence, I started thinking how great those two flavors would taste together. That rabbit trail led to others and finally to the creation of the following yummy, easy, tart, fresh and pretty dessert featuring kiwis and limes.
But do not worry: No dying limes were harmed in this recipe. In fact, it features a store-made lime product from Kroger’s. This “Preferred Selection” brand of jarred key lime pie filling is truly scrumptious: tart and just-right-sweet, loaded with real key lime juice. It also happens to be vegan. You can make the shortbread cookie crumbs from scratch (see recipe) or if you are in a hurry, just put a few of your favorite store-purchased shortbread cookies in the food processor to make fine crumbs.
I served this to six women on my back porch today. So pretty and refreshing–the kiwis look like the center of a flower, the strawberries make perfect “petals.” And the women just nearly licked their sherbet bowls clean!

Kiwi-Strawberry Key Lime “Flower” Tarts
Kiwi-Strawberry Key Lime “Flower” Tarts
Ingredients
Shortbread Cookie Crumbs (See recipe below or purchase your favorite cookies and whirl in the blender to make 1 1/2 cups fine cookie crumbs. Add 1/4 c. melted butter and whirl again.)
Kroger’s Key Lime Pie Filling (or your favorite brand)

My favorite Key Lime Pie Filling in a Jar. Loaded with key lime juice! (Kroger’s brand, located near pie fillings on baking aisle.)
8 strawberries, sliced into “petals”
2 kiwis, peeled and sliced into rounds for centers of the flowers
To Assemble:
Put 3 T. of cookie crumbs in each of six small dessert bowls (I used my old-fashioned sherbet bowls.) Using the back of a spoon press the crumbs around the bottom and sides to create a miniature tart shell.

Pressing crumbs into small dessert bowls with back of spoon
Spoon 2 to 3 Tablespoons of key lime pie filling over each shell, smoothing the top gently.
Arrange kiwi and strawberry slices into “flowers” as shown in the pictures.
I filled the bowls with the cookie crumbs (pressed against the sides) ahead of time, and then at the very last minute — filled them with the filling and topped them with the fruit. (A volunteer to help you assemble is nice, and a fun way to chat in the kitchen while doing something creative together.)
Shortbread Cookie Crumbs (Vegan)
Heat oven to 350 degrees
1 c. flour (can be mixture of whole wheat and white)
1/2 cup Earth Balance Butter (you can use regular butter if you aren’t vegan and prefer it)
1/4 cup powdered sugar (or brown sugar for a darker more caramelized crust)
1/2 c. finely chopped walnuts or pecans
Directions:
Pulse the first 3 ingredients in the food processor (or use your hands to blend). Add nuts. Pat or roll the dough onto a cookie sheet that has been sprayed with cooking spray. Dough can be any shape or form, just make the giant free from “cookie” about 1/3 inch thick. Bake 10 to 15 minutes or until light golden brown. Let cool completely. Break up the shortbread and pop it back in the food processor to make fine crumbs.

This was printed from: We Laugh, We Cry, We Cook
The site URL: http://welaughwecrywecook.com
The Title: Kiwi-Strawberry Key Lime “Flower” Tarts (Vegan)
The URL: http://wp.me/p1UwM9-iN
Coconut & Chocolate Coconut Covered Cherries (Vegan)
Posted: May 15, 2012 Filed under: Desserts | Tags: coconut, coconut chocolate covered cherries, coconut covered cherries, dairy-free, freezer desserts, frozen desserts, vegan 10 Comments
Coconut and Chocolate Coconut Covered Cherries
You know those times when you plan to make one thing and then it turns out to be a completely different thing, and the thing you didn’t mean to make is actually better than the thing you tried to make in the first place?
That’s how I discovered these coconut covered cherries. I just wanted a bowl of frozen cherries with a little whipped coconut cream on top, but as the coconut cream covered the frozen fruit, it froze and coated the cherries. Coconut Covered Cherries…yes please! I, of course, had to try a chocolate version too. Who doesn’t love chocolate covered cherries? These frozen delights make a perfect bite-sized treat when you need just a little something sweet.
They are pretty healthy too. There is only 1 teaspoon of sugar in 15 covered cherries. Coconut cream is surprisingly good for you, despite it’s saturated fat content. The medium-chain fatty acids in coconut gets converted to energy as soon as your body absorbs it (unlike saturated animal fat which is difficult for the body to metabolize). It also contains lauric acid which is an immunity booster.
When selecting your can of coconut milk, look for a full fat kind with only coconut and water in the ingredients. Other ingredients like guar gum can keep the cream from separating from the water. Refrigerate the coconut milk overnight so the cream will rise to the top. You want it to look like this with the cream at the top and the coconut water at the bottom. Save the water to use in cooking or smoothies.

When cold, the coconut cream rises to the top.
Life is just a bowl of cherries;
Don’t make it serious;
Life’s too mysterious.
You work, you save, you worry so,
But you can’t take your dough when you go, go, go.
So keep repeating it’s the berries;
The strongest oak must fall.
The sweet things in life
To you were just loaned,
So how can you lose what you’ve never owned?
Life is just a bowl of cherries,
So live and laugh at it all.

Coconut Covered Cherries
Rachel’s
Coconut & Chocolate Coconut Covered Cherries
Makes ~15 Cherries
Ingredients
Frozen Cherries
2 T. cream from full fat coconut milk that has been refrigerated over night (see above for explanation)
1 t. sugar
1/4 t. vanilla extract
1 t. cocoa powder (omit for plain version)
Parchment or wax paper

Only Five Ingredients!
Directions
In a bowl, mix coconut cream, sugar, vanilla and cocoa powder (for chocolate version) until the sugar dissolves.


This stuff is seriously delicious as is. It will be hard to keep little (and big) fingers out of it!
Dip the frozen cherries into the cream and place on a parchment or wax lined pan. If the cream isn’t sticking well, pat the cherries dry with a paper towel. Place in the freezer for 20-30 minutes until the cream is completely frozen. Transfer to air tight zip top bag or container. Enjoy straight from the freezer.
Other variations: Try different fruits or flavors like maple cinnamon coconut covered bananas. Or try rolling in sprinkles or shredded coconut. Let me know if you come up with a tasty variation!

The chocolate ones reminded me of chocolate cherry ice cream.
This was printed from: We Laugh, We Cry, We Cook
The site URL: http://welaughwecrywecook.com
The Title: Coconut & Chocolate Coconut Covered Cherries (Vegan)
The URL: https://welaughwecrywecook.com/2012/05/15/coconut-chocolate-covered-cherries-vegan
Chocolate Coconut Almond Cake (Vegan-Friendly)
Posted: May 11, 2012 Filed under: Desserts, Uncategorized, Vegan, Vegan Options, Vegetarian | Tags: almond, cake, chocolate, coconut, Depression Cake, German Chocolate Vegan Cake, vegan cakes, Wacky Cake 3 Comments
Moist and rich Chocolate Coconut Almond Cake
When my little sister (also named Rachel — my daughter is her namesake) was about eight years old, she went along with my mother to visit a little girl from church who was in the hospital. (The child had been very ill, but was on the mend and would have a full recovery.) Apparently the child looked painfully thin to my sister, because Rachel took one look at her then announced to my mother and all standing around the sick bed, “They just need to give that girl some CAKE!”
From that day forward, whenever anyone announced they were feeling poorly, someone in my family would inevitably advise, “All you need is some CAKE!”
I can see why my little sister thought cake would cure anything that ailed a body. My mother was a champion cake-baker back in the 70’s before she had to get serious about cutting out sugar for her health. Most Saturdays would find her frosting a homemade coconut or Italian Creme or carrot cake. We kids would salivate around the kitchen counter in anticipation. We would eat the cake in small slivers, because our theory was that three thin slices had less calories than one thick slice.
One of the cakes Mother made frequently was called Wacky Cake (some call it Depression Cake) because the ingredients were always on hand (it does not have any milk, butter or eggs) and you simply stir it up in a bowl (no mixer). You don’t even have to grease the pan. My brother always requested this cake for his birthday with a simple vanilla icing.
My husband had out-patient surgery this morning, and after I made him a healthy vegetable stew, I remembered my sister’s advice and decided give him some cake! In searching for vegan-friendly desserts for Mother’s Day this weekend, I remembered Mom’s old stand-by, Wacky Cake. My favorite cake is German Chocolate so I created a vegan-friendly coconut-“butter”-almond frosting for this cake, but used chopped almonds instead, to give it a bit more crunch. Success!! Though I cannot claim that this cake is healthy, it is delicious, and it is vegan. I couldn’t resist eating a piece of it while still warm, moist and falling apart. Heavenly. If you have vegans in your family, or anyone who cannot eat dairy or eggs, this is a wonderful recipe for a special occasion, and both the cake and the frosting are super easy.

Warm Chocolate Coconut Almond Cake (Vegan)
Vegan Chocolate Coconut Almond Cake
1 1/3 cups flour
1/2 teaspoon salt
1 cup packed brown sugar
1 cup water
1/4 cup unsweetened cocoa powder
1/3 cup vegetable oil
1 teaspoon baking soda
1 teaspoon vinegar
1/2 teaspoon vanilla
1/3 c. chopped almonds (I used food processor)
Preheat oven to 350 degrees F.
Mix flour, sugar, and cocoa powder and baking soda with a wire whisk. All the rest of the ingredients and whisk again. Pour in an ungreased 9 by 11 inch pan. Spread evenly. Sprinkle with chopped almonds. (The almonds on top will naturally “toast” and give the cake a delightful extra layer of crunch under the frosting.)
Bake 35 to 40 minutes, until wooden pick comes out clean. While cake is baking, make frosting below. While cake is warm prick all over with a fork and pour frosting over all.
Coconut Almond Icing
1/2 cup organic coconut milk (If the coconut milk has separated in the can, use mostly the cream that rises to the top of the can.)
1/3 c. Earth Balance butter
1/2 cup organic sugar
3/4 cup shredded coconut (sweetened or unsweetened)
1/2 c. chopped almonds
Mix all of the above, except coconut and almonds, together in a saucepan. Bring to boil and while stirring, boil for a full minute. Take off heat. Add coconut and almonds. Pour over cake and spread evenly. Serve warm, room temp or cold! It is delicious anyway you slice and serve it.
This was printed from: We Laugh, We Cry, We Cook
The site URL: http://welaughwecrywecook.com
The Title: Chocolate Coconut Almond Cake (Vegan Friendly)
The URL: http://wp.me/p1UwM9-hJ
.
No Bake Apricot Bars
Posted: May 2, 2012 Filed under: Breakfast Foods, Desserts, Vegan | Tags: apricots, breakfast, cashew apricot bars, cashews, dessert, freezer-friendly desserts, healthy desserts, no bake apricot bars, no bake date bars, vegan, vegan desserts, vegetarian 9 Comments
Some women nest when they are pregnant by obsessively organizing the nursery until every onesie is folded just so and all the outfits are color coordinated and sorted by size, some scrub the house obsessively. I did a little of those, but mostly I cooked. And when I say I cooked, I mean I cooked!
In the two weeks before Jackson arrived, I completely filled my freezer with everything from chili and cornbread, to pot pie, to muffins, to waffles, to cookies and hummus. I started with an empty freezer and when my nesting was over, I literally had to remove the ice basket to fit everything in.
One of the recipes I made, 5 Ingredient No Bake Date Bars, from the blog “Oh She Glows,” barely made it to my due date. My family and I could not keep out of them. They are like crack, but healthy crack. In fact, they could probably cure drug addiction.
Angela at Oh She Glows is a genius when it comes to making healthy vegan treats. I can’t wait for her cookbook to come out. These bars have no added sugar, only five ingredients and don’t even require turning on the oven. My favorite thing about them is that they are best eaten straight out of the freezer. When Jackson arrived and I was a new nursing mother, I would suddenly be ravenous, and could hardly think straight until I had food in me again. These were the perfect fuel for my sudden hunger attacks, high in protein and fiber, they were filling and healthy, but felt indulgent.
I’ve made different versions of the bars countless times now, but yesterday I tried a new combination that really rivaled it’s original counterpart. Instead of dates and almonds, I used dried apricots and toasted cashews. Wow! I don’t know which one I like more. I took them to the leader meeting for my MOPS (Mother’s of Preschoolers) group last night and several requested the recipe. So as promised, here you go ladies!
The sweet tangy pureed apricots sandwiched between layers of rich salty cashews hits three of the five taste bud senses and also combines creamy, chewy, and crunchy textures. It’s satisfying on every level.

5 Ingredient No-Bake Apricot Cashew Bars
Inspired by OhSheGlow’s 5 Ingredient No Bake Vegan Date Squares
Ingredients
Crust:
- 1.5 cups whole cashews (toasted, roasted, honey roasted – whatever you have)
- 1.5 cups regular oats (for Gluten-free, use GF oats)
- 1/2 tsp kosher salt (omit if cashews are salted)
- 10-15 dried apricots (~ 1/2 a cup), roughly chopped
- 1/4 cup coconut oil, melted
Filling:
- 25-35 dried apricots roughly chopped (~2 cups)
- 1/2 – 1 cup water
Directions:
1. Spray a muffin tin (my preference) or 8×8 pan with non-stick cooking spray. In a food processor, process cashews, salt, and oats until a fine crumble forms. Add apricots and process until crumbly again. Add coconut oil and process until sticky. Remove from processor, set aside 3/4 cup of the mixture for later, press remaining into cupcake molds or pan to form a crust. For muffin tins I use a tablespoon and put a heaping tablespoons into each mold, then use the back of the tablespoon to press down and smooth out the layer.
2. Process the apricots and 1/2 cup water in the food processor (I’ve found a smaller work bowl works better than a large one if you have a full sized food processor–in fact I just used my mini one for this step) until a paste forms, stopping to scrape down the sides and adding a little more water as needed (don’t exceed 1 cup). Scoop out the apricot mixture into the pan or evenly into the muffin tins and gently spread out to cover the crust.
3. Sprinkle on the reserved crust and gently press down into the apricot mixture, just so it sticks. Freeze for at least an hour or until firm. Cut squares or pop out of muffin molds and wrap individually with saran wrap. Store in freezer. Enjoy straight from the freezer or slightly thawed as a delicious, guilt-free treat!
This was printed from: We Laugh, We Cry, We Cook
The site URL: http://welaughwecrywecook.com
The Title: No Bake Apricot Bars
The URL: https://welaughwecrywecook.com/2012/05/02/no-bake-apricot-bars
Quicky Sticky Jasmine Rice & Mango
Posted: April 18, 2012 Filed under: Desserts, Fruit Dishes, Uncategorized, Vegan, Vegan Options, Vegetarian | Tags: anti-aging, coconut, coconut desserts, coconut milk, Dr. Amen, jasmine rice, mango, rice pudding, Thai desserts, Thai sticky rice and mango, Use Your Brain to Change Your Life 4 Comments
Becky's Quicky Sticky Jasmine Rice & Mango
Yesterday was my birthday, which means I’m only two years away from being able to answer the question, “Do you qualify for the senior discount?” in the affirmative.
The first time I say, “Yes, I’m officially old” to the kid behind the counter, you can be sure there will be salty tears stirred into my 20% Off Cup o’ Joe. (I know, the fact that I refer to coffee as “Joe” already dates me somewhere pre-WW2. But I thought I’d start practicing speaking Old People Talk. I want to get a leg up on fitting in with the AARP’s version of high school seniors as we gather in packs at the mall — before it opens, wearing sensible shoes and fanny packs, to walk around it ten times.)
But before I hit the ol’ double nickel birthday, I’d like to give anti-aging my very best shot. I am friends with and have worked with brain doc and Public Television guru, Dr. Daniel Amen. His latest book, Use Your Brain to Change Your Age, is packed full of research, stories and tips to stay young. If I were forced to sum up the entire book in two points, it would be:
1) Eat nutrition-packed, brain-healthy food. (Colorful fruits and veggies are our best friends in the anti-aging/anti-disease corner.)
2) Exercise. (Walking 30 minutes a day five times a week wards off dementia like a miracle drug.)
In August, I started a regular exercise routine, and though I am no where near svelte, I like the endorphin rush from moving in the morning, know I’m getting blood flow to my brain, and feel my endurance improving. Thanks to my Darling Daughter the Vegan, I’m discovering all sorts of yummy, creative ways to put more antioxidant-rich plant-based foods into my day. Yesterday, I decided to start my new birthday year off by becoming an EOD Vegan: Every Other Day Vegan. Periodically, I’ll report in and let you know if I’m aging backwards or losing any of my ample backside.
Thai food is one of my favorite vegan-friendly sources and last week I enjoyed a lunch of two amazing hot-spicy curries with my friend Lucille. When the waitress asked if we’d like to try Sticky Rice and Mango, since the mangoes are in season and “oh so sweet!” – we were game. And boy, am I glad we were. Fresh sliced mango with a side of almost translucent slightly sweet “sticky rice,” with a warm creamy coconut sauce over all, was delicious.
Making Thai sticky rice involves more time and contraptions than I’m willing to give or buy, but we adore Jasmine rice that I make in my $13.00 rice maker purchased at Wal-mart.

My cheap little beloved rice maker
(Commercial here: rice makers are awesome! You just pour in the rice and water, flip a switch and no burned rice, just perfect little fluffy grains, and all in about 15 minutes.) So I invented the following “Quicky Sticky Jasmine Rice & Mango” recipe – which I liked just as well as the original Thai dish. It makes a light, sweet ending to a Spring or Summertime meal.

Quicky Sticky Jasmine Rice & Mango
Serves 8
Ingredients
1 cup uncooked Jasmine rice (Jasmine rice imparts an amazing aroma and taste.)
1 ¼ cup water
1 can coconut milk, full fat (will be divided)
2 T. organic sugar
4 small mangos
Optional: 2 T. shredded coconut, sweetened or unsweetened, divided.
¾ t. salt, divided
About 8 mint leaves for garnish
Directions:
Into rice cooker (or pan, if you are cooking the rice on the stove top), put jasmine rice, ½ t. salt, water and ½ cup coconut milk and 1 T. coconut if you like. (Use mostly the liquid portion of the coconut milk to go into the rice, saving the majority of rich cream that rises to the top of the can, for the sauce.)
Into a small sauce pan, pour the rest of the coconut milk/cream from the can. Add 2 T. sugar, and if desired, 1 T. of shredded coconut, and ¼ t. salt. Stir and heat until creamy hot and sugar is dissolved. Set aside to let warm slightly.
Peel and slice mangoes, arranging them on pretty plates. You can cut them any way you like, but as you see in the picture, I cut them near to the seed, in two halves, then sliced the halves but keeping the shape intact. The dish in this pictures is enough to serve two, so I used one small mango for two people.
When the rice is done, ladle about ½ cup of the sweetened warm coconut milk over it, and stir. This will help make it “sticky.”
Pack the rice, about 1/3 cup or so, into a small cup (I used a Japanese tea cup that I first sprayed with vegetable oil), carefully turning upside down onto the plate next to the sliced mango.

Rice packed into small cup, ready to turn upside down on plate
Ladle some of the coconut milk over the rice and drizzle on mango as well. Serve any leftover coconut sauce on the table to let the guests serve themselves more if they like. Garnish with sprigs of mint.
Variations: Try with other tropical fruit like pineapple or banana. Berries would also be yummy. Makes a delicious light breakfast as well. Try with brown Jasmine rice.

Kinda’ Healthy Vegan Apple Fritters
Posted: April 5, 2012 Filed under: Breakfast Foods, Desserts | Tags: apple fritters, apples, breakfast, dessert, fritters, pastries, vegan, vegan donuts 6 Comments
Kinda' Healthy Vegan Apple Fritters
Confession: I don’t eat kale and carrots for every meal. Especially with a hyper eight month old on my hip, sometimes the best meal I have all day is a can of black beans wrapped in a tortilla. Well, I don’t generally wrap and eat the whole can itself. I do try and at least open the can first. I’m no savage.
Sometimes I crave down right bad things for me…like donuts. My favorite donut for as long as I can remember is an apple fritter. That two-handed sweet cinnamon pastry with bits of real apple, deep fried and drizzled with sugary icing. What’s not to love?
Well, the 500 or so calories and 20 or so grams of fat might be a little unlovable, and the milk, egg, and butter are less than kind.
I set out to make a healthier version of my old favorite. These are definitely still a treat, but subbing half of the flour for whole wheat flour, apple sauce for eggs, and nondairy milk and margarine for their dairy counterparts helps. Then instead of making huge fritters, I made mini fritters that were pan fried instead of deep fried. They still aren’t health food, but they are certainly better than the average donut shop fritter.
I prefer a donut for dessert, but if you’re a sweets-for-breakfast kind of gal or guy, then feel free to make these ahead and then re-crisp them in the morning under the broiler. I might cut the sugar a little if I were having these for breakfast though as I’m not a sweets-for-breakfast kind of gal.

Rachel’s
Kinda’ Healthy Vegan Apple Fritters
Makes 15 small fritters
Ingredients
Fritters
1 Apple, peeled and chopped into small pea size pieces
1/2 c. Whole Wheat Pastry Flour (or your flour of choice)
1/2 c. All Purpose Flour
1 1/2 t. Baking Powder
2-3 t. Cinnamon
1/2 t. Fresh Grated Nutmeg (fresh really is best)
1/4 c. Vegan Sugar
Dash of Salt
1/2 t. Vanilla Extract
1 T. Earth Balance Margarine, melted
1/4 c. unsweetened applesauce (ripe banana also works well)
1/3 c. non-dairy milk
Canola and/or Coconut Oil
Icing
3 T. Powdered Sugar
1/4 t. Fresh Grated Nutmeg
Nondairy milk
Directions
Fritters
Mix the dry ingredients together, then add the wet until everything is just combined, being careful not to over mix. Fold in the apples.
Put approximately 3 tbs of oil into your pan (you may need more or less depending on how large your pan is) and turn the burner onto med low heat. (I found on my electrical stove, 3, on a 9 setting nob, was the perfect setting.) Carefully drop batter by the tablespoon into the oil. Cook for 60-90 seconds on each side. You might want to test one first before doing a whole batch to see if your oil is the right temperature. You want them to be crispy on the outside and cooked thoroughly on the inside. Put fritters on a paper towel lined plate. Repeat, adding more oil as needed until all the fritters are pan fried.
Icing
Mix the powdered sugar and nutmeg with a tiny drizzle of milk. Keep add milk a little at a time until the icing is thin enough to easily drizzle over the fritters. If it gets too thin, just add a little more powdered sugar.
Drizzle the icing over the fritters and try your best not to eat the whole batch before your husband gets home from work. If, by “accident,” you do, just call that a trial batch and make another official batch for sharing. I think my next recipe trial better be one of the kale and carrots variety. 🙂
Refreshing Mandarin Orange & Pineapple Cake (Vegan Friendly)
Posted: April 4, 2012 Filed under: Desserts, Uncategorized, Vegan, Vegan Options, Vegetarian | Tags: birthday cakes, coconut milk, coconut oil, crushed pineapple, mandarin orange and pineapple cake, mandarin orange cake, Mandarin oranges, pineapple, pineapple cake, refreshing cake, refrigerator cakes, Spring cakes, Summer cakes, vegan birthday cakes, vegan cakes, whipped coconut cream, whipped cream 1 Comment
One warm day when my daughter Rachel was about fourteen, she bounced in the kitchen and said, “Mom, you have GOT to get the recipe for this cake called ‘Refreshing Cake’ that Cricket’s mom made today. It was cold and full of fruit and not too sweet, and creamy… and I want it for my birthday cake.”
Cricket was one of Rachel’s best friends, and luckily her mom was the sweet-natured recipe-sharing sort, so her recipe for “Refreshing Cake” (made with cake mix, eggs, pudding mix, a cup of oil, canned fruit and Cool Whip) showed up not only at birthdays, but was our go-to Spring and Summer dessert for family gatherings.
Then Rachel grew up, married, and became a vegan, bravely waving good-bye to many of her favorite desserts made with lots of dairy and eggs.
I, too, became more health conscious in my own way. I grew up in the 70’s when our collective moms (prompted by TV and the health advice de jour) stocked the kitchen with the latest new-fangled foods: Fresca, Tang (Why drink OJ from an actual orange when you can drink orange flavored sugar water?), margarine, IMO (A sour cream substitute. What those initials stood for is still a government secret.), saccharine, Mellorine (an artificial ice cream that melted into tile grout) and Cool Whip, that luscious tub full of hydrogenated oil and air!
We were a generation of kids raised on NASA and chemicals, basically eating astronaut food.
(I must hasten to add that my mother turned into something of a health nut in the decade of the 80’s, and has remained healthily and happily so ever since.)
But somewhere along the way to adulthood, I tasted real butter and ice cream (Blue Bell), promptly fell in love with the real McCoys, and began cooking with all things “natural.”
Now recipes with “artificial food” ingredients leave a slight chemical aftertaste in my mouth, not to mention an ache in my tummy.
But with the coming of Spring, visions of that moist pineapple and Mandarin orange cake, with its pineapple-whippy-pudding frosting started dancing in my head again. Along with the thought, “I wonder if I could create a ‘real food’ vegan-friendly version of this cake that doesn’t taste like fruit flavored mashed tofu and lentils?”
I’m pleased to say that with a quick trip for a couple of specialty items at Whole Foods, I produced a Refreshing Cake that is not only chemical free, organic and vegan… it tastes better than the original to me. No weird aftertaste, no achy tummy. Just a pure “real food” moist, yummy cake.
It would also make a great make-ahead cake for Easter lunch or dinner. A little preview tip: two cans of whole full fat coconut milk will need to go in your fridge overnight before making the recipe. This allows the “cream” to solidify and rise to the top so you can skim it off and whip it!

Becky’s Refreshing Mandarin Orange and Pineapple Cake
Serves 9 to 12, depending on size of pieces
Ingredients:

Some of the ingredients for “Better for You” Refreshing Cake
For Cake:
Dr. Oetker’s Organic Vanilla Cake Mix, (This mix has no dairy or eggs in the mix, so if you don’t add any, it can be vegan.)
4 eggs (Vegans use egg-replacer equal to 4 eggs. You can click on link for recipe or buy “egg-replacer” in a box at most health food stores.)
1/2 c. coconut oil
1/2 c. applesauce (you may also use another 1/2 c. of canola or coconut oil instead, but applesauce makes it lighter in calories)
1 11 ounce can Mandarin Oranges with juice
For Frosting:
2 16 oz. cans full-fat coconut milk, chilled overnight in fridge. (You will only use the coconut cream that rises to the top.) If you prefer dairy, you can use 1 c. whipping cream instead. Or 1 can of coconut cream and 1/2 c. whipping cream combined which is what I use most often as it seems to render the best of both!
1/2 c. vegan vanilla pudding mix (I used about half a package of Mori Nu vanilla pudding mix. If you aren’t vegan you can use any 3 1/2 oz. package of instant vanilla pudding mix.)
1 28 ounce can crushed pineapple, drained
1/4 c. raw organic sugar or agave nectar
2 t. good vanilla
Directions:
Preheat oven to 350 degrees.
To make the cake, mix the organic cake mix with eggs or egg-replacer of your choice, coconut oil and applesauce. When thoroughly blended, fold in mandarin oranges with juice, breaking gently as you stir. Pour batter into an 11 by 13 inch pan and bake for about 20 minutes or until golden brown and cake springs back to touch in the middle. Cool and refrigerate until cool to the touch before frosting.

Refreshing Cake before frosting
Using an electric mixer, whip the coconut cream as you would cream until it has the consistency of whipped cream. (Or if you prefer to use dairy, whip 1 c of heavy cream. I often use half coconut cream and have whipping cream.) Add 1/2 c. of vegan pudding mix (save rest for another cake, another day:) and continue to beat. Add vanilla and 1/4 c organic sugar or agave. Fold in the can of well-drained can of pineapple. ( Really squeeze the juice out, pushing pineapple against the colander holes.) Keep in fridge until you are ready to frost. If frosting feels too thick, add a little pineapple juice until it has the consistency of easy-to-spread, slightly stiff, whipped cream. If too thin, let it set in fridge for up to an hour and it should thicken.

Whipped Coconut Cream with Pineapple folded in
When the cake is chilled, frost with coconut-cream-pineapple frosting. You may want to garnish with a little flaked coconut. Cover with plastic wrap and keep in fridge until you are ready to serve. I think this cake tastes even better the next day or two as flavors have a chance to chill and mingle.
Strawberries Romanoff
Posted: March 23, 2012 Filed under: Desserts, Fruit Dishes, Uncategorized | Tags: fruit desserts, fruit salads, strawberries, strawberries Romanoff, strawberry dessert, vegan option, vegetarian, whipped cream, yogurt Leave a comment
When my daughter Rachel was about three or four, I jotted down some of the adorable phrases and words that I loved to hear her say. “Tears” were called “cwy dwips” (cry drips), and a “suitcase” was a “cuse box.” Her word for “strawberries” was “STA-biddies” which I still remember her saying, her whispy blond hair blowing around her as she bit into the ripe fruit, grinning while sweet red juices rolled down her chin.
Well, “sta-biddies” are in abundance now, and on sale today!
When I saw them overflowing the grocery display, my mind drifted to Strawberries Romanoff, a delectable concoction of strawberries served under a creamy fluff of brown-sugar cream, spiked with brandy, rum or bourbon. I first tasted this summer dream treat at La Madeleines, a wonderful French cafe, popular in the Dallas-Ft. Worth area. Whenever I visit Rachel in Texas, we do our best to go to lunch at La Madeleines and I always order Strawberries Romanoff for dessert.
Last summer, when my mom was visiting Denver, I tweaked and combined a few recipes I found online and produced this version of Romanoff cream which we like even better than the dish from La Madeleines! Mom and I sat around the kitchen counter and licked the bowl completely clean!
It only takes about five minutes to make the sauce, making this an easy, refreshing and beautiful dessert for these long Spring and Summer evenings. It looks oh so elegant, too.

Becky’s Strawberries Romanoff
Serves 6
Ingredients
1 c. whipping cream
6 T. powdered sugar
1 c. Greek Yogurt, plain (may also use sour cream)
6 T. brown sugar (Plus a T. more for garnish)
2 T. bourbon (or scotch, rum, brandy or your favorite liquor; or 1 T. vanilla or rum extract if you prefer non-alcoholic)
2 pints fresh strawberries, hulled and rinsed (You may keep them whole, or slice them, your preference. If they are tart, you may want to sprinkle a bit of sugar on them as well to sweeten them up some.)
Directions:
In a medium mixing bowl, whip cream into soft peaks, slowly adding powdered sugar to the whipped mixture.
In a separate smaller bowl, whisk together Greek Yogurt, 1/3 c. brown sugar and bourbon.
Add yogurt mixture to whipped cream and fold in until well combined.
To serve, spoon strawberries into martini glasses, about 2/3 full, place generous dollop (about 1/3 c.) of Romanoff sauce over top of each. Sprinkle a little bit of brown sugar over the sauce for garnish.
Variations: You can also layer the strawberries and sauce in parfait like fashion. Big wine glasses, or pretty bowls can also work in place of martini glasses. The powdered sugar helps the cream hold its shape so that it will keep for a couple of days in a sealed container. One of the reasons I always used powdered sugar instead of granulated when I make whipped cream.
Veganize This: Try coconut milk “whipped cream” and any of the many varieties of plain non-dairy yogurt.
This was printed from: We Laugh, We Cry, We Cook
The site URL: http://welaughwecrywecook.com
The Title: Stawberries Romanoff
The URL:https://welaughwecrywecook.com/2012/03/23/strawberries-romanoff/
© Copyright 2012 – All Rights Reserved
Blueberry Raspberry Oat Nut Bars
Posted: March 19, 2012 Filed under: Breakfast Foods, Desserts | Tags: bar cookies, blueberries, blueberry bars, blueberry desserts, blueberry oat nut bars, breakfast, breakfast food, dessert, nuts, oats, snacks, treats, vegan, vegetarian 15 Comments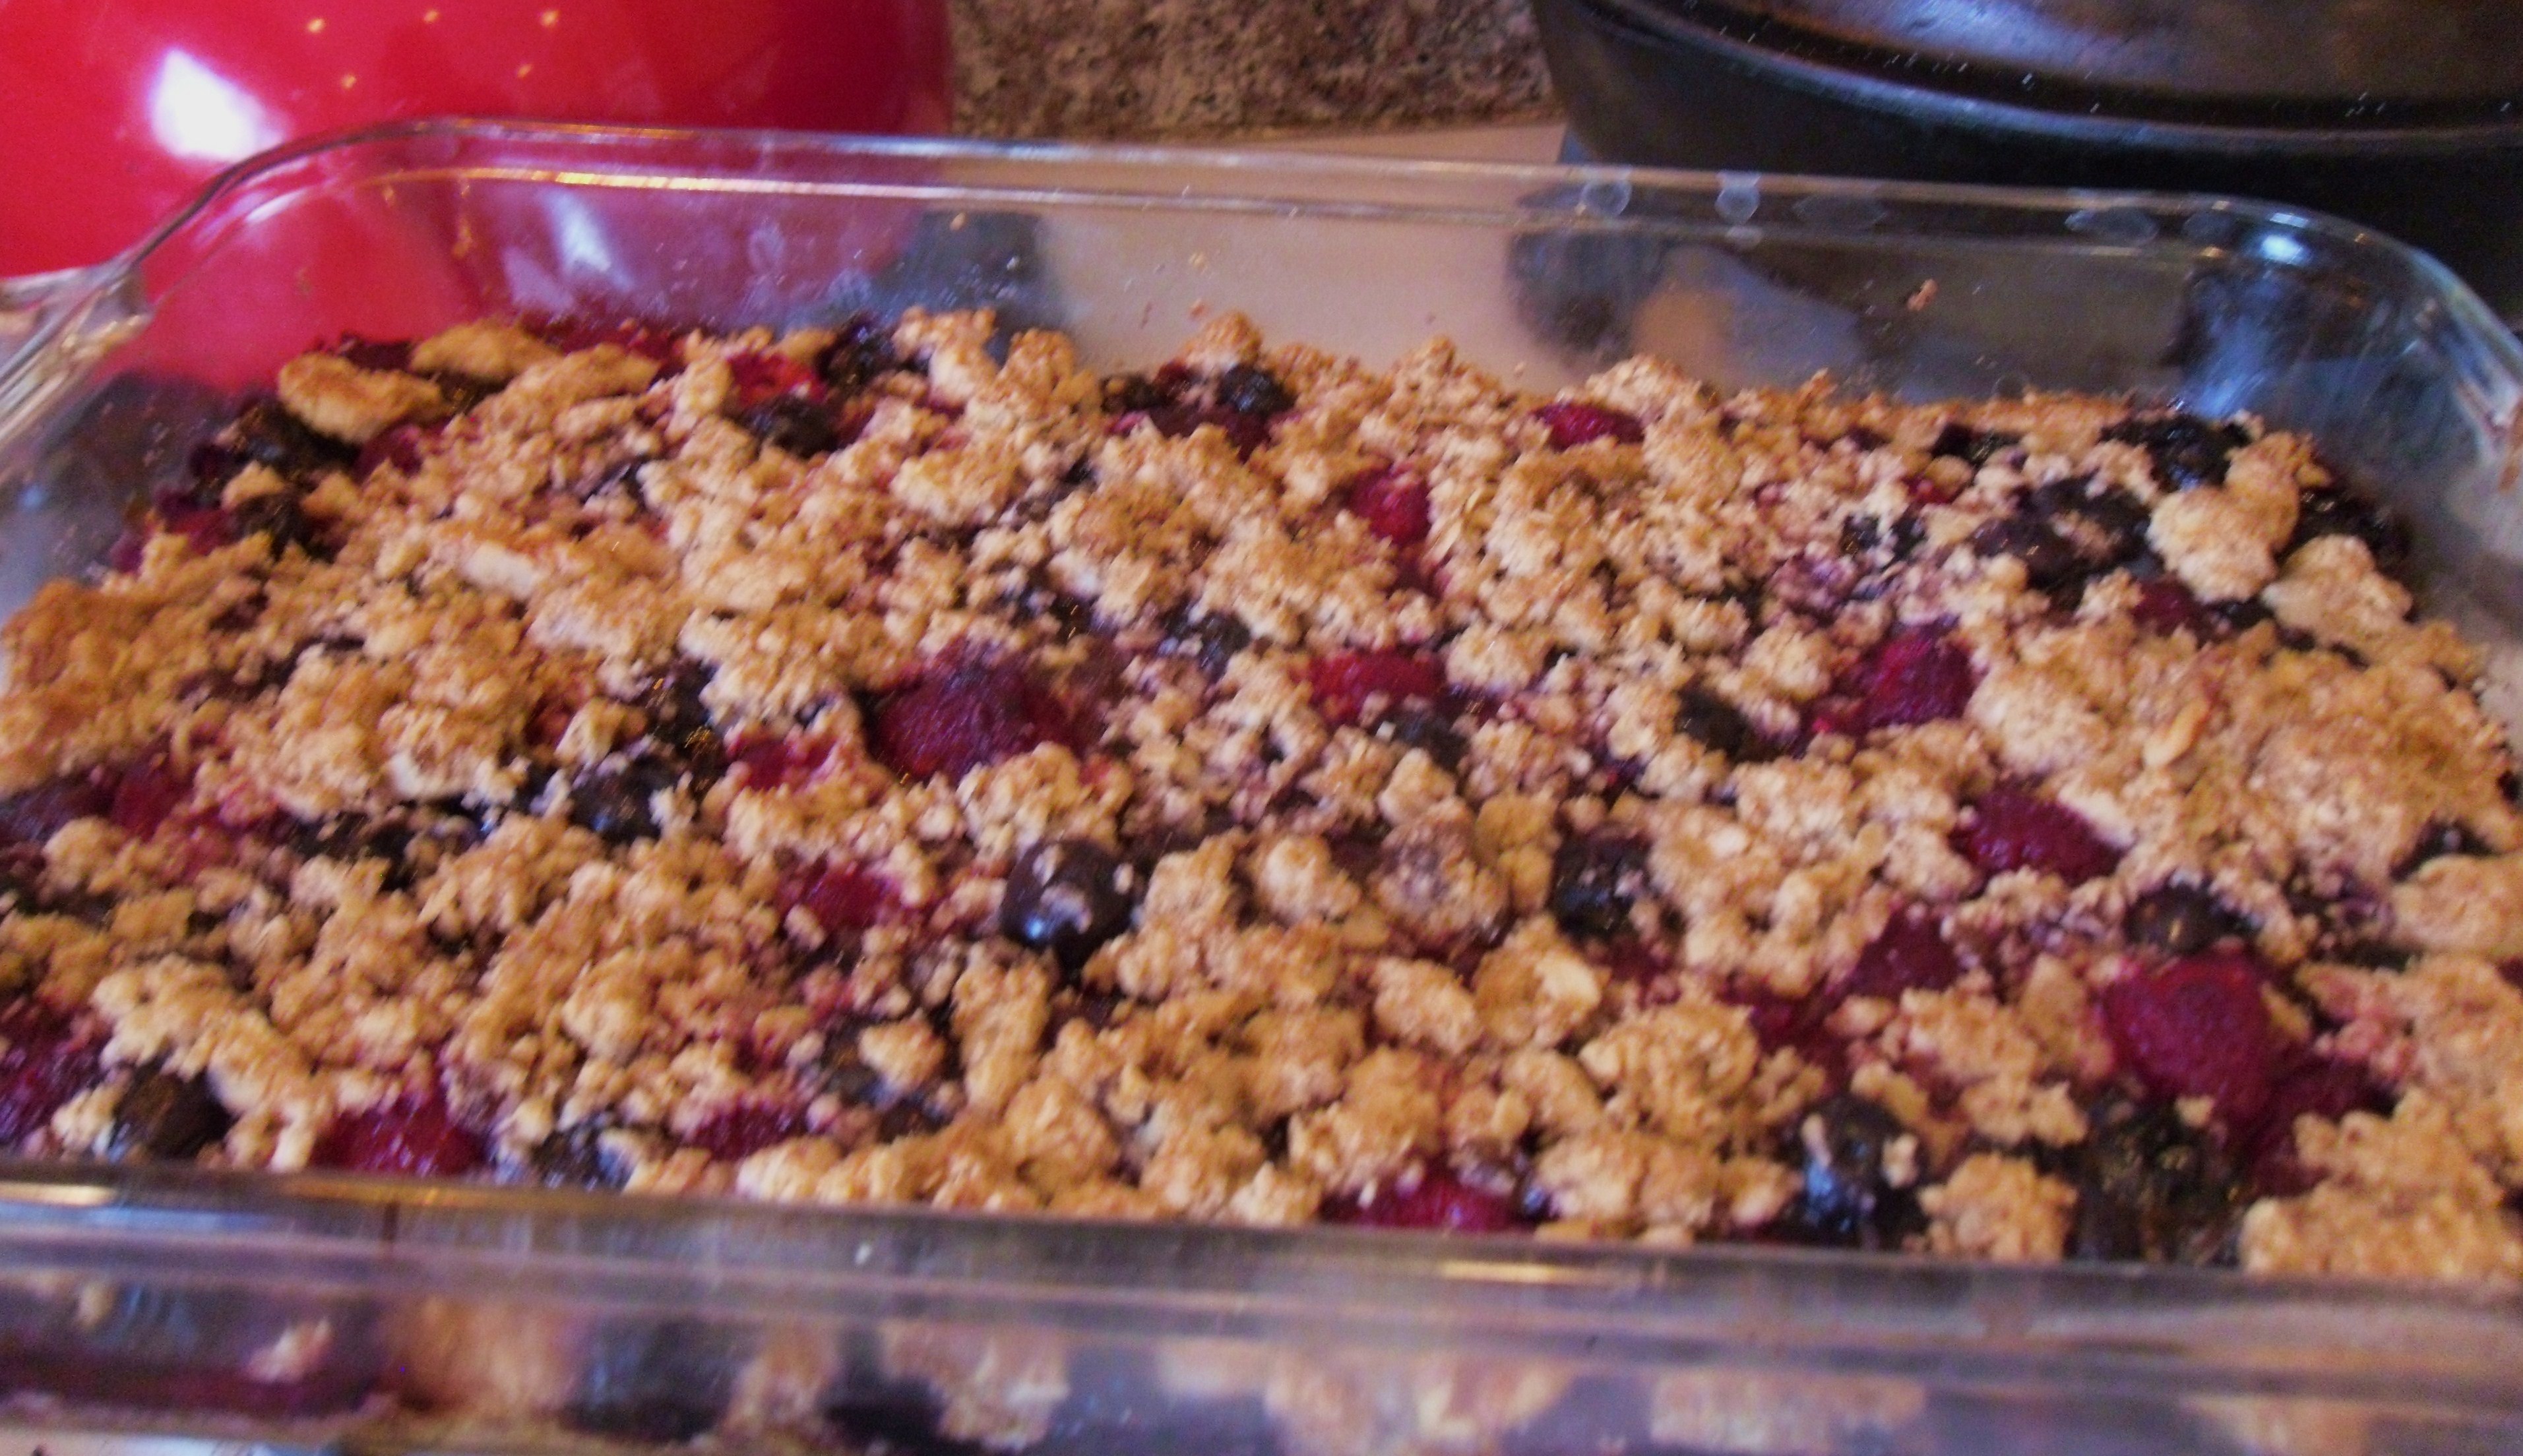 (Becky, the Mama.) This week I had a run of crazy mistakes that defy even my questionable logic. One day began by sending my husband’s business blog post, unedited, to hundreds of subscribers on the wrong day. From there it seemed every hour was punctuated by a wrong move, a major mess or spill in the kitchen, an embarrassing misspelling on social media, or a relational faux pas.
I was determined to make the next day mistake-free, and sailed through until about 3:00 pm, when I darted into a store and ran into a friend. Her face was full of compassion as she hugged me. “I read about all your latest mishaps on Facebook, bless your heart.”
I smiled and said, “Yes, but I’m having a much better day. No mistakes yet!”
She pointed to my abdomen and said, “So that big white sticker that says, ‘Citrus juicer, $5.00’ on your stomach, is that on purpose?”
Oh well, there’s “always tomorrow.”
This morning I woke feeling chipper, and posted a status on Facebook that described my excitement about going to my friend Sue’s house to celebrate her birthday with some of her good home cooking. I decided to whip up my favorite quick and easy berry bars to bring for dessert. They are a “just right” treat; not too sweet. Perfect under ice cream after dinner, but wonderful with a glass of milk for breakfast as well.
As we were enjoying our meal around their table (fabulous tenderloin steak, fresh corn on cob, and pesto pasta), Sue’s husband Jason grinned and asked, “Should we tell her now?”
“Tell me what?” I asked.
“Oh, Jason,” Sue said. “I wasn’t going to say anything. Becky had a hard week.”
“What?” I repeated.
Jason laughed. “Sue’s birthday is next week. We’d actually invited you to come for dinner next Sunday! But when Sue saw your status update, we thought, ‘Let’s just go with it. We’re free tonight, anyway.’”
I left half a pan of these blueberry raspberry bars with Jason and Sue, and hope it will remind them of how much I love them for being so patient and kind to their absentminded friend.
P.S. My daughter Rachel just wrote, “When my mom came to stay with me after Jackson was born, she made me these blueberry raspberry bars. I was a ravenous new nursing mom and let me just say, these did not last very long! They are especially delicious in the middle of the night with a glass of almond milk. Sigh…I miss those early nursing days when I could eat constantly and still lose weight!”

Blueberry Raspberry Bars
Becky’s Blueberry Raspberry Oat Nut Bars
Ingredients
Serves 12-15, depending on how big you cut the bars.
1 c. butter (vegans can substitute coconut oil or Earth Balance butter or a mixture of both)
1 c. brown sugar
1 3/4 c. flour
1 tsp. salt
1 1/2 c. oatmeal
1/2 c. chopped nuts (walnuts, pecans, almonds, whatever nut you like)
1 c. fresh or frozen blueberries
1 c. fresh or frozen raspberries
Directions
Preheat oven to 375 degrees. Dump the first four ingredients into the food processor and pulse until crumbly. Add the oatmeal and nuts, process just until blended. (You can also do this with a mixer or use clean hands for the job.) Press half of the mixture into a greased 9×13 inch pan: spread blueberries over the mixture and sprinkle with the remaining oatmeal mixture. (Like a crumb topping.) Bake about 25 minutes or until golden brown. Cool 10 minutes before cutting into bars.
If you have any leftover (and this is a big IF), I have found they stay freshest when wrapped well and refrigerated, then nuke the portion you want to eat for few seconds in microwave.
Try these with other fruits (raspberries, strawberries, cherries, pineapple, apples, rhubarb… or combos thereof).
Also works well with other flours (gluten free) and grains. Can sub wheat germ or other flakey grains for some of the oats to upsize or vary the nutritional value. You can use date sugar instead of brown sugar for sweetening, and keep it sugar free.
I love for people to find a basic recipe-method that works, then get creative with it, to make it their own. This is a great recipe to “play with,” because it is hard to mess up! (Even for me.)
This was printed from: We Laugh, We Cry, We Cook
The site URL: http://welaughwecrywecook.com
The Title: Blueberry Oat Nut Bars
The URL: https://welaughwecrywecook.com/2012/03/19/blueberry-oat-nut-bars/
© Copyright 2012 – All Rights Reserved


