
Seductive Puttanesca Sauce
Posted: April 25, 2012 Filed under: Beef, Gluten Free, Main Dishes, Pasta, Vegan, Vegan Options, Vegetarian | Tags: capers, chick peas, garbanzo beans, marinara, olives, Papperdelle, pasta, pepperocinis, Puttanesca, spaghetti squash, Vegan Pastas 1 Comment
Becky’s Seductive Puttanesca Meat Sauce over Lemon-Pepper Pappardelle
Now and then I get a hankering for something that tempts all the senses: salty/briny, sweet, garlicky, rich and tomato-y. And when I do there there’s nothing like Puttanesca sauce to satisfy.
There are hundreds of variations on Puttanesca, but basically, it is a rich marinara sauce with a touch of something salty and briny (capers, olives, anchovies, artichoke hearts, and or pepperocinis) to give it an extra tangy zip. I also like to balance the zip with something sweet — chopped sun-dried tomatoes and/or brown sugar.
I recently served this dish, innocently, to a lovely group of female friends, many of them involved with some sort of Christian ministry. They loved it, scraped the skillet clean! In attendance that night was my good friend Lucille Zimmerman who is a writer and a therapist who loves to research little known facts with the passion of Curious George. She went right home and researched the meaning of the word, “Puttanesca.” She wrote to tell me that it means — oh, how shall I say this delicately? –“prostitute, whore, ladies of night, harlot,” just choose your favorite wanton woman term. Probably not a “word of the day” you’d choose to teach your kids over pasta.
Apparently the potent aroma of this dish from Italy was so powerful that the scent lured in potential customers off the street, serving as an appetizer for, well, the other “desserts” on the menu.
Oh, well. There’s nothing I can do about the origin of this dish, but I can tell you there is something powerfully seductive about it!
Below is how I make my Puttanesca, but don’t be intimidated by the ingredient list: it is what I had on hand in the fridge. Just pull out whatever you have in your fridge or pantry — and as long as you have something salty & briny, and something sweet, to balance the basic marinara, you’ll probably love the results.

Becky’s Seductive Puttanesca Sauce Over Pappardelle Lemon-Pepper Pasta

Becky’s Seductive Puttanesca Sauce
Into a medium high skillet (I love my cast iron for this) saute:
2 cloves minced garlic
1/2 chopped onion in 2 T. olive oil
Throw in any mixture of the following that you have on hand, stirring after each addition. (I do highly recommend that you use the chopped artichoke hearts, to me they are the most essential ingredient!)
1/3 – 1/2 c. chopped marinated artichoke heart
1/2 c. to 1 cup, any roasted or left over vegies, diced.
1 T. capers
2 T. olives, chopped, any kind
2 T. pesto sauce (if you have it on hand… no worries if not)
2 T. chopped pepperocini peppers
2 T. chopped sun-dried tomatoes (packed in oil, preferably)
1 – 2 T. brown sugar (this will depend on your taste and also how many “sour” ingredients that you put in your sauce that will need balanced by sweet)
1 28 oz can crushed tomatoes (I like the ones with basil and garlic)
1 t. Italian seasoning or oregano
Salt & Pepper to taste
Simmer until sauce is thick and chunky, then season with salt, pepper, and Italian spices to taste.
You can dress up the recipe from here and add some flavorful meat of your choice. It is delicious with ½ lb of ground beef sauteed with ½ pound Italian sausage (chicken or turkey sausage is great) tossed in. Or you can go vegan and roast garbanzo beans (see recipe below) and serve over your favorite pasta, or spaghetti squash (see instructions for this below as well). My daughter and I made this vegan version together (she suggested we try it with roasted garbanzos), and it was AWESOME.
I personally adore this sauce served over Trader Joe’s Lemon Pepper Pappardelle Pasta (which is a wide ribbon-like pasta). I looked up the root meaning of “pappardelle” and to my great relief, it simply means “to gobble up.” Whew. Much better “Italian word of the day” for little ones.
A light sprinkle of Parmesan (Vegan Parm if you are going dairy-free) and it is ready to serve. The aroma should draw hungry folks to your kitchen in no time.
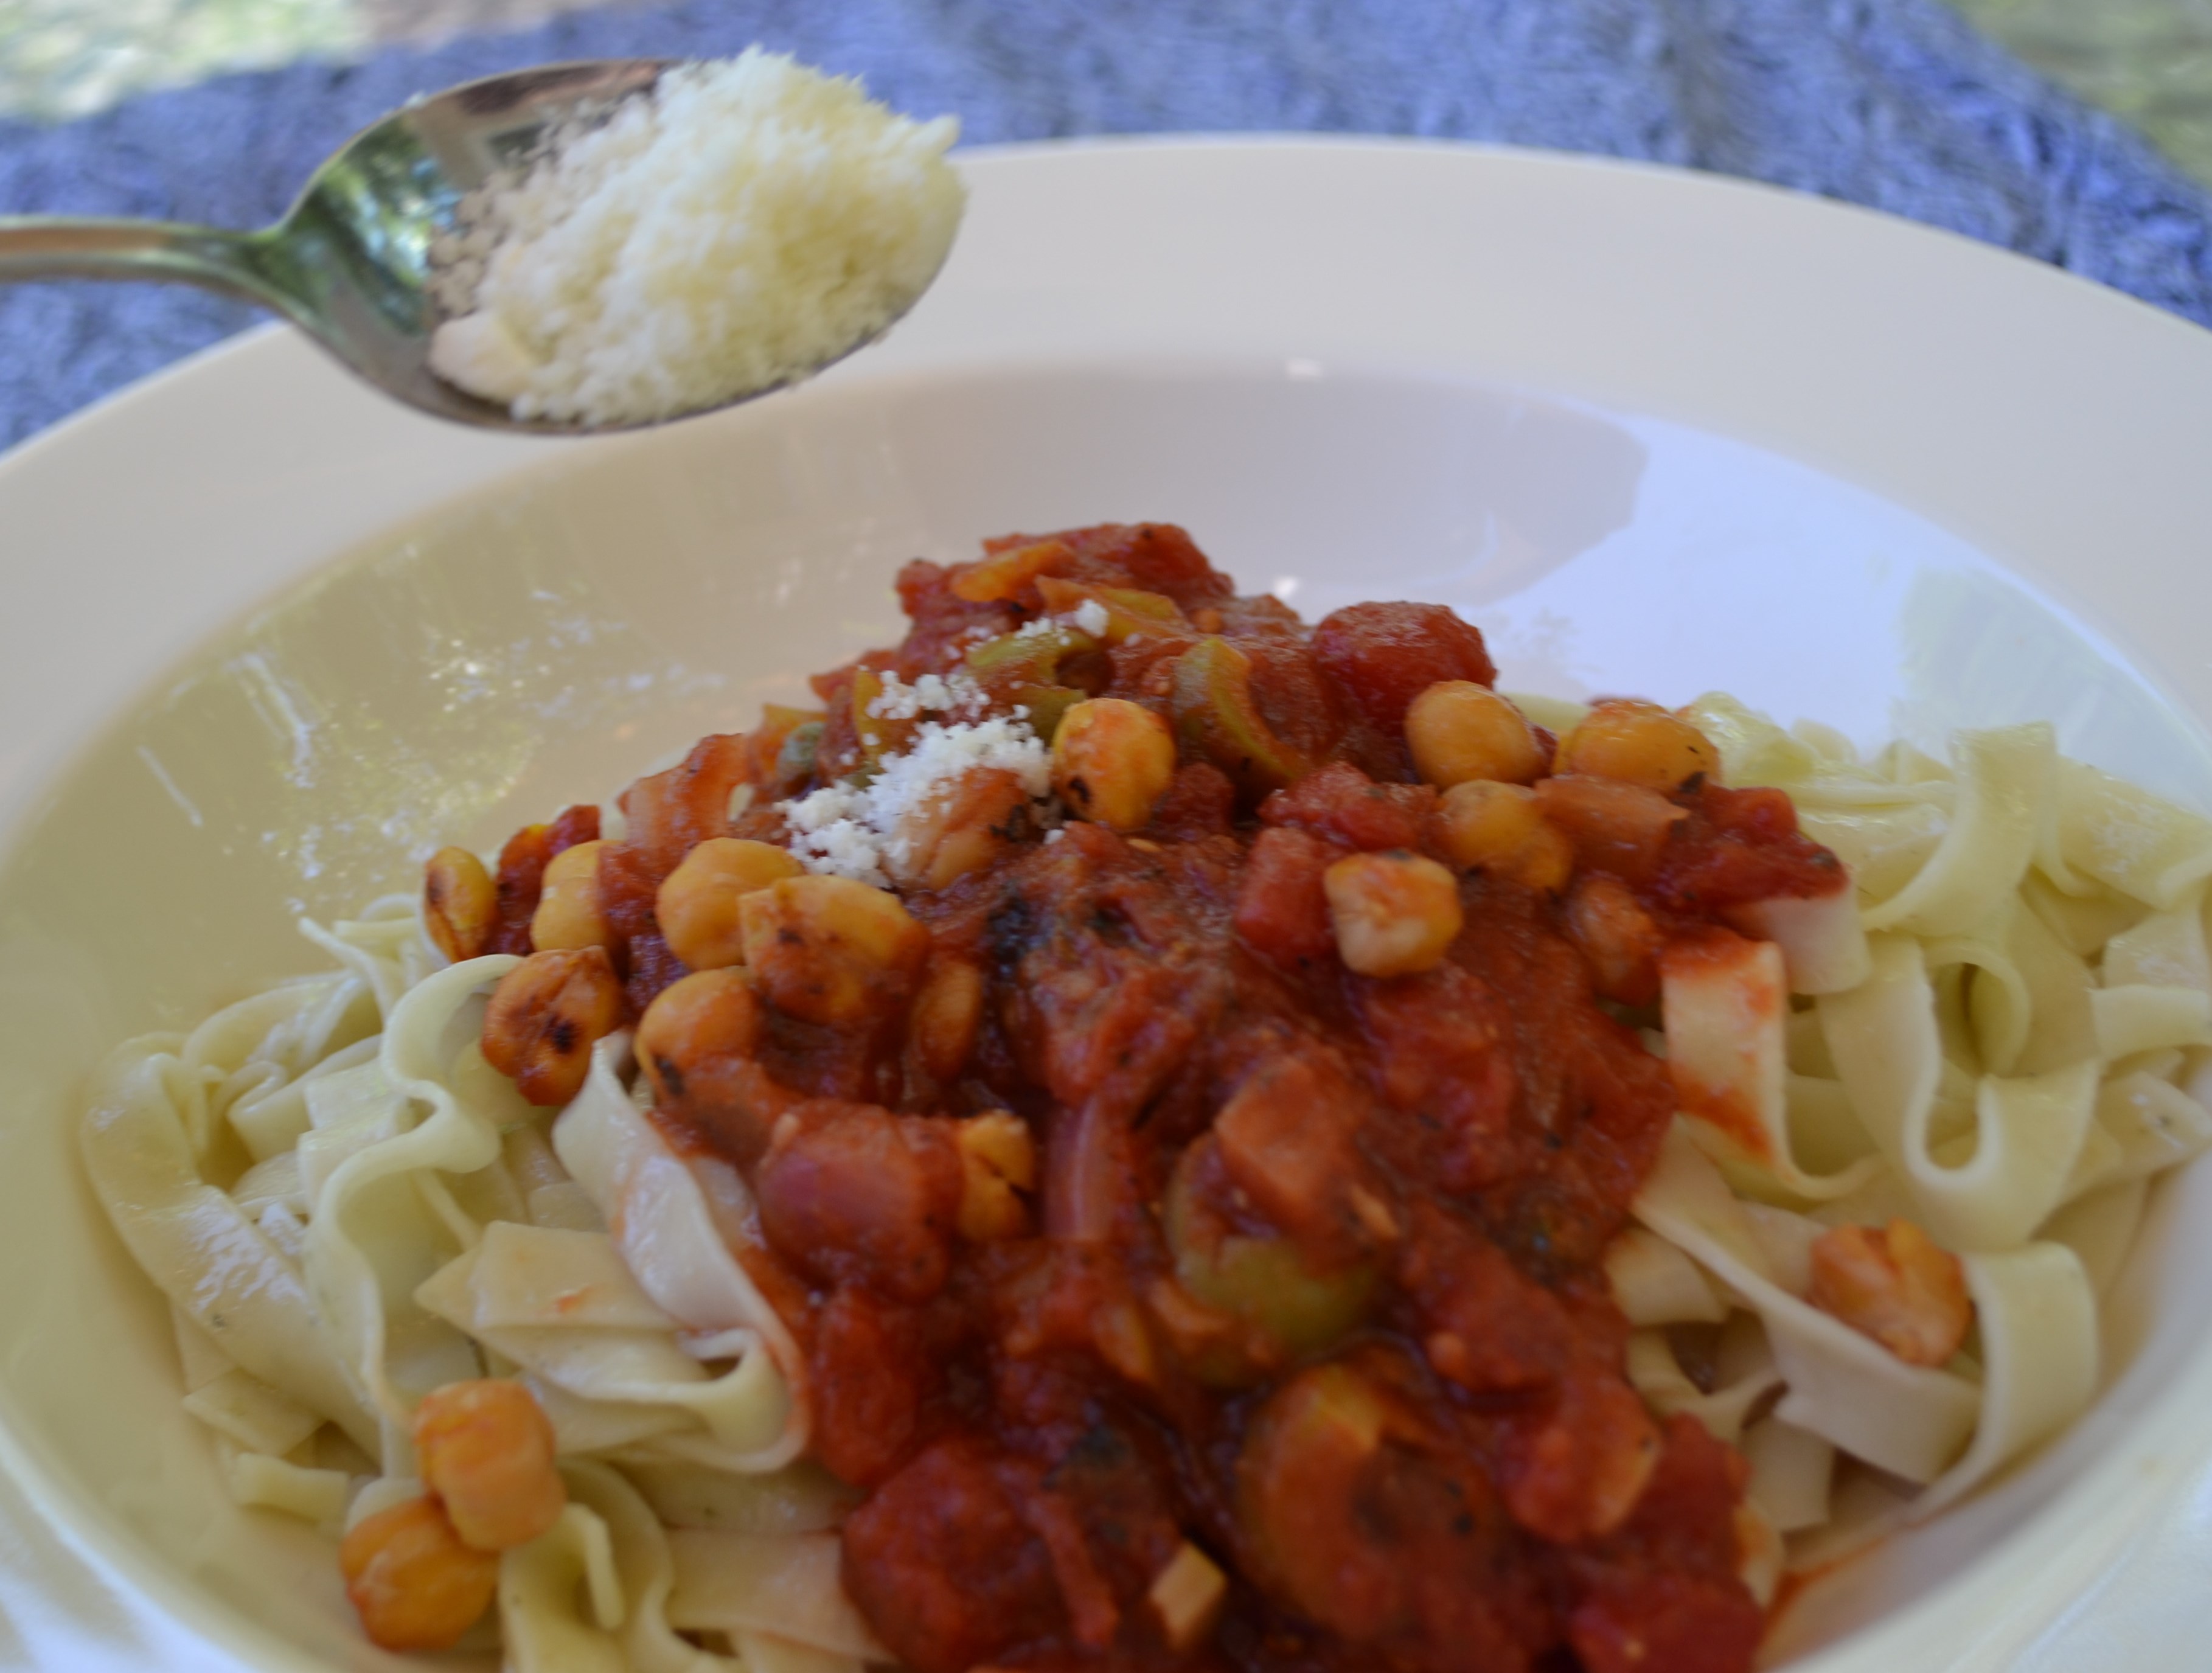
Roasted Garbanzo Beans ( Chick Peas )
Drain, rinse and pat dry a can of garbanzo beans. Pour them evenly on a cookie sheet that has been sprinkled with olive oil, then roll them around. Sprinkle with salt or your favorite spiced salt. Roast at 350 for 10 to 15 minutes or until they are browned and crisped. (Shake them once or twice while baking so they can brown on two sides.)
Spaghetti Squash
Take a spaghetti squash and cut it in half length wise. Scoop out seeds. Put 1/2 cup water in the bottom of a big microwave proof bowl. Put one of the squash halves in the bowl, hole side up. (If it wobbles, trim a thin piece of the squash off the bottom so that it sits more level in the bowl.) Put the other squash half on top of the squash in the bowl. Don’t cover it. Just put in microwave for 10 minutes. Test done-ness by squeezing the top squash with a pot holder. If it squeezes easily, it is done. Take a fork and scrape “strings” of squash in spaghetti-like fashion.
Lightly salt, then top with sauce and roasted garbanzo beans. (You can also serve leftover spaghetti squash with butter and pepper and nutmeg for a side dish.)
This was printed from: We Laugh, We Cry, We Cook
The site URL: http://welaughwecrywecook.com
The Title: Seductive Puttanesca Sauce
The URL:http://wp.me/p1UwM9-ep
Melty Parm Cheese, Walnut & Clementine Appetizer
Posted: April 23, 2012 Filed under: Appetizers, Uncategorized, Vegetarian | Tags: appetizers, clementines, Parmasan cheese, walnuts 4 Comments
Simple 3 Ingredient Delightful Bite: Parm Cheese (heated until pliable), walnuts and juicy clementines.

View from the condo porch. It is 75 degrees, which is why I need to be outside more than I want to be in the kitchen this week.
Though I generally love to cook, even when on vacation, I do not love to make complicated recipes that take time away from the pool and a book, and general self-imposed laziness. This week we are tucked into a timeshare in Orlando, Florida for seven days on business/vacation. (Greg is mostly taking care of the left side of the “business/vacation” slash, since he actually has to work. I’m taking care of the right side of the slash, since I –joy of joys! –mostly get to do whatever I please this week.)
A funny aside: Last night we were in bed and I heard what I thought was either the romantic roll of thunder or possibly the fireworks from Disney in the distance. I asked Greg if he heard the same sounds. He kindly responded, “Sweetie, that’s the toilet flushing in the condo above us.”
Needless to say, I’m totally in my Vacation Mind. So far today I’ve “cooked” a couple of bowls of cereal, a PBJ sandwich and peeled some string cheese and clementines. Not fancy fare worthy of food posting, really. But then, at Happy Hour time, I got inspired. I saw some Parmesan cheese and walnuts (I’d packed them in my carry-on from home), and a bowl of fresh Florida clementines (bought in haste from the local grocery last night.) Let me tell you, these Floridians really get premium citrus. These clementines are so juicy they nearly burst in your hands as you peel them. Naturally sweet and tangy. Oh my. When fruit is this good, you don’t want to do much to it. Just let Nature shine. So, on the fly I invented these Parm Cheese-Walnut and Clementine Appetizers. Salty, nutty, warm meets fresh, tangy, sweet and cold. So yummy.
Our cocktails in hand (see my recipe for Clementine Mojitos), I sliced a few “Parm shards,” sprinkled a few walnuts on top. Microwaved for 15 seconds. The Parmesan became just “melty” enough to be pliable. I rolled a piece of the warm Parm around a walnut and a slice or two of fresh clementine. It was Happy Hour in our mouths in less than a minute.
That’s it. That’s the whole 3 ingredient, 15 second recipe. The pictures below will show exactly how to throw this instant party food together.
Variations: Try with other cheeses, nuts and fresh fruits in season. For a larger crowd, use a baking sheet and put in a 250 degree oven for about 5 minutes or until cheese is just warm and pliable.

Parm "Shards," simply slice random thin pieces of Parmasan cheese and lay on a microwavable plate

Parm shards with broken pieces of walnuts, after being nuked for 15 seconds in the microwave

As parm cools, you can lift up little pieces and wrap around fresh clementine pieces, pop in your mouth and be very happy. Sometimes the best things in life really are the simplest!

This was printed from: We Laugh, We Cry, We Cook
The site URL: http://welaughwecrywecook.com
The Title: Melty Parm Cheese, Walnuts & Clementines Appetizer
The URL: https://welaughwecrywecook.com/2012/04/24/melty-parm-cheese-walnuts-clementines
Salmon with Avocado-Mango-Lime Salsa
Posted: April 20, 2012 Filed under: Fish, Main Dishes, Uncategorized | Tags: avocado, fish, mango, salmon, salmon with avocado mango salsa, salsa, seared salmon 1 Comment
Becky's Salmon with Avocado-Mango-Lime Salsa
Growing up, the only salmon I knew personally came from a can. My mom would mix it with crackers and egg, fry it and serve it as salmon patties. Then we kids would drown these little fish-fried hockey pucks in as much ketchup as possible, picking at them, eating a little bit of the edges hoping this would satisfy our mom so we could simply move on from this so-called dinner, and get to dessert.
I never made a single salmon patty for my children. Never served them salmon at all. Felt that I was doing them a huge favor.
Then, eight years ago I married Greg, an Oregonian and Lover of All Things Salmon. It was then, in my forties, that he gently let me know I’d not only never eaten salmon the way it was intended to be served, but I’d mispronounced it all my life. Who know that there is such a thing as a silent “l” in the middle of a word? It took me a full year to stop saying “SaL-mon” and start saying “Sah-men” as they do in the Great Northwest. About that time my eldest son left Texas to hop on an Alaskan fishing boat and has been catching fresh salmon every summer ever since, living for 4 to 5 months at a time on a boat full of stinky sailors and fresh fish.
I figured, at this point, that I owed it to both my husband and son to learn how to cook salmon correctly. I stumbled along, trying out recipes, eating salmon at restaurants and just sort of tolerating it. Then one evening, I was out with a friend who encouraged me to order the salmon on the menu and let the chef cook it his way. I took one bite of this chef-prepared salmon and said, “Oh. My. Gosh. This is the best meat I’ve ever tasted! But it doesn’t taste like salmon. Or fish. It tastes like crispy butter, crunchy out the outside but moist flakes of soft yumminess on the inside. How did the chef make this?”
What the chef did was cook the salmon on a searing hot grill and left the middle of the fish still slightly moist and opaque. He did not roast it. He did not cook it to death. And this made all the difference. He also served it with a fabulous lime-garlic-tomato salsa.
Now, I hate to brag, but these days I make the best salmon you’ve ever tasted. You need to start with a good fresh piece of salmon, of the milder tasting variety. Since Denver is not near an ocean, the best catch of the day around here is at Whole Foods. The Norwegian salmon is the mildest. I like the fish guy to cut one big slab of it, enough for two to three people, and leave the skin on. But I’m getting ahead of myself! Here’s the recipe. You will love it!

Seared Salmon, crispy outside, moist and flaky inside. Perfection!
Becky’s Salmon with Avocado-Mango-Lime Salsa
Serves 2 to 3
Ingredients
Norwegian salmon, skin on, cut it one slab, enough to serve 2 to 3 people (Fresh wild caught salmon is also delicious, but not as mild as the Norwegian at Whole Foods)
1 -2 T. olive oil (enough to coat pan and keep fish sizzling)
1 – 2 t. grill or steak seasoning (enough to lightly sprinkle on both sides of your fish)
1 avocado
1 small mango
1 small tomato
1/2 clove garlic grated fine
1 T. fresh lime juice
dash salt
dash sugar
Directions:
Using a grill pan preferably (or a large flat skillet that will take high heat) pour olive oil to coat the bottom and let it get “screaming hot.” Put salmon skin down onto grill pan. In about 30 seconds the skin will start to loosen, turn the salmon over and remove the skin with flat spatula, scrapping off any of the grey stuff on top of the pink fish. (Toss the skin in the trash.) Sprinkle lightly with 1/2 t or so of grill seasoning. Flip back over and cook this side of the salmon on high heat until it is seared and beautiful rich golden brown. In the meantime, sprinkle the other side with 1/2 t. of grill seasoning. Flip and cook the other side on high heat until it is a rich golden brown. Remove from heat. Let sit a few minutes while you make the relish.
Dice tomato, mango and avocado and mix together in a medium sized bowl. Add lime juice, fresh grated garlic, a dash of salt and a pinch of sugar. Gently toss, taste seasonings.
Using two spatulas move fish to large serving plate (pour any pooled juices atop) and garnish with the avocado-mango-tomato salsa. I like to serve this family style, letting every one at the table gently pull of the amount of salmon they want with a big serving fork and spatula. Serve any remaining relish in a bowl and allow guests to add more if they like.
Variations: add minced red onion, chopped jalapenos, and/or chopped fresh herbs like cilantro or mint or flat leaf parsley or basil to the salsa

This was printed from: We Laugh, We Cry, We Cook
The site URL: http://welaughwecrywecook.com
The Title: Salmon with Avocado-Mango-Lime Salsa
The URL: https://welaughwecrywecook.com/2012/04/20/avocado-mango-lime-salmon/
- Becky’s Salmon with Avocado-Mango-Lime Salsa
Quicky Sticky Jasmine Rice & Mango
Posted: April 18, 2012 Filed under: Desserts, Fruit Dishes, Uncategorized, Vegan, Vegan Options, Vegetarian | Tags: anti-aging, coconut, coconut desserts, coconut milk, Dr. Amen, jasmine rice, mango, rice pudding, Thai desserts, Thai sticky rice and mango, Use Your Brain to Change Your Life 4 Comments
Becky's Quicky Sticky Jasmine Rice & Mango
Yesterday was my birthday, which means I’m only two years away from being able to answer the question, “Do you qualify for the senior discount?” in the affirmative.
The first time I say, “Yes, I’m officially old” to the kid behind the counter, you can be sure there will be salty tears stirred into my 20% Off Cup o’ Joe. (I know, the fact that I refer to coffee as “Joe” already dates me somewhere pre-WW2. But I thought I’d start practicing speaking Old People Talk. I want to get a leg up on fitting in with the AARP’s version of high school seniors as we gather in packs at the mall — before it opens, wearing sensible shoes and fanny packs, to walk around it ten times.)
But before I hit the ol’ double nickel birthday, I’d like to give anti-aging my very best shot. I am friends with and have worked with brain doc and Public Television guru, Dr. Daniel Amen. His latest book, Use Your Brain to Change Your Age, is packed full of research, stories and tips to stay young. If I were forced to sum up the entire book in two points, it would be:
1) Eat nutrition-packed, brain-healthy food. (Colorful fruits and veggies are our best friends in the anti-aging/anti-disease corner.)
2) Exercise. (Walking 30 minutes a day five times a week wards off dementia like a miracle drug.)
In August, I started a regular exercise routine, and though I am no where near svelte, I like the endorphin rush from moving in the morning, know I’m getting blood flow to my brain, and feel my endurance improving. Thanks to my Darling Daughter the Vegan, I’m discovering all sorts of yummy, creative ways to put more antioxidant-rich plant-based foods into my day. Yesterday, I decided to start my new birthday year off by becoming an EOD Vegan: Every Other Day Vegan. Periodically, I’ll report in and let you know if I’m aging backwards or losing any of my ample backside.
Thai food is one of my favorite vegan-friendly sources and last week I enjoyed a lunch of two amazing hot-spicy curries with my friend Lucille. When the waitress asked if we’d like to try Sticky Rice and Mango, since the mangoes are in season and “oh so sweet!” – we were game. And boy, am I glad we were. Fresh sliced mango with a side of almost translucent slightly sweet “sticky rice,” with a warm creamy coconut sauce over all, was delicious.
Making Thai sticky rice involves more time and contraptions than I’m willing to give or buy, but we adore Jasmine rice that I make in my $13.00 rice maker purchased at Wal-mart.

My cheap little beloved rice maker
(Commercial here: rice makers are awesome! You just pour in the rice and water, flip a switch and no burned rice, just perfect little fluffy grains, and all in about 15 minutes.) So I invented the following “Quicky Sticky Jasmine Rice & Mango” recipe – which I liked just as well as the original Thai dish. It makes a light, sweet ending to a Spring or Summertime meal.

Quicky Sticky Jasmine Rice & Mango
Serves 8
Ingredients
1 cup uncooked Jasmine rice (Jasmine rice imparts an amazing aroma and taste.)
1 ¼ cup water
1 can coconut milk, full fat (will be divided)
2 T. organic sugar
4 small mangos
Optional: 2 T. shredded coconut, sweetened or unsweetened, divided.
¾ t. salt, divided
About 8 mint leaves for garnish
Directions:
Into rice cooker (or pan, if you are cooking the rice on the stove top), put jasmine rice, ½ t. salt, water and ½ cup coconut milk and 1 T. coconut if you like. (Use mostly the liquid portion of the coconut milk to go into the rice, saving the majority of rich cream that rises to the top of the can, for the sauce.)
Into a small sauce pan, pour the rest of the coconut milk/cream from the can. Add 2 T. sugar, and if desired, 1 T. of shredded coconut, and ¼ t. salt. Stir and heat until creamy hot and sugar is dissolved. Set aside to let warm slightly.
Peel and slice mangoes, arranging them on pretty plates. You can cut them any way you like, but as you see in the picture, I cut them near to the seed, in two halves, then sliced the halves but keeping the shape intact. The dish in this pictures is enough to serve two, so I used one small mango for two people.
When the rice is done, ladle about ½ cup of the sweetened warm coconut milk over it, and stir. This will help make it “sticky.”
Pack the rice, about 1/3 cup or so, into a small cup (I used a Japanese tea cup that I first sprayed with vegetable oil), carefully turning upside down onto the plate next to the sliced mango.

Rice packed into small cup, ready to turn upside down on plate
Ladle some of the coconut milk over the rice and drizzle on mango as well. Serve any leftover coconut sauce on the table to let the guests serve themselves more if they like. Garnish with sprigs of mint.
Variations: Try with other tropical fruit like pineapple or banana. Berries would also be yummy. Makes a delicious light breakfast as well. Try with brown Jasmine rice.

Italian Veggie Layered Casserole
Posted: April 16, 2012 Filed under: Main Dishes, Uncategorized, Vegan Options, Vegetarian, Veggies | Tags: eggplant, Italian veggie casserole, layered veggie casserole, squash, squash casserole, vegan casseroles, vegetarian casseroles, veggie lasagne, zucchini, zucchini casserole 2 Comments

Becky's Italian Veggie Layered Casserole
When my kids were little, I remember going bathing suit shopping with three small children in tow. (The last child, number 4, had yet to be born.) Like most women, I’d rather pour lemon juice on a paper cut than shop for a bathing suit, especially after having incubated, grown and given birth to multiple children. The only thing that could make this task even more painful was to try to get it done with three bored and antsy preschoolers in tow.
After what must have seemed an eternity to my eldest son, he said, “Mom, just buy one of those zucchini bathing suits and let’s get out of this Lady Store!”
Little did this child know that due to his weighing in at 9 lb 2 oz, leaving stretch marks from my neck to the my knees, his mother’s days of wearing “zucchinis” (bikinis) were forever behind me.
However, I am quite fond of cooking with zucchini, and this casserole below is one of my favorite ways to use up the abundance of zucchini squash that seem to overflow everyone’s backyard garden all summer long.
I created and made this casserole last week, and it seemed to get even better the next couple of days, as I enjoyed for a vegetarian lunch or a side dish with dinner. It’s a little trouble to make, but it makes a bunch and keeps beautifully in the fridge for several days. Just cut a slice, nuke and enjoy! (Would be a great take-to-work lunch.) It also makes a gorgeous colorful side dish to go with a simple meat like baked chicken, fish, or hamburger patty for the omnivores in your family, while making a satisfying meal for any vegetarians among you. With a few tweaks, this can easily be made into a vegan-friendly dish as well.
Variations:
Vegan version below.
Add cooked seasoned ground hamburger, turkey, chicken, or Italian sausage for an all-in-one main dish casserole.
Using same technique experiment with a variety of veggies and cheeses. Try using Alfredo sauce in place of marinara.

Becky's Italian Veggie Layered Casserole
Becky’s Layered Italian Veggie Casserole
Serves 10 to
Olive oil to coat large skillet (1 to 3 Tablespoons)
1 eggplant, peeled, sliced about ¼ inch thin
2 smallish or 1 large potato, unpeeled, sliced about ¼ inch thin
1/3 c. water
3to 4 zucchini squash, sliced ¼ inch
3 to 4 yellow squash
6 slices Swiss cheese (or mozzarella or any white cheese that melts; almond or soy cheese for vegans)
4 cups marinara sauce, your favorite brand, your favorite homemade recipe or my quick blender marina sauce below * (Try to choose or cook a marinara that is a little on the thick side.)
½ c. to 2/3 c. grated Parmesan, Asiago or other firm Italian cheese (Vegans, click on this link for a recipe for fake vegan parm)
1 ½ c. crushed buttery whole wheat crackers like Ritz or Town House brands (vegans use vegan-friendly crackers of your choice)
2 T. olive oil
2 T. butter or Earth Balance for Vegans
1 t. oregano or Italian seasoning
Salt and pepper
Directions:
In large skillet, pour a couple of tablespoons of olive oil around skillet then sauté eggplant slices until partially cooked, Using tongs, place eggplant in a layer in bottom of big rectangle 11 by 13 inch baking dish. Next, partially cook potato in same skillet, adding 1/3 cup water. Then add this layer on top of the eggplant. Salt and pepper the eggplant-potato layer to taste. Pour two cups marinara sauce on top of potato and eggplant.

First layer of eggplant an potatoes with first layer of sauce being ladled on
Lay Swiss cheese or other white cheese on top of this layer. Next (using same skillet), lightly sauté zucchini and yellow squash together, adding more oil if needed. Put this layer on top of Swiss cheese. Lightly salt and pepper the squash. Pour two more cups of marina on top of squash.

Second layer of squash and marinara
Sprinkle with Parmesan cheese (or vegan substitute) Melt butter with olive oil in skillet, add crushed crackers, and stir until evenly coated. Pour buttered crackers atop casserole. Sprinkle with 1 t. oregano or Italian seasoning.

Topped with cheese and buttered crackers, ready for oven
Bake at 350 until cheese is hot and melted and crackers are golden brown about 20 to 30 minutes.


A slice of Italian veggie heaven...
* Becky’s Quick Blender Marinara
1 16 ounce can diced tomatoes with basil
1 small 4 oz. can tomato paste
1 c. water
1 t. salt
1 t. Italian seasoning
½ onion
2 garlic cloves, peeled
2 t. brown sugar
(optional: fresh basil leaves, ¼ cup red wine)
Put all ingredients in a blender, blend until smooth, or until as chunky as you like it. Makes about 4 cups marina, perfect for this recipe.
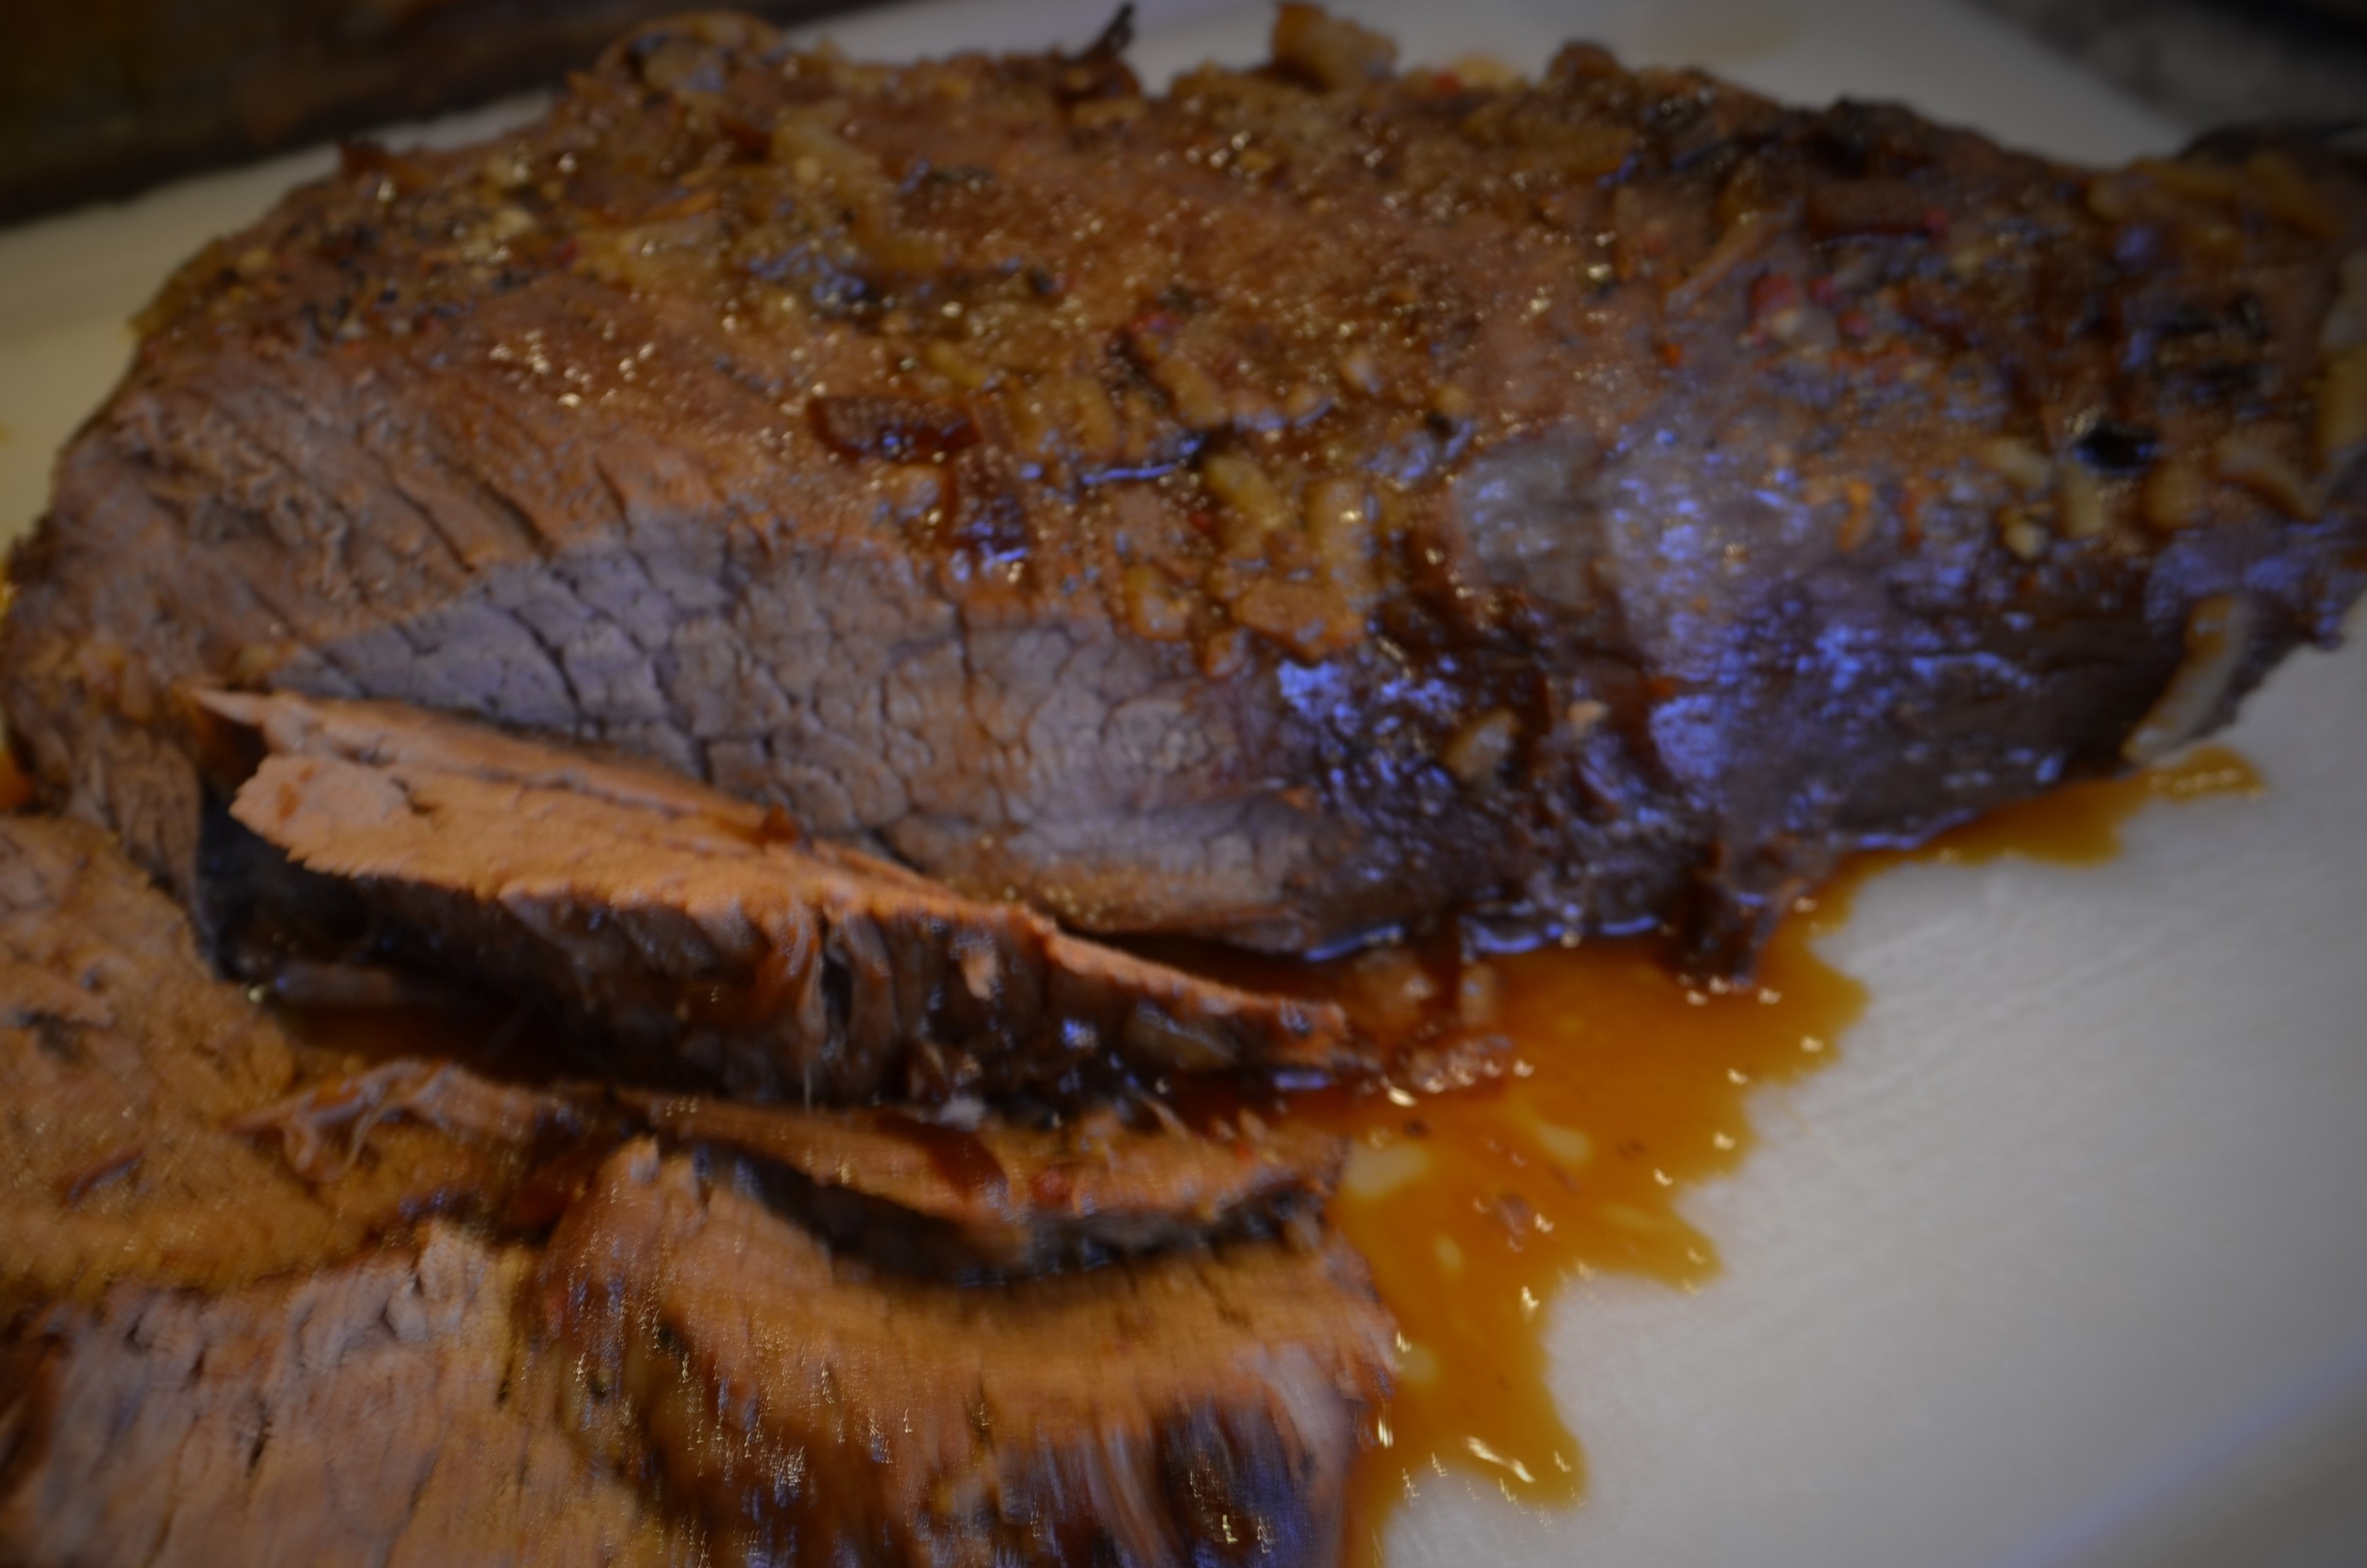
The BEST, Easiest , Juiciest Tri-Tip with Oodles of Au Jus
Posted: April 13, 2012 Filed under: Beef, Main Dishes, Sandwiches | Tags: au jus, beef, beef sandwiches, open face sandwiches, steak dip sandwiches, tri tip, tri tip dips 3 Comments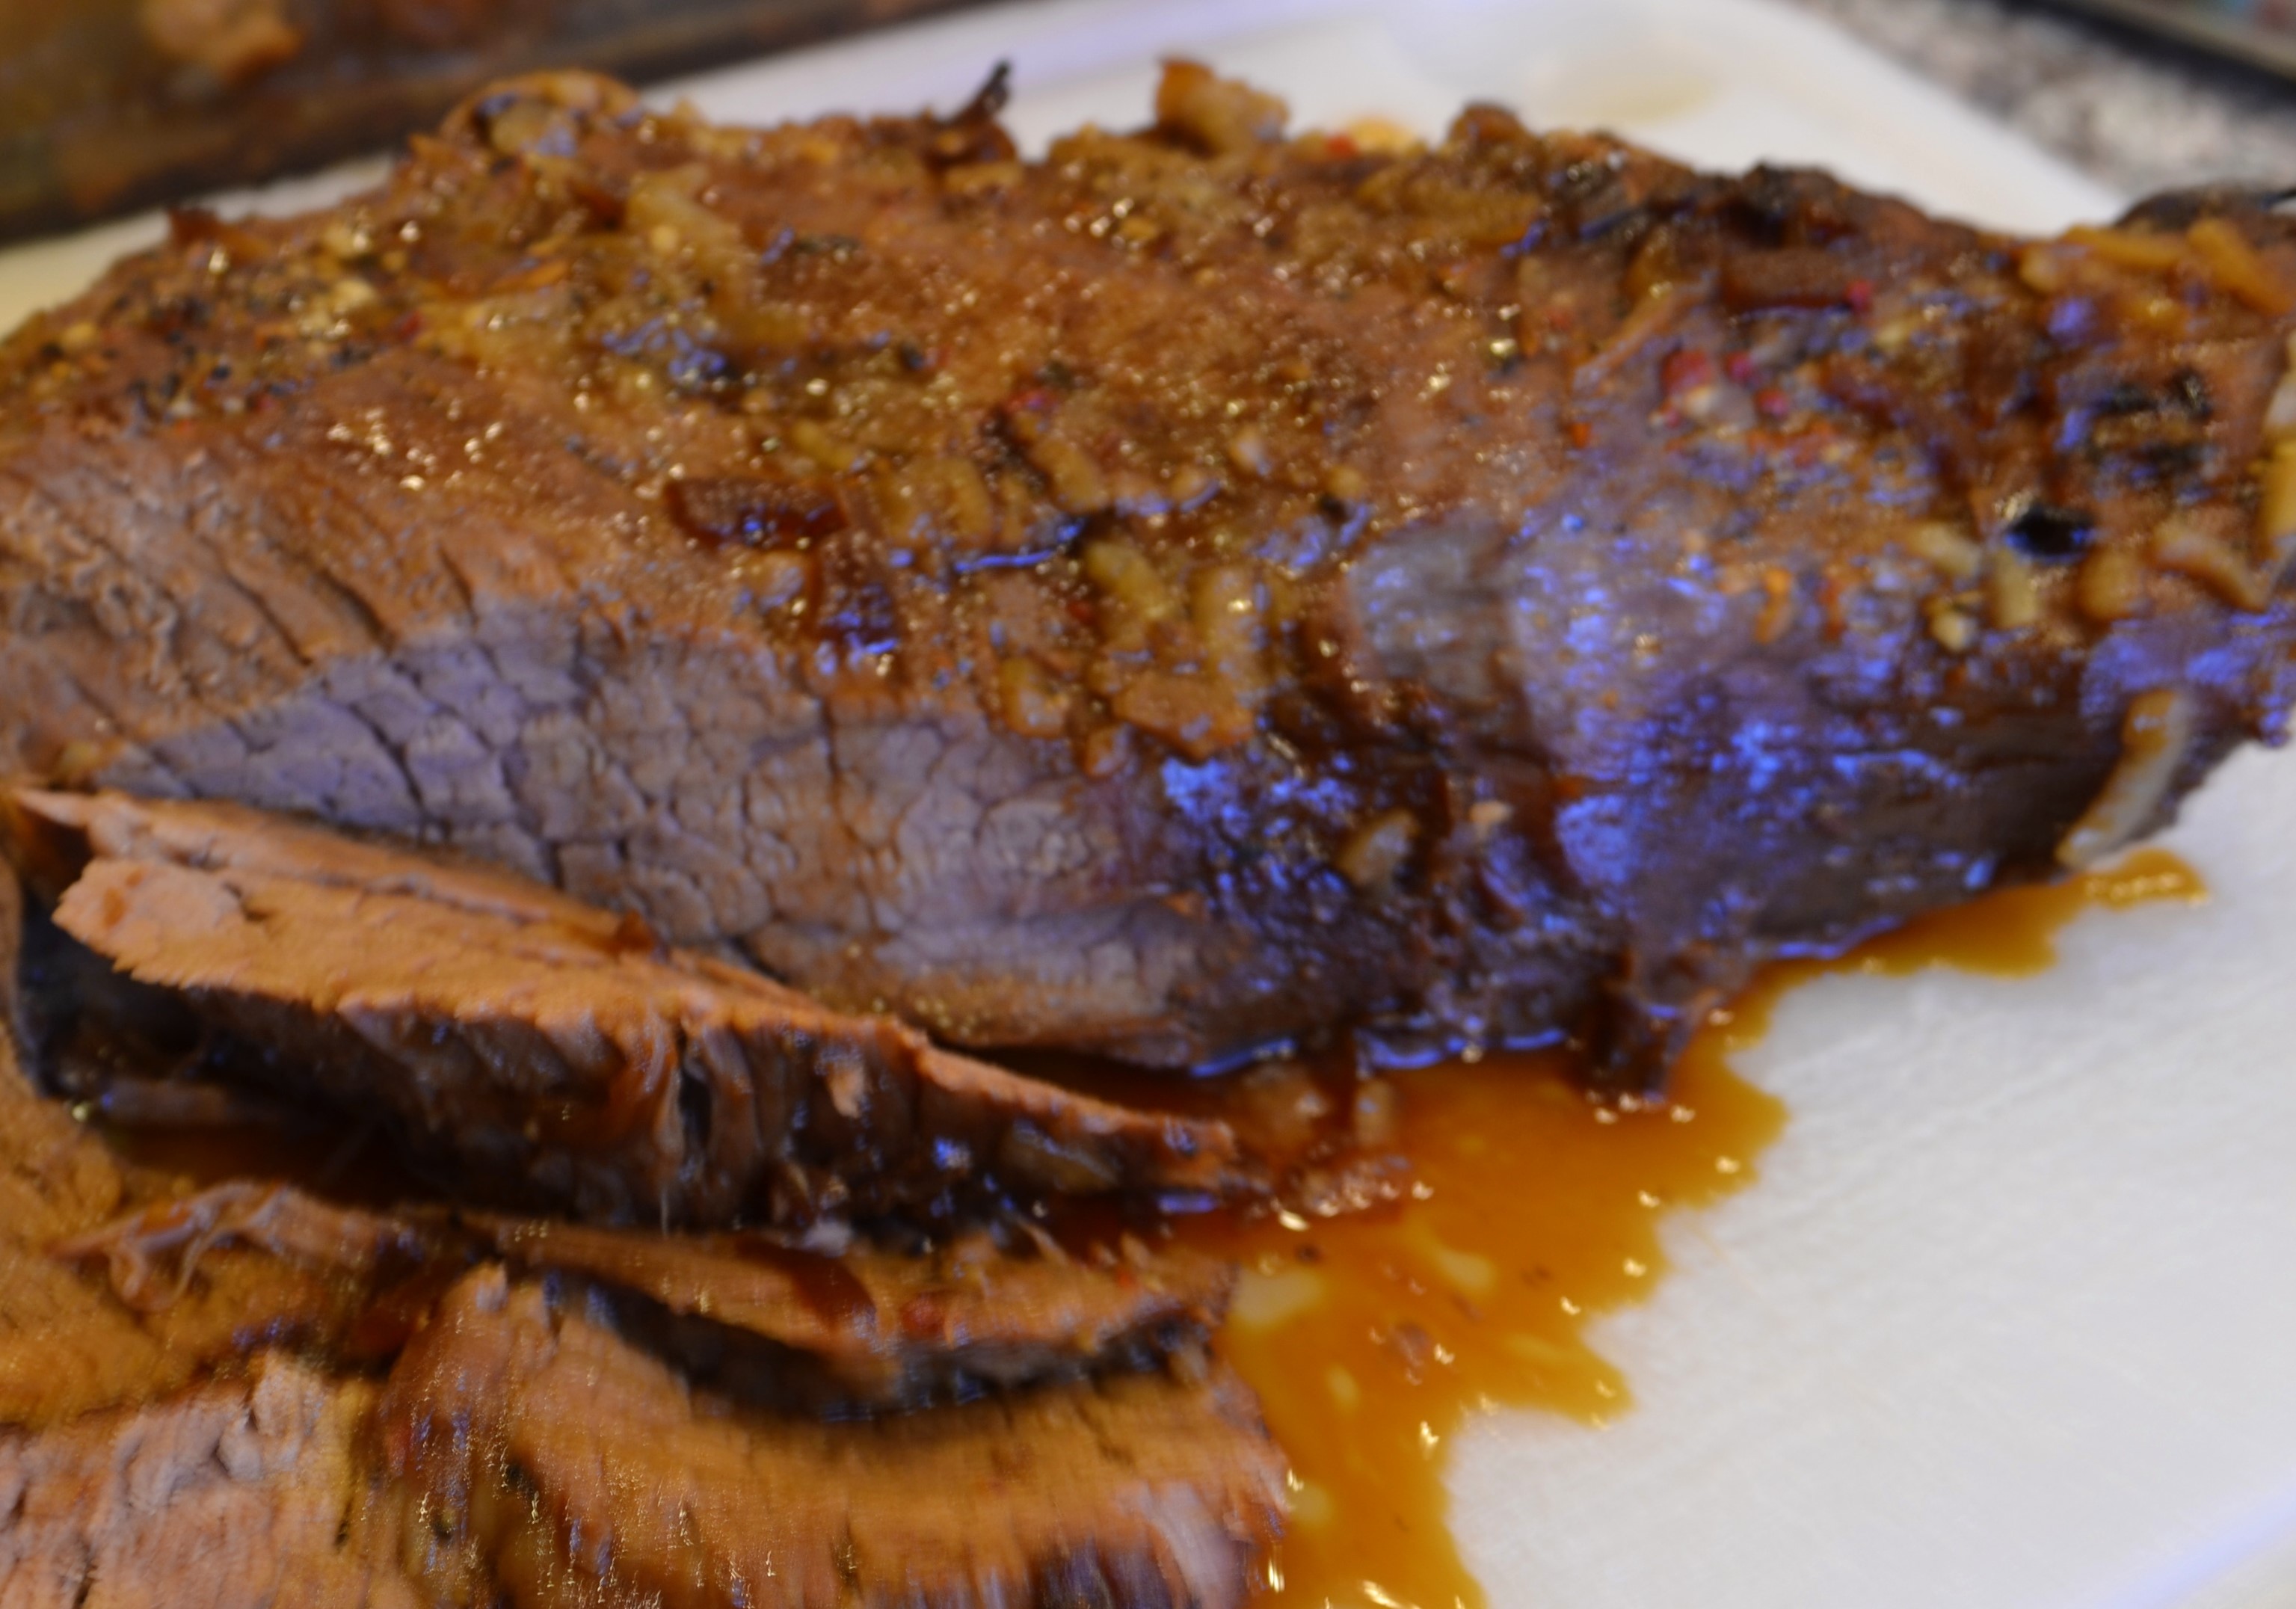
This recipe for tri-tip is so lip-smacking good, that our pastor Hugh Halter once asked me to do a little cooking demo of it before a church service. I have no idea how he tied this into the sermon, but if Hugh is anything, he is creative.
Last week I made it again for our pastor and his wife and some friends. As we sat on the back porch enjoying the meal, Hugh said, “I just don’t know how you make a piece of beef this juicy and tender!” I reminded him that I had once done a cooking demo on how to do it, in front of the entire church. Another attribute of our beloved pastor is that he has a memory like Swiss Cheese and had totally forgotten all about it.
Another one of the men at the table that day, leaned back, patted his stomach and said, “Becky this tri tip has ruined me. My father in law takes us out to the best steakhouse in town about once a year, and no steak I’ve had there is as good as this roast.”
Seriously, this tri-tip recipe will change your life. Your IQ will raise, you’ll be more beautiful, your charm quota will hit an all time high. At least in the eyes of the people to whom you serve this meal. They will look at you as if you are the Cooking Angel.
The best part: it will be the easiest roast you’ll ever make. I typically pop this roast in the oven before church – a la our mothers and grandmothers of the past – and 3 hours later, we walk into a home filled with a heavenly fragrance, lunch practically done.
I serve this roast alongside mashed potatoes and a salad the first day. But the second day is my favorite, because the I take the thinly sliced marinated leftovers and put them atop thick slices of buttery garlic toast, then top this with grilled onions and peppers, and finally the au jus. Au man, it is amazing.
I’ll first give the recipe for the Tri Tip, followed by the recipe for the Tri Tip Dip Sandwiches. Prepare to amaze yourself.

Tri Tip Dip Open-Faced Sandwich (Before pouring on au jus)
Becky’s Tri Tip
Serves 8-10
Heat oven to 325 degrees
Ingredients:
Two tri-tips (if you go to Sam’s Club, ours sells them two to a package)
Large Reynolds Cooking Bag
2/3 c. teriyaki sauce
1 envelope Lipton Onion Soup
3 ½ c. water
Directions:
Take a large cooking bag and holding it upright like you would a grocery bag, fill it with teriyaki sauce, onion soup mix and warm water. Carefully squish it around. Then, put both tri tips in the bag (you may want to call for some help on this), tie the bag with the twist tie that comes in the package. Then carefully lay the tri tips into a large rectangle pan. I do not poke holes in the cooking bag, and this seems to keep the roast juicier.

Two tri-tips in cooking bag with marinade, tied up and ready for roasting
Thus far, I’ve not blown up a bag and I’ve probably made this recipe 30 times. (I use my biggest Pyrex.) Pop in the oven at 325 and bake for 3 to 3. 5 hours.
When the tri-tip is done, carefully cut a slit in the bag and pour the juices into your biggest, deepest skillet. Slice the roast (I use an electric knife) across the grain. Then put the slices into the au jus in the skillet and simmer for a few minutes to infuse the roast with juices. Test to see if it needs additional salt and pepper.
Delicious served alongside or atop mashed potatoes.

Becky’s Tri Tip Dips & “Pouring on of Au Jus”
Tri Tip Dip Open-Faced Sandwiches
Serves 2
4 slices of French bread
1 T. olive oil
1 T. butter
1 clove garlic, peeled and cut in half
1 onion, sliced thin
1 large red or yellow pepper slice
Leftover Tri-Tip, sliced and Au Jus
Directions:
Put 4 slices of French bread on a cookie sheet and spread with butter, then sprinkle with olive oil. Broil until golden brown and then rub each slice with the cut end of a piece of garlic.

Toasted garlic bread
Saute onions and peppers until soft. Put two pieces of garlic bread on a plate, followed by several slices of warmed tri-tip, and generous portion of onion and peppers. Serve warm au jus in a small bowl on plate. Just before eating pour au jus over all and eat open-face style with knife and fork.
Sweet and Smoky Tilapia
Posted: April 11, 2012 Filed under: Fish, Main Dishes | Tags: blackened fish, blackened tofu, brown sugar, cumin, easy fish recipes, fish, smoked paprika, sweet and smoky tilapia, tilapia, tofu, vegan friendly 1 Comment
Becky's Sweet Smoky Talapia
I raised my kids on a lake in the country in small town Texas. I had three sons who all loved to fish, and by the time my youngest, Gabe, was six, he could dig for his own worms, bait his own hook, walk out the back door to the dock and pull in a small crappie (pronounced “croppie” ) or two.
His older brothers would paddle the boat out further and catch bigger bass, and Gabe longed to catch a bass with all his little heart. One day, I was being interviewed “live” on the radio, via telephone. I think I was discussing my first book, Worms in My Tea (co-authored with my mom, Ruthie), when the door to my office swung open, and a large mouth bass nearly smacked me in the face. When I calmed down from the shock of a fish flying in my office, I realized the fish was on the hook end of a fishing pole, being held by one excited little boy on the other end.
“Mom!” he yelled. “I caught a bass!” He sure did, and the news of it was broadcast live, somewhere on the radio in middle America. I managed to wipe fishy lake water from my brow, congratulate Gabe and carry on with the interview. These are things professional mothers do.
But I digress. I started this blog post thinking about crappie, and how, though they aren’t very big, they are, as we say in Texas, “some good eatin’.” And we ate a lot of them. So when the small fish, tilapia, seemed to swim out of nowhere into our supermarkets and on to the foodie scene as the new Rock Star of mild, affordable fish, I couldn’t help thinking how much they looked and tasted like crappie. In fact, who knows? They might just be crappie, with a fancy new name.
I loved tilapia at first bite. And it’s the best last-minute dinner! Even if it is frozen, it thaws in no time. Below is one of my favorite fish dishes. It’s fast, it is easy, it tastes amazing with its sweet, smoky, spicy, citrus flavors. And look how beautiful it is! Serve with an ear of fresh corn and a salad with avocado, and you’ve got a beautiful plate of healthy “good eatin’.”
Here’s something you may not know about tilapia, but as soon as you read this you can tell your friends and amaze them with it. Or just sound like a fish fact Know-it-All. Tilapia can be found in the Sea of Galilee, and are sometimes called “St. Peter’s fish.” This comes from the story in the Gospel of Matthew about the apostle Peter catching a fish that carried a coin in its mouth. (Matthew 14:24-27.)

Becky's Sweet and Smoky Talapia
Becky’s Sweet and Smoky Tilapia
Serves 2
Ingredients
2 T. olive oil
2 T. butter
4 medium to large tilapia fillets
2 T. smoked paprika
2 T. cumin
3 T. brown sugar
salt and pepper
1 lemon, cut in half
Directions:
Pre-heat oven to 350.
Put oil and butter in rectangle pan (large enough to hold tilapia without overlapping) and put in oven until butter has melted. Tilt pan until it is evenly coated.
In small bowl, mix paprika, cumin and brown sugar. Lightly salt and pepper both sides of 4 fillets. Lay tilapia fillets side by side in the buttery pan. Turn over so both sides are coated with oil/butter. Generously sprinkle tops of tilapia with the brown sugar-spice mix (using all of it), patting it in gently as you would a rub or blackening seasoning. Squeeze one half lemon over all.
Put in oven for 15 minutes or until fish flakes easily. Then turn oven to broil and watching carefully, broil the tops of the fish until the spice mixture starts to caramelize. Remove, serve with the remaining lemon half, cut in pretty slices as garnish.
Variations: Try this method with other fish and other spices you enjoy!
Vegan Variation: Use Earth Balance instead of butter, pressed or plain tofu slices or veggie burgers instead of fish.

Rachel made this with thin slices of pressed tofu & Earth Balance, following the above directions exactly and said it was delicious!
Chicken-Cream Cheese-Nut Cranberry Monte Cristos
Posted: April 9, 2012 Filed under: Main Dishes, Sandwiches, Uncategorized | Tags: chicken sandwiches, cranberry, cream cheese, ham sandwiches, monte cristos, walnut Leave a comment
Chicken-Cream Cheese-Nut Cranberry Monte Cristos
If you, like me, served a big bunch of family and friends a large Easter dinner yesterday, then I declare tonight to be “Cook’s Night Off!” If, however, like me, the thought of getting dressed, driving to a restaurant, and making polite conversation with other human beings sounds like it would take more energy than you currently have leftover, this AMAZING and easy sandwich recipe will help you get out of the kitchen and onto the comfy couch quick.
Sorry about the long name. I tried to work with just the initials (a la the “BLT”) but “CCNCMC Sandwiches” sounded like robot food.
I also give you permission to eat this buttery deliciousness in your most comfy T-shirt and stretchy pants. Or better yet, just wear your PJs and ratty old robe. Home chefs that serve big holiday meals deserve to be as lazy as you want to be the next day. Wallow in it, I say!
Feel free to substitute ham if you’ve got lots of it leftover and want to use it in place of chicken or as an addition to it. I am personally a little “hammed out” today.
A vegan version also follows, because I love my daughter and I want her to taste this dynamite flavor combo!

Becky’s Chicken-Cream Cheese-Nut Cranberry Monte Cristos
Serves 4
Ingredients
4 slices good bread (I like the round sliced French boule from Whole Foods, a light and airy artisan bread)
1/2 c. whipped cream cheese (Toffuti “Better than Cream Cheese” if you are vegan)
1/4 c. chopped walnuts, pecans, or pistachios
1 T. chopped green onions
4 slices turkey or chicken (use extra portion of of chopped nuts in place of meat for vegans)
1/3 c. whole cranberry sauce
2 eggs beaten with a dash milk (vegans use egg-replacer of choice and 1/3 c. non-dairy milk)
1 T. olive oil
1 T. butter (Earth Balance for vegans)
1/4 c. arugala or other lettuce greens
1 T. powdered sugar
Directions:
Mix whipped cream cheese or Tofutti with chopped nuts and green onions. Spread 4 pieces of bread with this mixture on one side. Lay two slices of chicken or turkey on two slices of the bread. (Add extra layer of chopped nuts in place of meat if you are vegan.) Spread cranberry sauce on the other two slices. Put together to make two chicken-cheese-walnut-cranberry sandwiches.
Melt butter or Earth Balance and oil together in a skillet big enough to hold two sandwiches. In a wide shallow bowl, beat the two eggs with milk (or substitutes if you are vegan). Carefully dip both sides of the sandwiches in the egg mixture as you would for French toast. Place the sandwiches, gently, into the skillet and let cook at medium heat until one side is golden brown. Carefully turn over the sandwiches and grill the other side (adding more oil and butter if needed.)

Sizzling Sandwich
Cut in half, tuck in a few arugula leaves, sprinkle tops lightly with powdered sugar. Serve with extra dollop of cranberry sauce if desired.
Rustic Iron Skillet Pot Pie
Posted: April 6, 2012 Filed under: Beef, Chicken, Main Dishes, Uncategorized, Vegan, Vegan Options, Vegetarian | Tags: beef pot pie, chicken pot pie, gravy, iron skillet pot pie, pie crust, pot pie, rustic pot pie, vegan pot pie, vegetarian pot pie, veggie pot pie 4 Comments
Homestyle Iron Skillet Pot Pie
My daughter is usually somewhat appalled at the disorganization in my refrigerator, along with the occasional discovery of leftovers-turned-science experiments lurking in its dark recesses.
On her last visit to Denver, her husband Jared was hungry and I told him, “Just look in the fridge and see what looks good to you. You never know what you might find.” To which Rachel immediately deadpanned, “Or what might jump out at you.”
So before I accidentally create new life forms from my leftovers, I really do try to use them up in more timely fashion these days. There are certain recipes I go-to when I need to use up the food I have on hand at the end of the week. This easy version of pot pie is one of the most successful and requested ones.
It is a little slice of flaky, creamy, hot home-style goodness. I don’t know why pot pie tastes so much better in an iron skillet than in a pie pan, but it does. And you’ll be amazed how easy it is, how fast it cooks up and comes together. (However, if you don’t have an iron skillet, it is still pretty darn amazing in a deep dish pie pan.)

Becky’s
Rustic Iron Skillet Pot Pie
Serves 4 to 5
Ingredients
1 pie crust, your favorite recipe, or refrigerated version or vegan version. (Click link for a great flaky vegan recipe!)
1/4 c. flour
2 T. olive oil
2 T. butter or Earth Balance (vegan)
1 1/2 c. chicken, veggie, or beef broth
2 potatoes, peeled and diced
4 medium carrots, peeled and diced
1/4 c. teriyaki sauce
1/2 t. grated garlic
1/2 c. frozen corn
1/2 c. frozen peas
Any other bits of leftover cooked veggies you have on hand. (I had about a 1/2 c cooked mushrooms to toss into the mix tonight, along with some leftover sauteed onions & peppers.)
Leftover diced cooked meat: chicken or beef, or any combination to make 1 1/2 to 2 cups, depending on how much you like and how much room is left in the skillet! (I diced a large cooked chicken breast and a cup of diced leftover roast. I often use leftover Rotisserie chicken meat for this dish.)
For Vegans: Use 1 can drained kidney beans and 1 can drained butter beans in place of meat. The kidney beans add a nice firmness and color and the butter beans are big and creamy and well, buttery. The combination makes a very tasty veggie pot pie. If you have a favorite vegan meat substitute, this could also be used.
Salt & Pepper to taste
Directions:
Preheat to 400 degrees.
Cook diced potatoes and carrots in about two cups water with dash of salt, turning burner to high to get a boil going, then down to medium heat to let them simmer.
While potatoes and carrots are cooking, mix 1/4 c. flour with 2 T. oil and 2 T. butter (Earth Balance for Vegans) in bottom of 10 inch iron skillet. Cook and stir constantly on medium heat until a paste forms (happens quickly), and while stirring with one hand (use a whisk), pour 2 1/2. cups veggie, beef or chicken broth slowly into skillet to make thickened gravy. (If you are new to gravy-making it helps to have a partner do the slow pouring of broth while you whisk.)
To the simmering gravy add:
2 T. teriyaki sauce
1/2 t. grated garlic
1/2 c. frozen corn
1/2 c. frozen peas
Any other leftover veggies you have on hand. (I had about a 1/2 c cooked mushrooms to toss in to the mix tonight, along with some leftover sauteed onions & peppers.)
To this add the drained, cooked carrots and potatoes. Gravy should be pretty thick and creamy (about consistency of heavy cream); adjust to desired thickness by simmering more to thicken, or adding a little more broth to thin. (You can add a splash of half-in-half or cream if you want a more creamy gravy.)
At this point, add salt and pepper to taste. Stir. Remove from burner.
Place uncooked pie crust over the top of the hot gravy-veggie mixture and carefully (that skillet is hot!) tuck the edges of the pie crust just inside the cast iron pan as pictured. Cut decorative slits in pie crust with a sharp knife to allow steam to escape.
Transfer skillet (using potholders) to 400 degree oven for 20 minutes or until crust is flaky and golden.
Serve pot pie at the table in the skillet, with big spoon to let each person dip out what they want. (Be sure to wrap a tea towel around handle of iron skillet so nobody burns themselves touching it.) Best served and eaten in bowls to catch every drop of goodness. Serve with a simple side of sliced fresh fruit and you’ve got dinner!
Variations: Some people prefer more “crust” with their pot pie. I love pie crust, too, but too often the bottom of pot pies can be soggy. So I will simply cook an extra round of pie dough, flat, on a cookie sheet, break it up in about 2 inch pieces, and serve in a bowl at the table, allowing “pie crust” lovers to add more crispy crusts to their bowl if desired. No soggy bottoms!
Ooops
Posted: April 4, 2012 Filed under: Uncategorized Leave a commentIt was bound to happen sometime, since I am a little ditzy, especially near midnight.
I (Becky) accidentally hit “publish” instead of “save draft” and sent a too-early version (just notes) of Homestyle Iron Skillet Pot Pie to your inbox. Please ignore. (I promise the new, complete version will pop up on Friday.)
However, Rachel’s apple fritters will appear in your inbox soon, and this post is ready for prime time!
Time for bed!


